Fix a Leaky Delta Kitchen Faucet: Easy DIY Repair Guide
A dripping Delta kitchen faucet wastes water and tests patience, but learning how to repair a delta kitchen faucet starts with identifying exactly which valve lives inside. Delta has used three distinct designs over the decades and each demands a different parts kit and disassembly sequence. Guessing leads to stripped bonnet nuts, backward seats, and a second trip to the hardware store.
The Diamond Seal ceramic disc cartridge carries a 5 million cycle rating and replaces in minutes with a single hex key, while the older ball valve needs seats, springs, and an adjusting ring set to a precise finger tight plus one eighth turn. Manufacturer specifications confirm that using the correct RP numbered kit cuts repair time in half and prevents the leaks that come from mismatched components.
Why You Need the Right Diagram Before You Turn a Wrench

Every Delta faucet ships with a model identification tag on the supply line or under the deck. That tag unlocks the official exploded diagram on DeltaFaucet.com/support. The diagram shows every O ring, spring, and cartridge in its exact orientation.
Without it you are working blind.
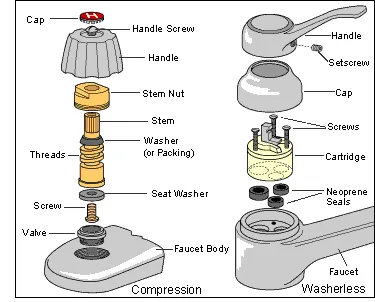
Ball valve diagrams label the cam packing, adjusting ring, and seat spring pockets. Cartridge diagrams show the pull direction and tab alignment. Diamond Seal diagrams illustrate the retaining nut torque spec and pin clocking.
A printed diagram on the bench saves you from reassembling the faucet twice.
Quick Answer: Identify Your Valve Type, Grab the Correct RP Kit, Follow the Exploded View
Find the model tag. Match the valve to ball, cartridge, or Diamond Seal. Order the genuine Delta RP kit for that model.
Shut off angle stops. Relieve pressure. Plug the drain.
Remove the handle. Pull the bonnet. Swap the parts exactly as the diagram shows.
Reassemble. Test at thirty seconds, five minutes, and twenty four hours.
Delta Valve Types Explained: Ball, Cartridge, Diamond Seal — Which One Is Yours
Delta kitchen faucets built before 2000 typically use a rotating ball valve with slots for hot and cold mixing. The ball rides on two rubber seats held by springs. A cam and packing seal the top.
An adjusting ring controls handle friction. This design uses RP70 seats and springs plus RP212 ball.
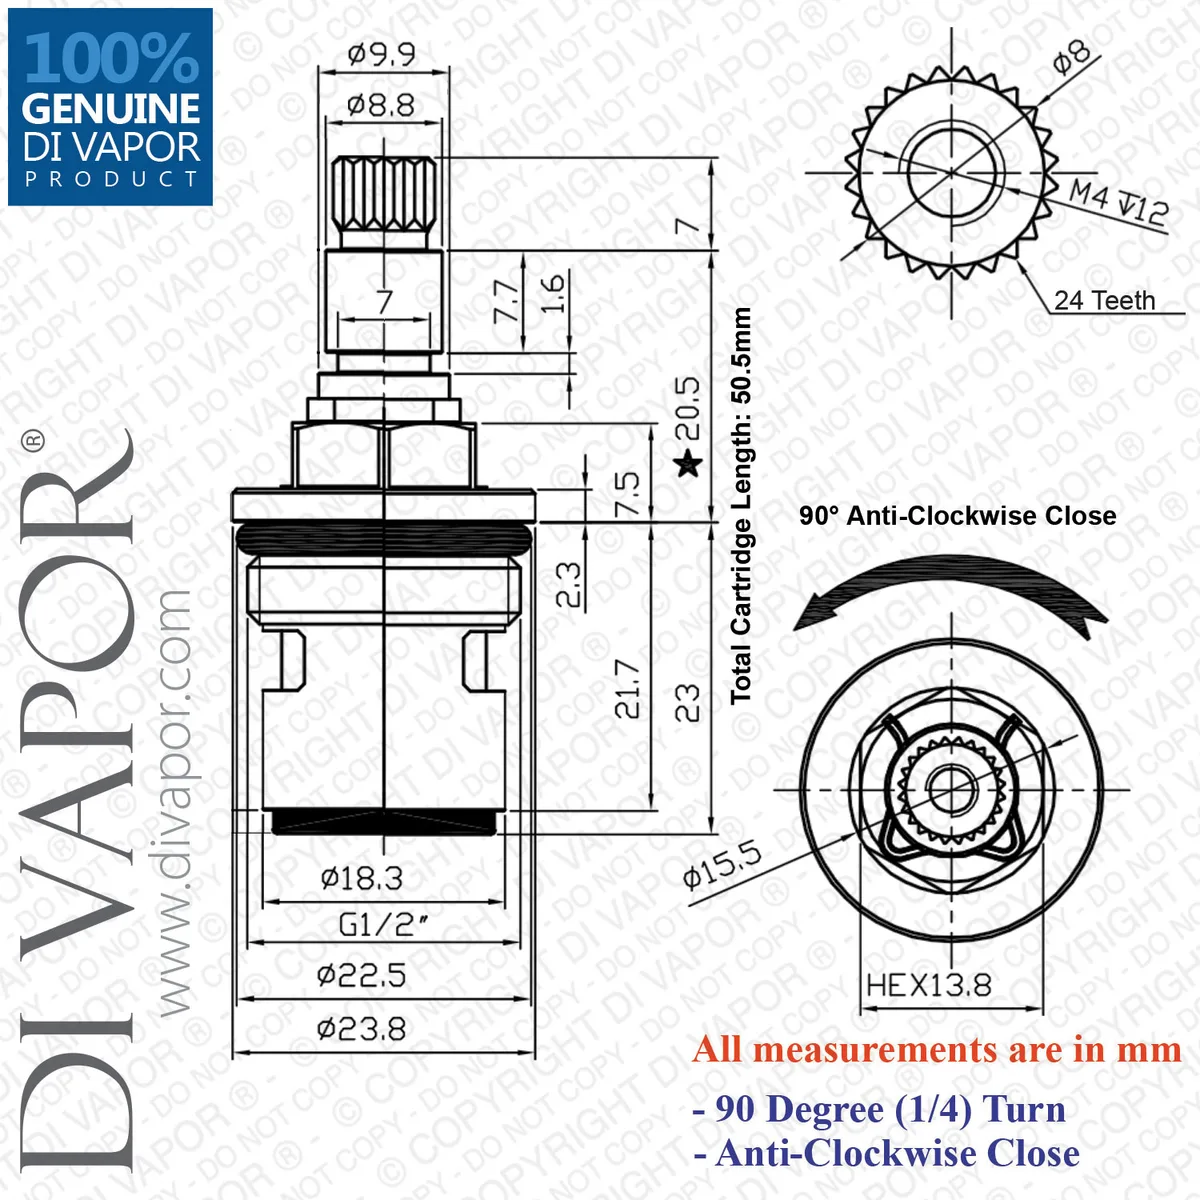
Models from roughly 2000 to 2015 often use a pull out cartridge such as the RP46074 or RP50587. These brass or plastic body cartridges slide straight up. Orientation tabs on the side must face the correct direction.
O rings on the cartridge body seal against the faucet bore.
Since 2015 most single handle models use Diamond Seal Technology. A ceramic disc cartridge with diamond embedded discs replaces the ball or older cartridge. The RP75212 and newer generation two cartridges are not interchangeable.
A retaining nut torqued to fifteen to twenty foot pounds holds the cartridge. No lubricant is needed on the discs.
| Valve Type | Era | Key RP Kit | Visual Tell |
|---|---|---|---|
| Ball valve | Pre 2000 | RP70 seats/springs, RP212 ball | Slotted ball, cam, adjusting ring |
| Cartridge | 2000 2015 | RP46074, RP50587 | Straight pull cartridge, side tabs |
| Diamond Seal | 2015+ | RP75212, Gen 2 | Ceramic disc, retaining nut, no cam |
Find Your Model Tag & Pull the Official Exploded Diagram (DeltaFaucet.com/Support)
The model tag is a small white or silver sticker. On pull down models it sits on the supply hose near the weight. On deck mount models it hides under the escutcheon or on the shank.
Newer boxes include a QR code that opens the diagram directly.
Go to DeltaFaucet.com/support. Enter the model number or scan the code. Download the PDF exploded view.
Print it in color if possible. The diagram uses Delta part numbers that match the RP kits on the shelf. Cross reference the part number on the kit bag before you open it.
If the tag is missing, compare your faucet silhouette to the model gallery on the support page. Leland, Essa, Trinsic, Cassidy, and Mateo each have distinct spout profiles. The gallery includes side and top views.
Match yours, then grab the diagram.
Visual Parts Guide: Seats & Springs, Cartridges, Balls, Cams, O-Rings — What Each Looks Like

A genuine Delta RP70 kit contains two rubber seats and two stainless springs. The spring goes into the faucet body first. The seat sits on top with the concave side facing up.
A ball valve RP212 is a polished brass sphere with two rectangular slots.
Cartridge kits RP46074 and RP50587 show a cylindrical body with two or three O rings. One end has a stem with flats for the handle. The side tabs are asymmetric.
One tab is wider. That wide tab points to the outlet port.
Diamond Seal cartridges look like a short cylinder with a hexagonal top. Two pins on the bottom register into the faucet body. The retaining nut has flats for a wrench.
No seats or springs exist in this design.
O rings appear in every kit. The large spout O ring seals the swivel. Small cartridge O rings seal the bore.
Handle base O rings prevent countertop leaks. Always replace every O ring in the kit. Reusing old rings is the most common cause of callbacks.
Step-by-Step: Ball Valve Repair (RP70/RP212) — Seat Orientation, Cam Packing, Adjusting Ring Torque
Shut off both angle stops and open the handle to relieve pressure. Plug the drain with a rag. Remove the handle set screw using a 3/32 inch hex key.
Lift the handle off. Unscrew the chrome dome cap by hand or with strap wrench. Loosen the adjusting ring with the Delta spanner wrench RP6420 or needle nose pliers on the notches.
Lift the cam packing and ball out together. Note the cam lug orientation, it fits one way.
Use a 1/8 inch hex key to remove the two seats and springs from the faucet body. The spring goes in first. The seat sits on top with the concave side facing up.
Drop the new springs in. Press the new seats down firmly. Reinstall the ball with slots aligned to the inlet ports.
Set the cam packing over the ball with the lug in the notch. Thread the adjusting ring on finger tight then turn one eighth turn more. Reassemble dome cap and handle.
Test for leaks.
| Step | Tool | Torque / Spec |
|---|---|---|
| Handle set screw | 3/32 hex key | Snug only |
| Adjusting ring | RP6420 spanner | Finger tight + 1/8 turn |
| Seat removal | 1/8 hex key | Gentle pry |
| Dome cap | Hand / strap wrench | Hand tight |
Step-by-Step: Cartridge Repair (RP46074/RP50587) — Pull Direction, Tab Alignment, Full Seat Check
Remove the handle same as ball valve. Unscrew the bonnet nut with an adjustable wrench. Protect the finish with a cloth.
Pull the cartridge straight up. It may resist, wiggle gently. Do not rock side to side.
Inspect the faucet bore for mineral buildup. Clean with white vinegar and a nylon brush if needed.
Note the cartridge orientation. The wide tab faces the outlet port. The narrow tab faces the inlet.
The new cartridge must match exactly. Lubricate the new cartridge O rings with silicone plumber's grease. Push the cartridge straight down until it bottoms out.
You will feel a positive stop. Thread the bonnet nut to 15 foot pounds. Reinstall handle.
Turn water on slowly. Check for leaks at the bonnet and spout base.
Step-by-Step: Diamond Seal Ceramic Disc (RP75212/Gen 2) — Retaining Nut Torque, Pin Alignment, No Lube
Remove handle and dome cap. The retaining nut has flats for a 1 inch or adjustable wrench. Turn counterclockwise.
Lift the cartridge straight up. Two pins on the bottom register into holes in the faucet body. Note the clock position.
Generation one and generation two cartridges are not interchangeable. Check the part number on the old cartridge.
Clean the bore. Do not apply lubricant to the ceramic discs. Align the new cartridge pins with the body holes.
Press down firmly. Thread the retaining nut to 15 to 20 foot pounds. Reinstall dome cap and handle.
Open angle stops slowly. The Diamond Seal design eliminates seats and springs entirely. If the faucet still drips, the cartridge is likely the wrong generation.
Touch2O & MagnaTite Repairs: Solenoid Click Test, Battery Box Swap, Magnet Dock Alignment, Hose Weight Position
For Touch2O models, start at the battery box under the sink. Six AA batteries or the AC adapter power the solenoid. Replace batteries annually.
If the faucet activates randomly, check the grounding wire on the shank. It must contact bare metal. Disconnect the solenoid wire harness.
Touch the faucet spout. You should hear a distinct click from the solenoid. No click means a failed solenoid, order RP75212 for the valve plus the solenoid kit.
MagnaTite docking uses a magnet in the sprayer head and a magnet in the dock. If the sprayer won't stay docked, clean both magnets. Check the hose weight under the sink.
It should sit low enough to create a gentle curve in the hose. Too high and the sprayer pulls up. Too low and it won't retract.
The weight clips onto the hose, slide it to find the sweet spot. A kinked hose at the weight is the number one cause of poor retraction.
Common Visual Mistakes: Springs Installed Backward, Cartridge 180° Out, Overtightened Bonnet, Lost Parts Down Drain
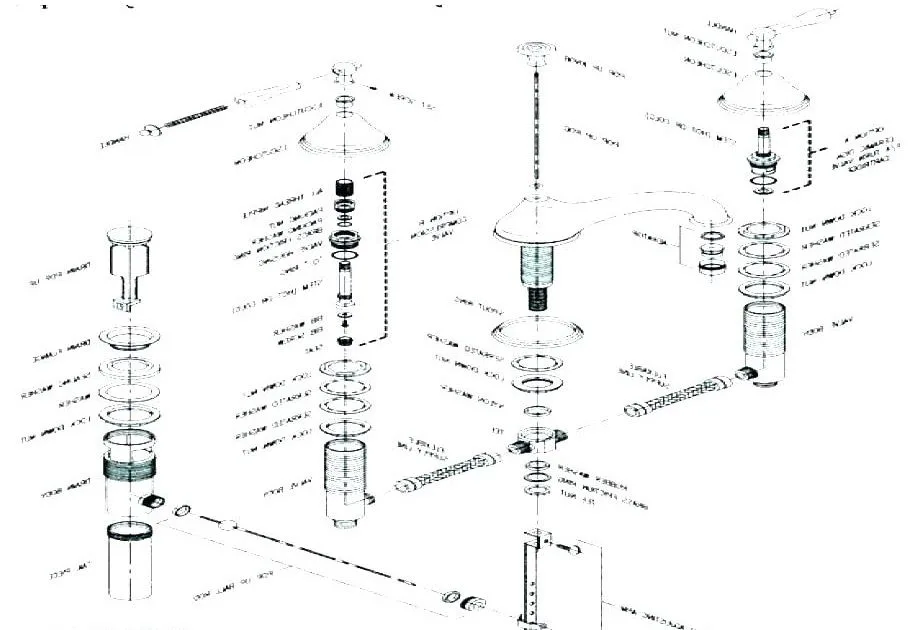
The exploded diagram shows the spring going into the body first with the seat on top concave side up. Reversing them blocks water flow and causes an instant leak. On cartridge models, installing the cartridge 180 degrees out swaps hot and cold.
The wide tab must face the outlet. On Diamond Seal, overtightening the retaining nut past 20 foot pounds cracks the cartridge body. A torque wrench prevents this.
The bonnet nut on cartridge models needs 15 foot pounds. Overtightening strips the brass threads in the faucet body. That damage requires a full faucet replacement.
Always plug the drain. A spring or seat falling down the drain adds an hour to the job. Use a magnetic pickup tool if something drops.
Lay parts out on a towel in disassembly order. Reassembly goes faster when you don't have to guess.
Pro Tips: Penetrating Oil on Stuck Shanks, Basin Wrench Leverage, White Vinegar Soak for Mineral Lock, Phone Flashlight + Mirror for Under-Deck Visibility
Supply lines that haven't moved in years often seize to the faucet shanks. Spray penetrating oil on the connections fifteen minutes before you start. A basin wrench with a telescoping handle gives you the leverage to break them free without stripping the nuts.
If the nuts round off, a flare nut wrench on the supply line side helps.
Hard water crust locks cartridges and bonnet nuts tight. Soak a shop towel in white vinegar and wrap it around the stuck part for twenty minutes. The acid dissolves the mineral bond.
For visibility under the deck, prop your phone with the flashlight on and use a small inspection mirror. You'll see the model tag and supply connections without contorting.
When reassembling, wrap supply line threads with two wraps of PTFE tape. Hand tighten then one quarter turn with the wrench. Overtightening compresses the ferrule and creates a weep that appears days later.
A torque wrench set to 15 foot pounds on compression fittings removes the guesswork.
When to Stop & Call a Pro: Cracked Body, Stripped Shank Threads, Solenoid Corrosion, Supply Line Failure
A hairline crack in the faucet body leaks only under pressure. No repair kit fixes that. Stripped threads on the supply shanks mean the faucet cannot seal to the supply lines.
Both require full replacement. If the Touch2O solenoid housing shows green corrosion or the circuit board has white powder, moisture has penetrated the electronics. The solenoid kit costs nearly as much as a new faucet.
Supply lines that crumble when touched indicate systemic plumbing age. Replacing the faucet without addressing the supply lines invites immediate rework. A licensed plumber can sweat copper or crimp PEX in the same visit.
The service call pays for itself in avoided water damage. Delta's lifetime warranty covers parts only, labor is never included.
Maintenance That Prevents Future Repairs: Aerator Cleaning Schedule, Handle Exercise, Battery Swap Calendar, Hard Water Mitigation
Clean the aerator every six months. Unscrew it, soak in vinegar, scrub with a nylon brush. A clogged aerator mimics low pressure and forces debris into the cartridge.
Exercise the handle through full hot to cold range monthly. Seals that never move dry out and leak.
Mark your calendar for annual Touch2O battery replacement. Dead batteries leak acid that destroys the solenoid. If you have hard water, install a whole house softener or a point of use cartridge filter.
The Diamond Seal discs resist scale but the supply lines and aerator don't. A $30 filter cartridge saves a $200 faucet.
FAQs: Model Tag Missing, RP Kit Substitutions, Warranty Claim Process, Generic Parts Risk
What if the model tag is missing or unreadable
Match your faucet to the photo gallery on DeltaFaucet.com/support. Leland has a high arc with a single hole mount. Essa shows a transitional curve.
Trinsic is angular. Cassidy has a traditional bridge. Mateo features a pull out with a distinct dock.
The gallery includes dimensions.
Can I use a generic cartridge from the hardware store
Generic cartridges often have different spline counts or O ring diameters. They may fit loosely and leak within weeks. Genuine Delta RP kits cost five to ten dollars more and eliminate the guesswork.
The warranty only honors repairs with genuine parts.
How do I file a warranty claim
Call 1-800-345-3358 with the model number and date of purchase. Delta ships replacement parts free to the original owner. No receipt required for faucets manufactured after 2010, the date code on the body suffices.
Commercial installations carry a five year warranty.
Are Danco or Keeney kits acceptable for ball valve seats and springs
They work in a pinch but the spring tension and seat diameter vary. Aggregate reviews report higher callback rates. For a rental turnover they're fine.
For your own kitchen spend the extra dollars on RP70.
Decision Guide: Repair vs Replace — Age, Finish Condition, Parts Availability, Your Time Value
If the faucet is over fifteen years old and the finish is pitting, replace it. The Delta Leland in SpotShield stainless retails around $250. A plumber installs it in an hour.
Your time value matters, if you earn more than $75 an hour the math favors hiring out.
Parts availability drops for models discontinued before 2010. Some RP kits become special order with week long lead times. A new faucet ships next day.
If you've already repaired the same faucet twice, the third repair rarely lasts. The cavity where the cartridge seats wears oval and no kit fixes that.
Keep the old faucet if it's under ten years old, the finish is intact, and the repair is a simple cartridge or seat swap. The Diamond Seal platform is modular and designed for service. That's the sweet spot where DIY pays off.