How to Hook Up a Kitchen Sink Drain: Step-by-Step Guide
Learning how to hook up a kitchen sink drain starts with understanding that every cabinet layout is slightly different. The wall stub-out height varies. The sink depth changes.
The disposal flange adds another offset. A single misaligned slip joint will weep for months before you notice. This guide walks through the entire assembly using visual cues that matter on the job site.
Per the 2026 International Plumbing Code a kitchen sink trap arm must slope at least one quarter inch per foot toward the vent and the trap seal must hold two inches minimum. Those two numbers drive every cut and every rotation you make. Let us start by looking at why this job demands visual thinking.
Quick Answer
Hooking up a kitchen sink drain means assembling a basket strainer tailpiece P-trap and trap adapter with slip joints. You dry fit every piece first. You cut tailpieces to length.
You orient beveled washers taper toward the nut. You slope the trap arm one quarter inch per foot. You test with water before tightening fully.
Why This Install Demands Visual Thinking
Text alone cannot show you the beveled washer taper direction. It cannot show the trap arm slope relative to the cabinet floor. It cannot show how a disposal discharge elbow rotates to clear the tee.
A photo or diagram makes each relationship instant. You see the gap. You see the angle.
You see the clearance.
Manufacturer instructions assume perfect rough in heights. Real cabinets rarely match. The wall stub out sits too high or too low.
The sink bowl depth changes the tailpiece length. The disposal flange drops the inlet six and three quarter inches below the sink bottom. An adjustable P-trap or a Fernco coupling solves many offsets but only if you recognize the problem visually first.

The image above shows a complete under sink layout with a disposal a double bowl tee a P-trap and a dishwasher branch. Notice how the trap arm runs slightly downhill toward the wall. Notice the slip nuts and washers at every joint.
That visual reference will anchor every step that follows.
Parts Identification: What Each Fitting Looks Like In Hand
Every tubular component has a distinct profile. The basket strainer flange sits flush in the sink deck. The locknut threads onto the strainer shank from below.
A rubber gasket and a friction ring sit between the locknut and the cabinet. Plumber's putty seals the flange to the sink.
The tailpiece slides into the strainer shank. A slip nut and washer capture it. A branch tailpiece adds a seven eighths inch barb for the dishwasher hose.
The disposal flange replaces the strainer on the disposal side. Its mounting ring locks to the disposal body with three bolts or a quick lock cam.
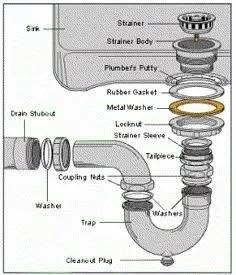
The P-trap consists of a U bend and a trap arm. The trap adapter connects the arm to the wall stub out. Slip nuts and beveled poly washers seal every joint.
Nylon nuts resist corrosion. Brass nuts look finished but can seize on old threads. Keep a pair of channel locks and a strap wrench handy.
Basket Strainer & Disposal Flange: Sealing Surfaces Up Close
The basket strainer seal relies on putty not the rubber gasket. Roll a pencil thick bead. Press the flange into it.
Tighten the locknut until putty squeezes out evenly. Wipe the excess. The rubber gasket and friction ring prevent the locknut from spinning loose later.
For a disposal flange the putty bead goes under the flange lip. The backup flange sits against the sink bottom. The mounting ring draws the assembly tight.
InSinkErator uses three bolts. Waste King uses a twist lock cam. Moen uses a speed lock ring.
Each brand ships its own hardware. Do not mix parts.
The disposal discharge elbow points straight down. Rotate it so the dishwasher inlet faces the branch tailpiece or the air gap. The knockout plug inside the elbow must be removed before connecting the dishwasher hose.
A hammer and screwdriver pop it out. Retrieve the plug so it does not reach the grind chamber.
Tailpiece Configurations: Single Double Bowl Branch Disposal
A single bowl sink needs one straight tailpiece. Cut it so the P-trap inlet sits above the trap weir. The maximum tailpiece length before the trap is twenty four inches per code.
Measure from the strainer shank outlet to the trap inlet. Mark. Cut with a PVC cutter.
Deburr the end.
A double bowl sink uses a continuous waste tee. The tee center outlet drops to the P-trap. Each sink tailpiece connects to a tee end.
The tee must be level side to side. If one bowl is deeper its tailpiece gets cut shorter. Dry fit both sides before cutting.
A branch tailpiece adds a dishwasher connection. The barb sits above the trap weir. This prevents food waste from backing into the dishwasher hose.
If you have a disposal the dishwasher hose clamps to the disposal inlet instead. An air gap on the countertop or a high loop under the cabinet satisfies code in most jurisdictions.
| Configuration | Tailpiece Count | Tee Required | Dishwasher Connection |
|---|---|---|---|
| Single bowl no disposal | 1 straight | No | Branch tailpiece or disposal |
| Single bowl with disposal | 1 disposal flange | No | Disposal inlet |
| Double bowl no disposal | 2 straight | Yes continuous waste | Branch tailpiece on one side |
| Double bowl with disposal | 1 straight 1 disposal flange | Yes disposal tee | Disposal inlet |
The table above summarizes the four common layouts. Match your sink and disposal choice to the row. Buy the corresponding kit.
Most home centers sell packaged kits for each scenario.
Slip-Joint Anatomy: Washer Orientation & Nut Engagement
A slip joint consists of a nut a beveled poly washer and the tubular pipe end. The washer taper faces the nut. The nut threads onto the fitting body.
As you tighten the nut the washer compresses against the pipe creating a seal. Hand tight plus one quarter turn with channel locks is the standard.

The image shows the correct orientation. The thin edge of the washer points toward the nut. The thick edge seats against the fitting shoulder.
Reverse the washer and it will leak every time. Cloth inserted washers work the same way. Rubber washers are less common on tubular but appear on some basket strainers.
Never use pipe dope or tape on slip joint threads. The seal is mechanical not threaded. Overtightening cracks the nut or distorts the washer.
If a joint weeps back the nut off a hair realign the pipe and retighten. Chrome brass nuts need a cloth wrap to protect the finish. Plastic nuts tighten by hand only.
A telescoping trap adapter slides up and down on the wall tube. This absorbs vertical offset between the trap arm and the stub out. Set the trap arm slope first.
Then slide the adapter to meet the stub out. Tighten the adapter slip nut last. This sequence guarantees slope and seal simultaneously.
P-Trap Alignment: Slope Height And Offset Visual Checks
The trap arm must slope toward the wall at a minimum of one quarter inch per foot. That slope keeps solids moving and maintains the two inch trap seal. A level placed on the trap arm should show the bubble slightly off center toward the wall.
If the bubble sits centered the arm is flat and will clog.

The diagram above shows the correct slope relationship. Notice the trap arm drops as it runs toward the wall stub out. The telescoping adapter absorbs the vertical difference.
The trap U bend hangs level. The tailpiece drops straight down from the tee. Every joint aligns without stress.
When the wall stub out sits too high the trap arm cannot slope enough. You have three options. Lower the tee inside the wall if the wall is open.
Use an adjustable P-trap with a deeper U bend. Or install a repair coupling and a longer tailpiece to drop the trap inlet. The adjustable trap is the fastest fix for a closed wall.
When the stub out sits too low the tailpiece hits the cabinet floor before reaching the trap. Extend the tailpiece with a coupler and a longer straight section. A tailpiece can run up to twenty four inches before the trap per code.
If you need more drop use a flexible drain hose rated for tubular connections. Secure it with hose clamps.
Horizontal offset between the sink center and the stub out is common. The trap arm can rotate up to forty five degrees off center. The slip joint at the trap adapter allows this rotation.
Keep the slope. Do not rotate so far that the trap arm binds against the cabinet wall. A forty five degree elbow on the trap arm adds more offset if needed.
Step By Step Visual Walkthrough Dry Fit To Final Test
Dry fit the entire assembly before applying putty or tightening any nut. Start with the basket strainers. Set them in the sink decks.
Slip the tailpieces into the strainer shanks. Add the tee for double bowls. Slide the P-trap onto the tee outlet.
Connect the trap arm to the wall adapter. Check every alignment.
Measure the tailpiece cut points. Mark each pipe with a fine tip marker. Remove the assembly.
Cut with a PVC cutter or fine tooth hacksaw. Deburr every cut end with a utility knife. Rough edges tear washers and cause leaks.
Reassemble dry. Verify the trap arm slope with a torpedo level.
Apply plumber's putty to the basket strainer flanges. Press them into the sink decks. Install the rubber gaskets friction rings and locknuts from below.
Tighten until putty squeezes out uniformly. Wipe excess. Install the disposal flange the same way if applicable.
Mount the disposal to the flange per manufacturer instructions.
Install slip nuts and washers on every joint. Orient washers taper toward nuts. Hand tighten all nuts.
Snug each with channel locks one quarter turn past hand tight. Protect chrome nuts with a cloth. Do not overtighten plastic nuts.
The trap adapter slip nut goes on last after slope is confirmed.
Fill both sink bowls with water. Pull the stoppers simultaneously. Watch every joint for weeps.
Run the disposal if present. Run the dishwasher drain cycle if connected. Tighten any joint that shows moisture.
A second test after fifteen minutes catches slow seeps.
Dishwasher Connection Air Gap High Loop Disposal Inlet
The dishwasher drain hose must connect above the trap weir. This prevents sink waste from backing into the dishwasher. Three code approved methods exist.
An air gap fitting on the countertop. A high loop under the cabinet. Or a direct connection to the disposal inlet with the disposal providing the air break.
An air gap is the most positive protection. The hose from the dishwasher connects to the small port. A larger hose runs from the air gap to the branch tailpiece or disposal inlet.
The air gap vents to atmosphere. If the drain clogs water spills onto the countertop not into the dishwasher. Many jurisdictions require this method.
A high loop routes the dishwasher hose up to the underside of the countertop before descending to the drain. The loop top must be at least thirty two inches above the floor. Secure the hose with a clamp or zip tie.
This method relies on gravity and the loop height to prevent siphonage. It costs less but offers less protection than an air gap.
If you have a disposal the dishwasher hose clamps directly to the disposal inlet. Remove the knockout plug inside the inlet first. The disposal grinding action breaks up food particles.
The disposal body acts as an air break. This is the cleanest install visually. Verify your local code allows it.
Some areas still require an air gap even with a disposal.
| Method | Code Acceptance | Install Effort | Visual Impact |
|---|---|---|---|
| Air gap | Universal | Moderate | Visible on counter |
| High loop | Most areas | Low | Hidden |
| Disposal inlet | Many areas | Low | Hidden |
Choose the method your inspector accepts. The air gap never fails. The high loop can sag over time.
The disposal inlet requires a disposal. Run the dishwasher through a drain cycle after install. Check the connection for leaks.
Common Visual Mistakes Leaks Cross Threads Backward Washers
A backward beveled washer is the number one leak cause. The thin edge must face the nut. The thick edge seats against the fitting shoulder.
Reverse it and the washer cannot compress evenly. Water tracks along the pipe threads. Flip the washer and retighten.
Cross threaded slip nuts happen when the nut starts at an angle. The ACME threads are coarse but fragile. Start every nut by hand.
Turn it until you feel the threads engage. Then apply the wrench. If resistance spikes in the first turn back out and restart.
Forcing it strips the nut or the fitting.
Overtightening cracks plastic slip nuts. Hand tight plus one quarter turn is the spec. Channel locks give leverage.
Use a light touch. If a joint weeps after proper tightening the pipe may be oval or the washer damaged. Replace the washer.
Do not keep cranking.
Misaligned trap arm slope shows as a level bubble centered or tilted away from the wall. The trap arm must drop. If the wall stub out forces a flat or uphill run the trap will lose its seal.
The adjustable trap or a lowered wall tee fixes this. Do not accept a flat arm.
Missing dishwasher knockout plug blocks the disposal inlet. The plug sits inside the disposal discharge elbow. Pop it out with a screwdriver and hammer.
Retrieve the plastic piece. If it falls into the grind chamber it will jam the disposal on first run. Shake the disposal upside down before mounting.
Basket strainer putty gaps cause countertop leaks. The putty bead must be continuous and thick enough. Press the flange straight down.
Do not rotate the flange after seating. Rotation breaks the putty seal. Tighten the locknut evenly.
Wipe excess putty from the sink deck immediately.
Code Compliance At A Glance Trap Seal Arm Length Vent Distance
The trap seal depth must be two inches minimum. Measure from the trap weir to the top of the water in the U bend. A shallow seal allows sewer gas into the kitchen.
Standard tubular P-traps meet this automatically. Do not modify the trap to fit a tight cabinet. Use a low profile trap rated for two inch seal.
Trap arm length limits vary by code. The IPC allows up to sixty inches from the trap weir to the vent. The UPC limits it to thirty inches.
The NPC Canada allows forty eight inches. Check your local adoption. Measure along the centerline of the pipe.
Exceed the limit and you need a vent connection at the trap arm.
Trap arm slope is one quarter inch per foot minimum. Steeper is fine. Flatter is a violation.
Use a four foot level and a one inch block to verify. Place the block under the level at the wall end. The bubble should center.
This confirms the slope over four feet.
The trap must be accessible for cleaning. Slip joints satisfy this. A glued trap requires a cleanout tee upstream.
Some codes require an access panel for concealed traps. Check before closing the cabinet soffit. A removable cabinet floor panel counts as access.
Hot water discharge from a dishwasher can soften ABS trap arms over time. PVC handles heat better. If the dishwasher drains through the trap arm consider PVC for that section.
The transition from ABS to PVC requires purple primer and green transition cement. A Fernco coupling works too.
| Code | Max Trap Arm Length | Min Slope | Min Trap Seal |
|---|---|---|---|
| IPC 2026 | 60 inches | 1/4 in/ft | 2 inches |
| UPC 2026 | 30 inches | 1/4 in/ft | 2 inches |
| NPC 2026 | 48 inches | 1/4 in/ft | 2 inches |
Verify your local amendment. The table shows the model code baselines. Your city may be stricter.
When in doubt follow the shortest arm length and the steepest slope.
Pro Visual Cues What Plumbers Spot In Three Seconds
A pro checks the trap arm slope first. The bubble on a torpedo level tells the story. They verify beveled washer orientation at every joint.
Thin edge toward the nut. They confirm the dishwasher hose rises before it falls. High loop or air gap.
They spot putty squeeze out under the basket strainer flange. Even ring means good seal. They look for the disposal knockout plug on the floor.
Missing plug means it's inside the grind chamber. They check slip nut engagement. Threads fully engaged not just started.
They see the trap adapter telescoping range. Not bottomed out not fully extended. These cues catch ninety percent of future leaks.
Quick Reference Measurements And Orientation Cheat Sheet
| Item | Spec | Orientation Rule |
|---|---|---|
| Trap arm slope | 1/4 in per ft min | Bubble off center toward wall |
| Trap seal depth | 2 in min | Water covers weir by 2 in |
| Tailpiece max length | 24 in | Strainer to trap inlet |
| Trap arm max IPC | 60 in | Weir to vent |
| Trap arm max UPC | 30 in | Weir to vent |
| Dishwasher high loop | 32 in above floor | Clamp to countertop underside |
| Slip nut torque | Hand tight + 1/4 turn | Cloth on chrome nuts |
| Beveled washer | Taper toward nut | Thin edge faces nut |
| Disposal inlet height | 6-3/4 in below sink | Fixed by flange |
| Putty bead | Pencil thick | Continuous no gaps |
Print this table. Tape it to the cabinet wall. It saves return trips.
Frequently Asked Questions
Can I use a flexible drain hose for the trap arm
No. Flex hose is not approved for trap arms. It sags and loses slope.
Use rigid tubular with slip joints. A flexible coupling is only for connecting misaligned pipes at the wall.
My wall stub out is too high for the trap to slope
Lower the tee inside the wall if open. Otherwise use an adjustable P-trap with a deeper U bend. It drops the trap inlet without changing the arm slope.
Do I need an air gap if I have a disposal
Many codes still require an air gap. Check your local amendment. The disposal inlet is allowed in some areas but not all.
An air gap never fails inspection.
Can I glue the slip joints for extra security
Never glue slip joints. They are designed to be removable for cleaning. Glue prevents maintenance and violates code.
The mechanical seal is reliable when assembled correctly.
Why does my trap gurgle when the dishwasher drains
The trap arm may be too long or the vent too far. Air pulls through the trap seal. Shorten the arm or add an air admittance valve if code permits.
Verify slope first.
How often should I check under sink connections
Inspect every six months. Look for corrosion on nuts water stains on the cabinet floor and putty drying at the strainer. Tighten any weeping joint a hair.
Replace washers at first sign of cracking.