Kitchen Sink Backed Up? Here’s How to Fix It
You're staring at a sink full of gray water that won't drain. Learning how to fix a backed up kitchen sink starts with knowing which pipe is clogged and why. Most backups trace to one of three spots: the disposal, the P-trap, or the branch line before the vent.
Per IPC standards, a 1½-inch branch line serves a standard kitchen sink, and grease buildup narrows that diameter by half in just two years without maintenance. Let's walk through the triage that tells you exactly which tool to reach for first.
Quick Answer
Most kitchen sink backups clear by removing the P-trap. Place a bucket, loosen slip nuts with channel locks, and clean the trap. Reassemble and test.
If water still backs up, snake the branch line or check the vent stack.
Why Your Kitchen Sink Backs Up (And What It Tells You)

The water tells you where the blockage lives. Standing water in both bowls of a double sink means the clog sits downstream of the tee, usually in the branch line or main stack. Water rising only on the disposal side points to the grind chamber or the disposal inlet tee.
Slow drainage with a gurgling glug means air can't enter the system, so the vent stack or air admittance valve is likely blocked. A sewage smell that appears when you run the faucet signals a dry trap or a cracked pipe letting sewer gas escape. Each symptom maps to a different repair path.
Grease and oil cause 70 percent of kitchen clogs according to municipal sewer districts. They solidify at 100 to 110 degrees Fahrenheit, coating pipe walls like cholesterol in arteries. Starchy foods, rice, pasta, potato peels, swell into a paste that no chemical can dissolve.
Fibrous waste such as celery strings or corn husks wraps around disposal impellers and jams the shredder ring. Hard objects, bones, pits, utensils, crack the grind chamber or lodge in the trap bend. Mineral scale from hard water narrows the pipe interior over years, mimicking a soft clog but requiring mechanical scraping.
The material of your pipes changes the game. PVC and ABS tolerate hot water and moderate chemical exposure. Cast iron and galvanized steel corroded after 40 to 50 years develop rough interiors that snag debris.
Copper DWV resists corrosion but develops pinhole leaks if acidic drain cleaners sit too long. Knowing what you have under the cabinet dictates which methods are safe.
Quick Triage: Stop, Look, Listen Before You Touch Anything
Never plunge a disposal side. The pressure blows out the shaft seal and floods the motor windings. Never pour chemical drain opener into a disposal.
Lye or sulfuric acid etches the grind chamber, ruins the seals, and creates a hazardous splash-back risk for the next person who works on it. Clip the dishwasher drain hose to the countertop with a clip or zip tie so backflow can't contaminate the appliance. Plug the opposite bowl with a wet rag or sink stopper to focus pressure where you need it.
Run the disposal. A healthy hum means the motor spins. A quiet hum with no grind means the impellers are jammed.
No sound at all means the overload tripped or the unit is dead. Check the reset button on the bottom of the disposal before assuming the worst. Look under the cabinet.
Water dripping from the trap slip nuts means the clog is past the trap. Dry pipes with water backing up in the sink means the blockage is in the trap or disposal.
Listen to other fixtures. Flush the nearest toilet. Run the tub.
If they gurgle or bubble when the kitchen sink runs, the vent stack or main line is involved. That moves you from a DIY trap job to a main line snake or a roof vent clearing. If everything else drains fine, the problem is local to the kitchen branch.
Know Your Plumbing: Disposal, Trap, Vent, and Where Clogs Hide

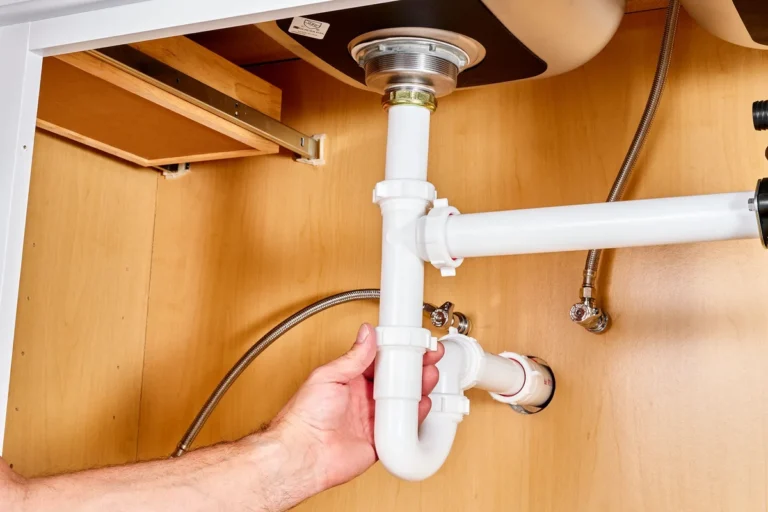
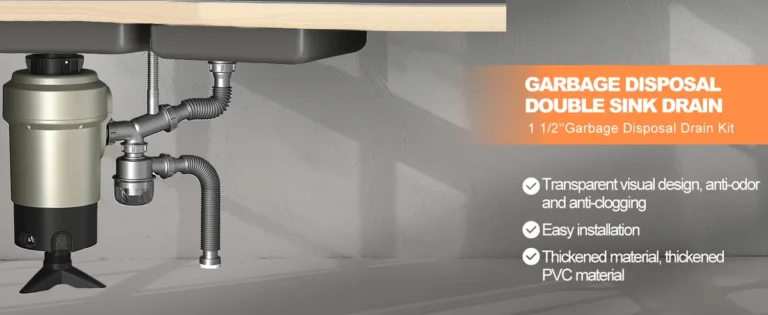
A standard kitchen drain system has five key components. The tailpiece drops from the sink flange. The garbage disposal mounts to a 3-bolt flange on one bowl.
The P-trap, a U-shaped pipe, holds water to block sewer gas. The branch drain runs horizontally at a 1/4-inch-per-foot slope to the main stack. The vent stack rises through the roof or terminates at an air admittance valve under the cabinet.
The disposal inlet tee connects the grind chamber to the trap arm. Its baffle slows discharge so the trap doesn't siphon dry. The dishwasher inlet nipple on the disposal or tailpiece takes the dishwasher drain hose.
A high loop or air gap prevents cross-contamination. The cleanout, a threaded plug on a wye or tee, gives access to the branch or main line without cutting pipe.
Clogs hide in predictable spots. The disposal grind chamber catches bones and fibrous waste. The disposal inlet tee narrows to ¾ inch, a magnet for grease and starch.
The P-trap bend catches heavy debris and lost jewelry. The branch line accumulates grease over years, especially at 90-degree turns. The vent stack clogs with leaves, bird nests, or ice in winter.
An AAV fails silently after 10 to 20 years, sealing shut and starving the system of air.
Pipe diameter matters. A 1¼-inch tailpiece feeds a 1½-inch trap arm into a 1½- or 2-inch branch. The main stack steps to 3 or 4 inches.
Every reduction is a potential choke point. Older homes with 1¼-inch branch lines clog twice as fast as modern 2-inch runs.
Decision Tree: Which Branch Are You On?
Start with the simplest question. Does the disposal run? If no, reset the overload.
If it hums but won't grind, you have a jam, go to Path B. If it runs but water backs up, the clog is past the disposal.
Next, which bowls are affected? Both bowls backing up means the clog is in the shared branch line or main stack, go to Path C or E. Only the disposal side means the disposal inlet tee or trap arm, go to Path A or B.
Only the non-disposal side means that tailpiece or its trap arm, go to Path A.
Does the dishwasher cause backup? Run a drain cycle. If water floods the sink, the disposal inlet nipple or the high loop is clogged, go to Path A with focus on the dishwasher connection.
If the dishwasher drains fine, the blockage is further down.
Do other fixtures gurgle? Flush the toilet. Run the tub.
If they bubble when the kitchen runs, the vent stack or main line is blocked, go to Path D or E. If they stay quiet, the problem is isolated to the kitchen branch.
Is there a cleanout accessible? Look for a threaded plug on a wye in the basement, crawlspace, or exterior wall. If yes, you can snake the main line, go to Path E.
If no, you're limited to trap and branch access, Paths A, B, C.
Step-by-Step: Clear the Clog Based on Your Branch
Path A: Accessible P-Trap Cleanout (Most Common Fix)
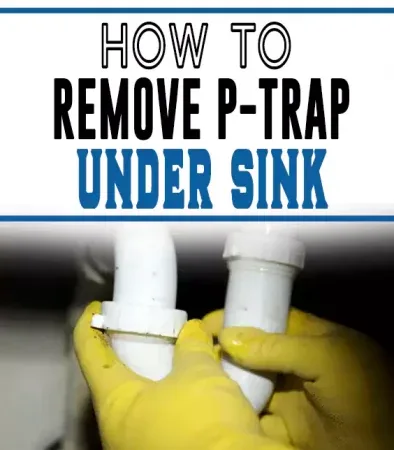
Place a bucket under the trap. Loosen the slip nuts with channel locks, turn counterclockwise. PVC nuts hand-tighten; old ones may need a strap wrench.
Pull the trap free. Dump contents into the bucket. Scrub the trap interior with a bottle brush.
Check the trap arm where it enters the wall. Shine a flashlight. If you see buildup, feed a hand auger 3 to 5 feet into the branch.
Crank clockwise. Pull back. Repeat until the cable moves freely.
Reassemble the trap. Hand-tighten slip nuts, then snug with channel locks, quarter turn past hand-tight. Run hot water for two minutes.
Watch for leaks.
Path B: Disposal Jam — Hex Wrench, Not Plunger
Unplug the disposal or flip the breaker. Insert a ¼-inch hex wrench into the bottom center socket. Work it back and forth until the shredder ring spins freely.
If no hex socket, use a wooden broom handle through the sink flange to lever the impellers. Never use fingers. Remove the obstruction with tongs or pliers.
Press the red reset button. Restore power. Run cold water.
Turn on disposal. It should grind smoothly.
Path C: Branch Line Snake — 25 ft Hand Auger Technique
Remove the P-trap per Path A. Feed the auger cable into the branch line. Advance 3 feet at a time.
Crank clockwise at each joint. Feel for resistance, a soft grab means grease, a hard stop means a solid object or pipe break. If the cable kinks, pull back and restart.
Don't force past 25 feet without a cleanout. Retrieve the cable slowly. Flush the line with hot water.
Reassemble the trap.
Path D: Vent Stack / AAV Check — Roof or Under Sink
Locate the AAV under the sink, a cylindrical valve on a vertical pipe. Unscrew the cap. Press the diaphragm.
It should move freely. If stuck, replace the valve, $15 to $30 at any hardware store. If no AAV, the vent goes through the roof.
From a ladder, shine a light down the stack. Clear leaves or debris with a garden hose on jet setting. In winter, pour hot water to melt ice plugs.
Never climb a wet or icy roof.
Path E: Main Line via Cleanout — When to Snake, When to Call
Remove the cleanout cap with a pipe wrench. Stand clear, pressure may release sewage. Feed a 50-foot sectional cable or rent a drum machine.
Advance to the main line. If the cable hits a solid stop at 10 to 15 feet, you likely have a root intrusion or collapsed pipe. Stop.
Call a pro with a camera. If the cable moves freely to the street, retrieve and flush. Hydrojet rental costs $80 to $120 per day but clears grease better than a snake.
Tools That Belong Under Your Sink (And What to Skip)

Four tools handle 90 percent of kitchen sink backups. A cup plunger creates seal on flat sink bottoms. A 25-foot hand drum auger reaches past the trap into the branch line.
Channel locks (10-inch) grip slip nuts without crushing PVC. A ¼-inch hex wrench, often included with the disposal, frees jammed impellers. Keep them in a small bucket under the cabinet.
Skip the flange plunger. Its folded rubber cup seals toilet drains, not sink basins. Skip chemical drain openers.
Lye and sulfuric acid damage disposal seals, etch PVC, and create hazardous splash risk. Skip the blow bag (water ram). It can burst old cast iron or push clogs into the main line.
Skip the wire coat hanger. It scratches pipe interiors and snaps off at bends.
A wet/dry shop vac with a crevice tool pulls standing water fast. A bottle brush scrubs the trap interior. A flashlight or headlamp lets you see into the trap arm.
Nitrile gloves protect against sewage bacteria. A zip tie clips the dishwasher hose high during repairs. These cost under $50 total and fit in one bucket.
| Tool | Purpose | When to Use |
|---|---|---|
| Cup plunger | Displace clog in trap | First attempt, no disposal |
| 25 ft hand auger | Clear branch line | Past trap, no cleanout |
| Channel locks | Loosen slip nuts | Trap removal, reassembly |
| ¼-inch hex wrench | Free disposal jam | Disposal hums, no grind |
Common Mistakes That Turn a Clog into a Repair Bill
Plunging the disposal side blows the shaft seal. Water enters the motor housing and shorts the windings. A $150 disposal becomes a $350 replacement plus labor.
Forcing a hand auger past the trap into the disposal shreds the cable and jams the impeller. The disposal must be removed to extract the cable, two hours of labor.
Over-tightening slip nuts on PVC cracks the hub. A slow leak develops behind the cabinet, rotting the floor sheathing. Hand-tighten plus a quarter turn with channel locks is the spec.
Using boiling water on PVC pipes softens the wall above 140 degrees Fahrenheit. The pipe sags at the hanger, creating a belly that traps debris. Hot tap water at 120 degrees is safe and helps melt grease.
Pouring chemical opener into standing water creates a caustic bath. The next person who removes the trap gets chemical burns. Mixing bleach with acid drain cleaner releases chlorine gas.
Never mix products. Ignoring a gurgling toilet means the vent or main line is blocked. Treating only the sink trap guarantees a callback within days.
Removing a cleanout plug without a pipe wrench rounds the square head. A rounded plug requires cutting the fitting, a $400 repair. Climbing a wet roof to clear a vent stack risks a fall.
Use a garden hose from a ladder or call a pro. Assuming the problem is fixed because water drains once misses a partial blockage that will catch the next load.
Safety Lines You Don't Cross: Chemicals, Asbestos, Sewage, Permits
Never use chemical drain openers in a garbage disposal. InSinkErator and Moen warranties void if caustics contact the grind chamber. EPA Safer Choice certified enzyme maintainers are the only chemicals approved for monthly use in disposal systems.
They digest grease without etching metal or plastic.
Pre-1980 cast iron pipes often have asbestos wrap at joints. Disturbing it releases fibers. If the wrap looks frayed or powdery, stop.
Call a licensed abatement contractor. Do not cut, sand, or scrape. Sewage backup is Category 2 gray water or Category 3 black water.
Wear nitrile gloves, goggles, and an N95 mask. Sanitize tools and surfaces with a 10 percent bleach solution after contact.
Most jurisdictions require a permit for trap re-pipe, vent modification, or main line replacement. A simple trap cleanout does not. Check your local building department website before cutting pipe.
Unpermitted work flags at sale inspection and can void insurance claims for water damage. GFCI protection on the disposal circuit is required by NEC 210.8(A)(6). Test the GFCI monthly.
If you smell gas (rotten egg) that gets stronger when water runs, evacuate and call the gas utility. A cracked sewer line can pull gas into the drain through a dry trap. Do not use electrical switches.
Do not light matches. This is rare but life-threatening.
Prevention Habits That Actually Work (Enzymes, Guards, Hot Water Discipline)
Scrape plates into the trash before rinsing. A sink strainer catches 95 percent of solids. Empty it every use.
Run cold water 15 seconds before and after disposal use. Cold water solidifies grease so the disposal chops it into particles that flow past the trap. Hot water melts grease; it re-solidifies 10 feet down the line.
Pour one cup of enzyme maintainer down the drain monthly. Let it sit overnight. Brands with Bacillus spores outperform liquid enzymes in third-party lab tests.
They form biofilms that eat grease continuously. Avoid weekly boiling water pours, they stress PVC joints. A monthly hot tap water flush (two minutes at full flow) clears early buildup without thermal shock.
Install a disposal splash guard if yours is missing. It reduces spray and keeps utensils out. Never put fibrous waste (celery, corn husks, artichoke leaves) in the disposal.
They wrap the shredder ring. Never put starch (rice, pasta, potato peels) down the drain. They swell into a paste that no snake can clear.
Bones, pits, and shells belong in the trash.
If you have hard water, consider a point-of-use softener for the kitchen line. Calcium scale narrows 1½-inch branch lines to ¾-inch in five years. A sediment filter before the softener protects the resin.
This is a remodel-level upgrade but pays back in avoided drain calls. When planning a kitchen remodel, specify 2-inch branch lines and a cleanout at the sink base.
When to Call a Pro: The Abort Criteria Checklist
Stop and call a licensed plumber if sewage backs up into the sink from the drain line. This means the main line is blocked past your reach. Stop if the auger cable won't advance past 10 feet in the branch.
You likely have a collapsed pipe or root intrusion. A camera inspection ($250, $500) locates the break before excavation.
Stop if you hear pipe movement or cracking sounds when snaking. Old cast iron or galvanized pipes can shatter under torque. Stop if the cleanout plug is rounded, corroded, or painted over.
Forcing it cracks the wye fitting. Stop if you suspect asbestos wrap on pipes. Disturbance requires certified abatement.
Stop if water rises in lower fixtures (toilet, tub, shower) when you run the sink. This confirms a main line or vent stack blockage. Hydrojetting a main line requires a 4,000 PSI machine and confined-space training, not a DIY rental.
Stop if the disposal leaks from the bottom seal. The unit must be replaced; repair cost exceeds new unit price.
A pro brings a camera, a hydrojetter, a sectional cable machine, and a pipe locator. They can see the problem, clear it, and verify the fix in one visit. Expect $350, $600 for main line hydrojet, $250, $500 for camera plus locate.
Emergency after-hours rates add 50 to 100 percent. Ask for a flat rate before dispatch.
FAQ: Real Questions From Real Backups
Why does my sink gurgle when the washing machine drains?
Shared branch line or vent restriction. The washer's high-volume discharge pulls air through the sink trap. Clear the vent or snake the branch.
Can I use Drano in a garbage disposal?
No. Caustics etch the grind chamber and void the warranty. Use EPA Safer Choice enzyme maintainers only.
How do I know if the vent stack is blocked?
Multiple fixtures gurgle. Toilet bubbles when sink runs. Roof vent may have leaves, ice, or a bird nest.
What if the cleanout plug won't turn?
Penetrating oil, wait 15 minutes. Use a 4-foot cheater pipe on the wrench. If it rounds, call a pro, forcing it cracks the wye.
Why does water back up only when the dishwasher runs?
Disposal inlet nipple or high loop is clogged. Remove the dishwasher hose, clear the nipple with a bottle brush.
How often should I treat drains with enzymes?
Monthly. Overnight dwell works best. Bacillus spore formulas outperform liquid enzymes in lab tests.
Your Backup Decision Card: Print, Save, Stick Inside Cabinet
| Symptom | First Move | Tool | Abort If |
|---|---|---|---|
| Both bowls full | Pull P-trap | Channel locks, bucket | Cable won't pass 10 ft |
| Disposal side only | Hex wrench jam clear | ¼-inch hex wrench | Motor hums, no spin after reset |
| Non-disposal side only | Pull that trap | Channel locks | Leak at wall joint |
| Gurgling toilet/tub | Check vent/AAV | Ladder, hose, AAV replace | Sewage smell, main line backup |
| Dishwasher floods sink | Clear disposal inlet | Bottle brush, hose pull | Cracked disposal body |
Keep a bucket, channel locks, 25 ft auger, hex wrench, and cup plunger under the sink. Monthly enzyme dose. Scrape plates.
Cold water with disposal. You'll avoid 90 percent of callbacks.