How to Fix a Clogged Kitchen Sink with Garbage Disposal
A clogged kitchen sink with garbage disposal stops meal prep cold and threatens water damage to the cabinet base. Most people reach for a plunger or chemical cleaner and hope for the best. That approach fails because the symptom, standing water, has four distinct causes that each demand a different fix.
This guide walks you through the diagnostic path professionals use so you match the solution to the actual failure.
Per NEC 2020 Article 210.8(A)(6), the disposal circuit requires GFCI protection and a dedicated 15- or 20-amp breaker. Manufacturer specs confirm the thermal overload reset button typically trips after 5 to 10 minutes of sustained jam. Let’s start by identifying which of the four failure modes you’re facing.
Quick Answer
A clogged kitchen sink with garbage disposal usually means a jammed flywheel, a tripped overload, a blocked P-trap, or a clog downstream of the tee. Cut power at the breaker first. If the motor hums, free the flywheel with a 1/4-inch hex key.
If silent, press the red reset button and check the breaker. For backups in the other basin, remove and clean the P-trap. For deep clogs, snake the branch drain past the trap.

Why Your Disposal-Backed Sink Needs a Diagnostic Path, Not a Checklist
A linear checklist assumes every backup looks the same. It doesn’t. A jammed flywheel hums.
A tripped overload stays dead silent. A clogged trap backs up both bowls. A deep line clog may not affect the disposal side at all.
Treating them identically wastes time and risks damage. Chemical cleaners eat rubber seals and void warranties. Plunging a jammed flywheel stresses the motor shaft.
Snaking a trap that just needs cleaning scratches the pipe interior. The diagnostic path eliminates guesswork by reading the symptoms before you touch a tool.
Quick Triage: Identify Your Failure Mode in 60 Seconds
Stand at the sink. Flip the wall switch. Listen.
Motor hums but nothing grinds, flywheel is jammed. Go to Decision Branch 1.
Dead silence, no hum at all, power is interrupted. Go to Decision Branch 2.
Water rises in the opposite bowl, clog sits past the tee in the shared branch drain. Go to Decision Branch 3.
Dishwasher drains into the sink or won’t drain, knockout plug left in, air gap blocked, or hose routed wrong. Go to Decision Branch 4.
Grab a flashlight. Look under the cabinet. Note which connections are wet.
That visual clue often confirms the audio diagnosis.
How the System Actually Works: Disposal, Trap, and Shared Drain
The disposal grinds waste into a slurry that exits through the discharge elbow into the tailpiece. From there it drops into the P-trap, the U-shaped pipe that holds water to block sewer gas. The trap outlet connects to the branch drain running horizontally inside the wall to the main stack.
A double-bowl sink uses a tee fitting to join the disposal tailpiece and the other basin’s tailpiece before the trap. The dishwasher hose clamps onto a nipple on the disposal body or a tailpiece branch. An air gap or high loop prevents backflow.
Understanding this layout tells you exactly where a clog can live and which component to open.
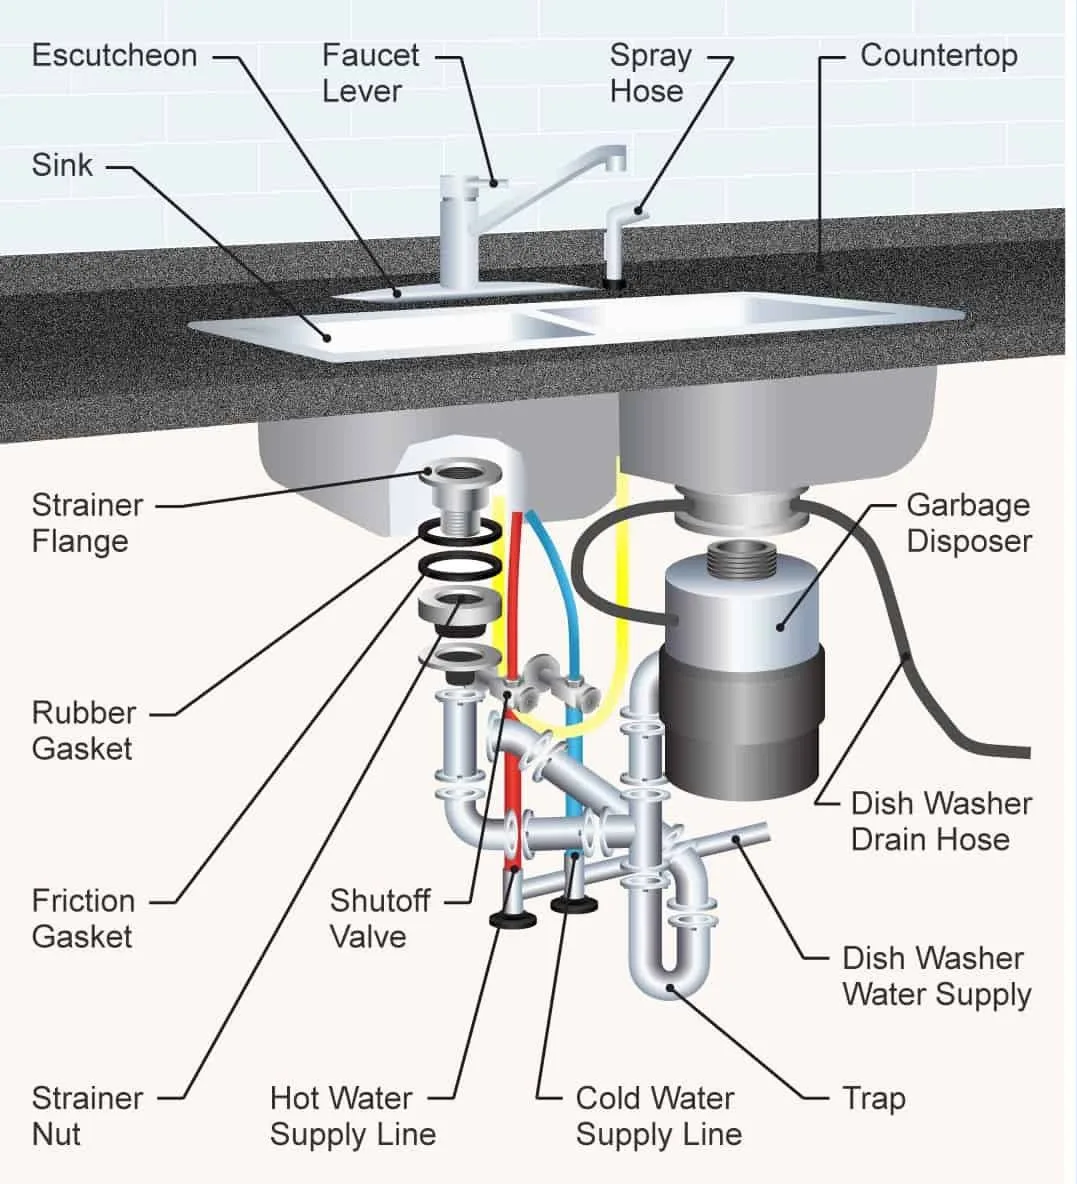
Key dimensions matter. The trap arm, the horizontal pipe between trap and wall, must slope at least 1/4 inch per foot. Maximum vertical drop from the trap to the vent is 24 inches per IPC and UPC.
Standard drain diameter is 1-1/2 inches. Disposal discharge outlets match this size. Dishwasher inlet nipples accept 7/8-inch hose.
Knowing these specs helps when you replace parts or verify an existing install.
Decision Branch 1: Motor Runs but Won't Grind — Jammed Flywheel
The motor energizes but the shredder plate cannot rotate. Hard objects, bone, fruit pits, glass, bottle caps, wedge between the impeller lugs and the grind ring. Fibrous waste like celery strings or corn husks wraps the shredder hub.
Starch from potato peels or rice expands into a paste that locks the plate. The thermal overload will trip within minutes if you keep the switch on. Cut power at the breaker immediately.
Do not rely on the wall switch alone.
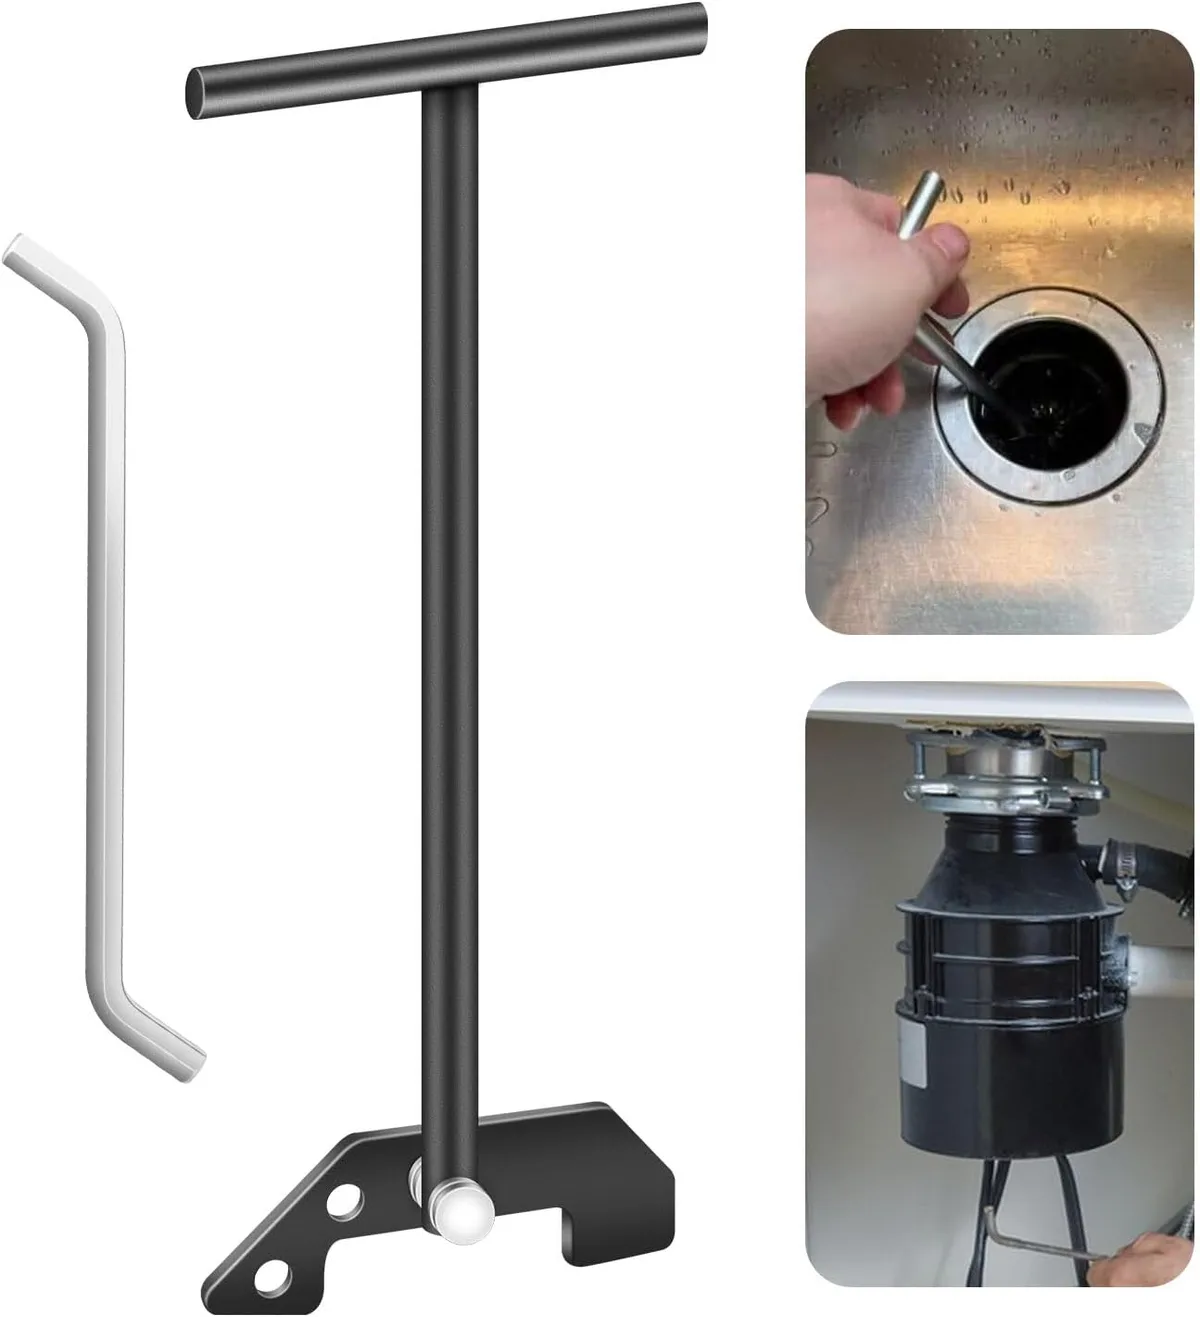
Most disposals accept a 1/4-inch hex key inserted into the center socket on the bottom of the unit. Insert the key. Work it back and forth until the flywheel rotates freely.
If your model lacks a bottom socket, some Moen and Waste King units use a 5/16-inch socket, insert a wooden broom handle through the sink flange into the grind chamber. Lever against the impeller lugs to break the jam. Never put your hand in the chamber.
Once free, restore power and press the red reset button on the bottom. Run cold water. Flip the switch.
The motor should spin up cleanly.
Decision Branch 2: Dead Silence — Electrical Trip or Burned Motor
No hum means no current reaches the motor windings. Start at the breaker panel. A dedicated 15- or 20-amp circuit feeds the disposal per NEC 210.52(C)(3).
The breaker may have tripped. The GFCI receptacle under the sink or upstream in the kitchen may have tripped. Press the reset button on the GFCI.
If it won’t hold, you have a ground fault, likely water in the motor windings or a nicked wire. Next, check the red reset button on the disposal bottom. Press it firmly.
It clicks when engaged. Wait 5 to 10 minutes for the thermal overload to cool if the unit recently jammed.
If power is confirmed at the breaker and GFCI, and the reset button is engaged, but the motor stays dead, the start capacitor or motor windings have likely failed. Disposals under 1/2 HP often use a permanent split capacitor motor. The capacitor is a small metal can mounted on the side.
A bulging or leaking capacitor confirms failure. Replacing the capacitor costs $10 to $15 and takes 15 minutes. Replacing the motor means replacing the unit.
At 8 to 15 years typical lifespan, a unit over 10 years old with a burned motor is rarely worth repairing. New 3/4 HP models run $120 to $180.
Decision Branch 3: Water Backs Up Into the Other Basin — Clog Past the Tee
Water rising in the non-disposal bowl means the blockage sits downstream of the tee where the two tailpieces join. The disposal may grind fine but the slurry has nowhere to go. Grease buildup in the horizontal branch drain is the most common culprit.
Soap scum and food particles coat the pipe walls over years until the effective diameter shrinks to a fraction of 1-1/2 inches. A snake or auger is the right tool here. Chemical cleaners cannot cut grease at distance and will sit in the trap damaging seals.
If the house has a cleanout on the branch drain, use it. Otherwise you will snake through the trap outlet after removing the trap.
Decision Branch 4: Dishwasher Won't Drain — Knockout Plug, Air Gap, or Hose Routing
A new disposal install often leaves the dishwasher inlet knockout plug intact. The plug blocks the nipple so the dishwasher pumps water into the sink instead of the drain. Tap the plug out with a screwdriver and hammer before connecting the hose.
If the knockout was removed but the dishwasher still backs up, check the air gap on the countertop or the high loop under the sink. The air gap prevents siphoning and must be clear. Remove the cap and clean debris.
The high loop must rise above the flood rim of the sink before descending to the disposal. A sagging hose traps water and breeds odor. Secure the hose with a clamp and zip tie to the cabinet wall.
Step-by-Step: Clearing a Jammed Flywheel (Hex Key & Broom-Handle Methods)
Cut power at the breaker. Verify with a non-contact tester.
Locate the bottom socket. Most InSinkErator and Emerson units use a 1/4-inch hex. Moen and Waste King often use 5/16-inch.
Insert the hex key fully. Feel for the socket engagement.
Work the key back and forth. Apply steady pressure. Do not force. The flywheel will break free with a distinct click.
Rotate several full turns. Confirm free movement in both directions.
Remove the key. Restore power. Press the red reset button.
Run cold water. Flip the switch. Listen for smooth startup.
If your unit lacks a bottom socket, use a wooden broom handle. Insert through the sink flange. Lever against an impeller lug.
Rotate the plate manually. Never use metal tools inside the grind chamber. They damage the shredder ring and create burrs that snag future waste.
Step-by-Step: Resetting Thermal Overload & Checking Breaker/GFCI
The red reset button on the disposal bottom is a thermal overload protector. It trips when the motor draws excess current during a jam. Wait 5 to 10 minutes after a jam before pressing it.
The button clicks firmly when engaged. If it pops out again immediately, the motor is still jammed or the windings are damaged.
Check the dedicated breaker in the panel. A 15-amp breaker handles most 1/2 HP units. A 20-amp breaker is required for 3/4 HP and 1 HP models per manufacturer specs.
Flip the breaker fully off then on.
Check the GFCI receptacle under the sink or the GFCI breaker in the panel. Press the test button then the reset button. A GFCI that will not reset indicates a ground fault.
Do not bypass it. Call an electrician.
Verify voltage at the disposal wiring with a multimeter if comfortable. 120 volts should be present at the black wire when the wall switch is on. No voltage means an open neutral or a broken switch leg.
Step-by-Step: Removing & Cleaning the P-Trap Without Flooding the Cabinet
Place a 1-gallon bucket under the trap. Loosen the slip nuts by hand or with slip-joint pliers. Protect the nut finish with a cloth.
Lower the trap into the bucket. Water and debris will spill. Clean the trap interior with a bottle brush.
Inspect the trap arm for buildup. Scrape grease with a putty knife.
Check the tailpiece from the disposal. Remove the disposal discharge elbow if clogged. The elbow unbolts from the disposal body with three bolts.
Clean the gasket surface. Replace the gasket if cracked.
Reassemble in reverse order. Hand-tighten slip nuts then snug 1/4 turn with pliers. Over-tightening cracks PVC.
Run water. Check every joint for leaks. Tighten slightly if needed.

A clean trap restores flow in 90 percent of downstream clogs. The remaining 10 percent require snaking the branch drain.
Step-by-Step: Snaking the Branch Drain When the Clog Is Downstream
Feed a 25-foot hand auger into the branch drain through the trap outlet or a cleanout. Advance the cable slowly while turning the handle clockwise. You will feel resistance when the cutter hits the blockage.
Push gently, then pull back to break up the mass. Repeat until the cable moves freely. Retract the cable, cleaning it with a rag as it exits.
Reassemble the trap. Run hot water for two minutes to flush remaining debris. A 50-foot auger reaches the main stack in most single-story homes.
For longer runs, a powered drum auger from a rental center saves time. Never force the cable past a tight bend; it can kink and damage the pipe.
Common Mistakes That Turn a 15-Minute Fix Into a Service Call
Using chemical drain cleaner in a disposal voids the warranty and corrodes the grind chamber seals. Plunging a jammed flywheel without cutting power can snap the motor shaft. Over-tightening slip nuts cracks PVC traps and causes slow leaks that rot the cabinet floor.
Forgetting to remove the dishwasher knockout plug on a new install floods the sink during the first dishwasher cycle. Skipping the breaker and relying on the wall switch leaves live voltage at the disposal terminals. Inserting fingers into the grind chamber, even with power off, risks laceration from sharp shredder edges.
Using a metal coat hanger instead of a proper auger scratches the pipe interior and creates snag points for future buildup.
Safety Non-Negotiables: Power Isolation, Chemical Bans, and Hand Placement
Turn off the dedicated breaker before any work. Verify zero voltage with a non-contact tester at the disposal wiring. Never trust the wall switch alone.
Wear safety glasses when snaking or removing the trap; sewage splash carries bacteria. Keep a bucket and towels ready. Do not use chemical drain cleaners, they generate heat that warps PVC and destroys rubber gaskets.
Enzyme treatments like Bio-Clean are septic-safe and won’t harm seals. Never place hands inside the grind chamber. Use the hex key or a wooden broom handle only.
If you must inspect the chamber, use a flashlight and a mirror. Keep children and pets away from the open cabinet during repair.
Maintenance Habits That Prevent Recurring Backups
Run cold water for 15 seconds before and after each use. Cold water solidifies grease so the shredder can chop it. Hot water liquefies grease that later congeals downstream.
Grind ice cubes monthly to scour the shredder ring and dislodge buildup. Citrus peels freshen odor but do not clean. Avoid fibrous waste, celery, corn husks, artichoke leaves, that wraps the hub.
Starchy waste, potato peels, rice, pasta, expands into paste. Bones and fruit pits dull the shredder and jam the flywheel. A monthly dose of enzyme cleaner keeps the branch drain clear.
For septic systems, enzyme treatment is essential; chemicals kill beneficial bacteria.
When to Stop and Call a Pro: Decision Guide for Homeowners
Call a licensed plumber if the auger cannot clear the clog after three attempts. The blockage may be a collapsed pipe, root intrusion, or a foreign object lodged in a tight bend. Call an electrician if the GFCI will not reset or the breaker trips immediately after reset.
These indicate a ground fault that could energize the sink. Replace the disposal if the motor hums but the flywheel spins freely, the start capacitor or windings have failed. Units over 10 years old with a burned motor are rarely worth repairing.
Leaks from the disposal body itself mean a cracked housing or failed shaft seal; replacement is the only fix. If the sink backup coincides with gurgling toilets or slow drains elsewhere, the main sewer line may be blocked, a job for a pro with a camera and hydro-jetter.
Frequently Asked Questions
What size hex key fits my garbage disposal?
Most InSinkErator and Emerson units use a 1/4-inch hex key. Moen and Waste King often require a 5/16-inch key. Check the bottom center of the unit for the socket size stamped on the housing.
How long should I wait before pressing the reset button?
Wait 5 to 10 minutes after a jam for the thermal overload to cool. Pressing it too soon will cause it to trip again immediately.
Can I use chemical drain cleaner in a garbage disposal?
No. Chemical cleaners void warranties, corrode grind chamber seals, and generate heat that warps PVC pipes. Use enzyme treatments instead.
Why does water back up into the other sink bowl?
The clog is downstream of the tee where the two tailpieces join. The branch drain or trap is blocked. Remove and clean the P-trap first, then snake the branch drain if needed.
Is a humming disposal broken?
A humming motor with no grinding action usually means a jammed flywheel, not a burned motor. Free the flywheel with a hex key before assuming the unit has failed.
When should I replace instead of repair?
Replace if the motor is dead and the unit is over 10 years old, if the housing leaks from the body, or if repair costs exceed half the price of a new 3/4 HP model.
Final Recommendation: Match the Fix to the Failure Mode
Start with the 60-second triage. Listen, look, then act. A humming motor gets the hex key.
A silent unit gets the breaker and reset button check. Two-bowl backup gets the trap cleaning. Dishwasher issues get the knockout plug and air gap inspection.
This diagnostic path saves the average homeowner $200 in unnecessary service calls. Keep a 1/4-inch hex key, slip-joint pliers, and a 25-foot auger under the sink. Run cold water every use.
Grind ice monthly. Skip the chemicals. The disposal will last its full 8 to 15-year lifespan.