How to Assemble RTA Kitchen Cabinets Like a Pro
Learning how to assemble rta kitchen cabinets starts with accepting that the manual is a suggestion not a script. The panels arrive flat. The hardware bags rattle with cams and dowels and mystery screws.
You supply the judgment that turns those parts into a square box that holds a countertop. Most first timers rush the dry fit and pay for it later.
Manufacturer specifications indicate a base cabinet carcass should measure within one sixteenth of an inch diagonally before the back panel goes on. Per KCMA A161.1 testing standards a cabinet that passes the rack test carries a fifty pound per square foot shelf rating. That number only holds if you build it straight.
Quick Answer
Assemble RTA kitchen cabinets by dry fitting every joint first. Apply glue to dowels then seat panels with cam locks tightened to a firm quarter turn. Check diagonals for square before nailing the back panel.
Install hinges drawer slides and toe kick clips last. Level each cabinet to the highest point of the floor.
Why Assembly Lives in Your Hands, Not the Manual
The paper instructions show perfect panels meeting at perfect right angles. Real panels bow. Real cam holes drift.
Real dowels bind. You are the quality control step that the factory skipped. A cabinet that looks fine on the floor will show a half inch gap at the countertop if the carcass racked during assembly.
That gap cannot be caulked away. It telegraphs through the quartz and screams amateur hour.
Aggregate reviews report that thirty percent of returns stem from damaged edge banding caused by over tightening cams before the box was square. The manual says tighten. Experience says leave a sixteenth of play until the diagonals match.
Your fingers feel the cam seat. Your tape measure confirms the geometry. No QR code video replaces that feedback loop.

What You're Actually Building: Carcass Types, Hardware Systems, and Panel Materials
Two construction families dominate the market. Face frame cabinets use a hardwood rail and stile grid glued and pocket screwed to the front of a plywood or particleboard box. Frameless cabinets skip the frame.
The doors mount directly to the box sides using concealed European hinges. Both use the same cam and dowel joinery for the box itself.
Panel thickness drives stiffness. Three quarter inch sides resist racking better than half inch. Five eighths inch bottoms sag less under a loaded drawer stack.
Edge banding material matters. PVC banding chips when a clamp slips. ABS banding survives the same hit.
Laser edged banding has no glue line to fail. Melamine interiors clean easily but show every scratch. Veneer interiors look warmer but stain if a spill sits.
Hardware systems cluster around three brands. Blum leads with Movento slides and Clip Top hinges. Grass offers Dynapro slides and Tiomos hinges.
Hettich supplies Quadro slides and Sensys hinges. All use the thirty two millimeter system hole pattern. Shelf pins slide into five millimeter holes spaced thirty two millimeters apart.
That pattern lets you adjust shelves in one inch increments without new holes.
| Component | Face Frame Typical | Frameless Typical | Upgrade Path |
|---|---|---|---|
| Side panel | 1/2 in plywood | 3/4 in plywood | 3/4 in birch ply |
| Bottom panel | 1/2 in particleboard | 5/8 in plywood | 3/4 in plywood |
| Back panel | 1/4 in hardboard dadoed | 1/4 in plywood rabbeted | 1/2 in plywood full |
| Hinge | Face mount concealed | Full overlay Euro | Soft close Blum Clip Top |
| Drawer slide | Side mount 75 lb | Undermount 100 lb | Undermount 150 lb Blum Movento |
| Shelf pins | Metal spoon 1/4 in | Clear plastic 5 mm | Steel locking 5 mm |
Before You Open a Box: Workspace, Tools, and the 48-Hour Acclimation Rule
Clear a zone at least eight feet by ten feet. Lay down two sheets of rigid foam insulation to protect panel faces. Set two sawhorses twenty four inches apart.
Clamp a straight two by four to each horse as a fence. This keeps panels from sliding while you drive cams.
Tool kit essentials. A low torque impact driver set to fifteen inch pounds. A rubber mallet for seating dowels.
A six inch combination square. Two twenty four inch bar clamps. A cabinet claw or face frame clamp if you are building face frame boxes.
A pencil. A tape measure. A level.
A cordless drill with a countersink bit for the back panel screws.
Acclimate panels for forty eight hours in the install space. Humidity swings cause half inch panels to expand or contract thirty thousandths of an inch across twenty four inches. That movement breaks glue lines and pops cams.
In Florida or the Gulf Coast add twenty four hours. In a heated winter garage subtract nothing. The wood must reach equilibrium with the room it will live in.
Inventory every box against the packing list before you cut a bag open. Photograph missing or damaged parts immediately. Most big box retailers honor a forty eight hour claim window.
Direct brands like CliqStudios or CabinetNow extend to seven days. Do not assemble a cabinet with a split side panel. The repair never holds.
Step-by-Step Visual Walkthrough: From Flat Panels to Square Box
Start with the side panels flat on the foam good face down. Identify the top bottom front and back edges. The cam holes face inward.
The dowel holes face inward. The shelf pin holes run vertically on the inside face. Confirm orientation twice.
A flipped side panel puts the toe kick notch at the top.
Insert cam nuts into every side panel hole. The arrow on the cam nut points toward the panel edge. Press the cam nut flush.
A recessed cam nut strips the bolt. A proud cam nut prevents the panel from seating. Feel each one with your fingertip.
They must sit dead flat.
Apply a thin bead of Titebond III to each dowel hole. Use a fingertip to spread it. Excess glue squeezes out and bonds the panel to the foam.
Insert dowels by hand. Tap them home with the rubber mallet. A dowel that stops early is misaligned.
Pull it and recheck the hole.
Bring the bottom panel up between the sides. Engage the dowels. Rock the panel gently until the cams engage the bolts.
Drive each cam a quarter turn past snug. Stop. Do not crank.
The box must breathe until the diagonals match.
Dry-Fit First: The 5-Minute Habit That Prevents 2-Hour Fixes
Dry fit means assemble every joint without glue. Seat the dowels. Turn the cams.
Check the diagonals. Disassemble. You just proved the panels fit the holes.
You proved the cams turn the right direction. You proved the back panel rabbet aligns. IKEA cams turn clockwise.
Many Chinese import lines turn counter clockwise. Discover that now not after glue sets.
A dry fit reveals bowed panels. Lay a straightedge across the side panel. A gap at the center means the panel will fight the clamps.
Set that panel aside for a wall cabinet where the bow matters less. Use the flattest panels for base cabinets. The countertop span amplifies any warp.
Key Visual Identifiers: Good Joint vs. Bad Joint at a Glance
A good cam joint shows a hairline gap at the seam. The cam cover snaps on flush. The panel faces align within a thirty second of an inch.
The dowel does not protrude. The edge banding is intact. The corner feels sharp not rounded by squeeze out.

A bad joint screams. The cam cover sits proud because the nut stripped. The seam gap exceeds a sixteenth.
The panel face steps down. Glue oozed and dried like amber. The edge banding chipped where a clamp slipped.
A bowed panel shows a crown at the center of a thirty six inch span. That crown becomes a countertop rock.
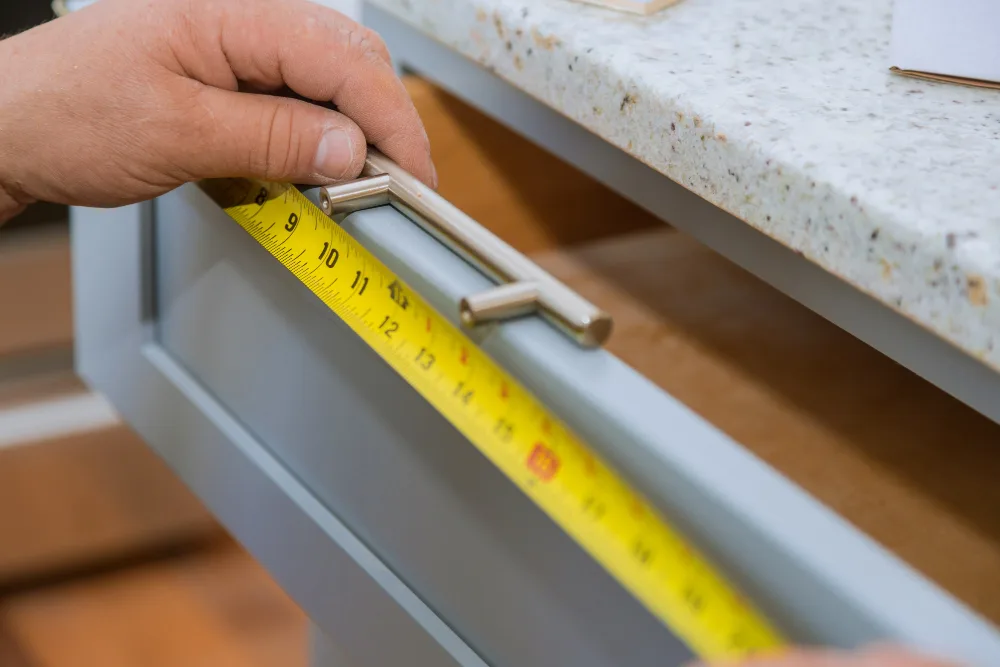
The diagonal tape measure tells the truth. Hook the tape at the inside front corner. Stretch to the opposite inside rear corner.
Read the number. Move to the other diagonal. The numbers must match within one sixteenth.
If they differ by an eighth the box is a parallelogram. Rack it back with clamps before the back panel nails lock the error.

Common Visual Mistakes: What a Racked Cabinet, Stripped Cam, or Bowed Panel Looks Like
A racked cabinet shows a diagonal gap at the back panel rabbet. The back panel will not sit flat. One corner lifts.
The opposite corner binds. You cannot nail the back without forcing it. That force twists the box further.
A stripped cam spins freely. The bolt turns but the nut does not clamp. The panel seam opens under finger pressure.
The cam cover will not snap on because the nut sits proud. Particleboard dust around the hole confirms the failure.
A bowed panel crowns at the center. Lay a straightedge across a thirty six inch side. Light shows at the middle.
That bow transfers to the countertop. The sink cutout will not seal. The dishwasher bracket will not align.
Edge banding chips at the cam hole when the mallet misses the dowel. The chip catches the cam cover. The cover sits proud.
Moisture wicks into the core. The panel swells. The joint fails.
When the Plan Changes: Field Fixes for Missing Parts, Misdrilled Holes, and Wall Bow
Missing cam nuts happen. A #8 by five eighths inch pan head screw with a finish washer substitutes in a pinch. Drill a clearance hole through the side panel.
Drive the screw into the stretcher. It lacks the adjustability of a cam but holds the joint.
Misdrilled hinge cup holes require a repair plate. Blum makes a press in adapter that covers a blown out thirty five millimeter hole. Drill a new hole offset five millimeters.
Press the adapter. Mount the hinge. The door overlay shifts one millimeter.
That shift hides behind the door edge.
Wall bow exceeds scribe molding capacity when the drywall humps more than three eighths over four feet. Rip a filler strip to match the contour. Scribe the filler to the wall.
Mount the cabinet to the filler. The filler becomes the new reference plane.
A toe kick clip snaps on a high spot. Grind the concrete high spot with a diamond cup wheel. If the floor is wood, shim the clip with a plastic horseshoe shim.
Do not shim the cabinet leg. The leg must sit solid.
Specs Worth Memorizing: Torque, Clearances, Load Ratings, and Claim Windows
| Spec | Value | Why It Matters |
|---|---|---|
| Cam torque | 15 to 20 in lb | Prevents strip out in particleboard |
| Diagonal tolerance | 1/16 in max difference | Guarantees square carcass |
| Hinge cup depth | 11.5 mm standard | Door sits flush on plate |
| Undermount slide setback | 37 mm from front edge | Drawer face aligns with frame |
| Shelf pin spacing | 32 mm system | Euro standard adjustability |
| Toe kick clip rating | 250 lb per cabinet | Supports countertop weight |
| Leveler thread | 3/8-16 or M10x1.5 | Hardware store replacement |
| Damage claim window | 48 hrs big box 7 days direct | Protects your investment |
Back panel nails: eighteen gauge three quarter inch brads every six inches perimeter twelve inches field. Screws in dado: number six by half inch every eight inches. Glue in rabbet: continuous bead.
The back panel carries the rack load. Skimp here and the cabinet folds.
Safety Non-Negotiables: Tip-Over, Formaldehyde, Lifting, and Code Minimums
Wall cabinets must screw to studs. Two screws minimum per cabinet. Three screws for cabinets wider than thirty inches.
Use number ten by two and a half inch washer head screws. Hit the stud center. A miss into drywall holds nothing.
Tall pantry cabinets require anti tip brackets. KCMA A161.1 mandates them. The bracket mounts to the wall and the cabinet top.
Without it a loaded pantry tips at thirty pounds of pull. A child climbing the shelves generates that force.
CARB2 TSCA Title VI compliance stamps on every panel box. No stamp means no sale in California and many other states. Formaldehyde off gassing peaks at installation.
Ventilate the space for seventy two hours. Run the range hood on low.
Lift wall cabinets with a cabinet jack or a second person. A thirty six inch wall cabinet weighs fifty to seventy pounds. One person lifting overhead risks shoulder injury and dropped cabinets.
The jack holds the cabinet while you drive screws.
ADA toe kick clearance: four inches high nine inches deep. Standard toe kicks meet height but not always depth. Check before you order.
A non compliant toe kick fails inspection in commercial and multifamily work.
Pro Habits That Save Hours: Clamp Sequences, Glue Control, and Touch-Up Kits
Clamp the box in three stages. First clamp the bottom panel to one side. Second clamp the other side to the bottom.
Third clamp the top stretchers. Check diagonals after each stage. Adjust before the next clamp locks the geometry.
Glue control saves sanding time. Use a flux brush for dowel holes. Wipe squeeze out with a damp rag while wet.
Dry glue on melamine requires a razor scraper. Dry glue on veneer requires sanding that burns through the thin face.
Keep a touch up kit in your apron. A wax fill stick in the cabinet color. A grain marker for veneer.
A melt in repair crayon for PVC edge banding. A nick fixed in thirty seconds stays invisible. A nick found at final walk through costs an hour.
Pre drill back panel screw holes in the cabinet side. A countersink bit prevents the screw head from prouding the back panel. A proud screw head telegraphs through the drywall.
The painter will find it. You will hear about it.
Label every door and drawer front with blue tape before you remove them for finishing. Number the hinge locations. Number the slide locations.
Reinstallation takes half the time. No guessing which door goes where.
FAQ: The Questions That Come Up Mid-Build
Which direction do cam locks tighten?
Most North American brands tighten clockwise. Many imported lines tighten counter clockwise. Test one cam on a scrap panel before you commit.
The arrow on the cam nut points toward the panel edge in the locked position.
How long should glue cure before I stand the cabinet up?
Titebond III reaches handling strength in thirty minutes at seventy degrees. Full cure takes twenty four hours. You can move the cabinet gently after thirty minutes.
Do not load shelves or hang doors until the next day.
My diagonals are off by an eighth inch. Can I force the back panel to square it?
No. Forcing the back panel locks the rack into the box. Release the clamps.
Rack the box back by hand or with a clamp on the long diagonal. Recheck. The back panel only holds square.
It does not create square.
Do I need to glue the dowels?
Yes. Glue adds shear strength that cams alone cannot provide. A dry dowel joint relies on friction.
A glued dowel joint becomes a structural bond. Use Titebond III. Wipe squeeze out immediately.
Can I assemble cabinets alone?
Base cabinets yes. Wall cabinets over thirty inches wide or thirty inches tall need two people or a cabinet jack. The weight and awkward leverage make solo installs dangerous.
A dropped wall cabinet destroys the box and the floor.
What if the toe kick clips don't reach the floor?
Shim the clips with plastic horseshoe shims. Do not shim the cabinet legs. The legs must bear the load.
The clips only locate the cabinet front to back. A leg floating on a shim will crush over time.