Low Kitchen Sink Pressure? Easy Fixes That Work Fast
Low pressure at the kitchen sink turns simple tasks into frustrating waits. You turn the handle and get a trickle instead of a steady stream. Learning how to fix low water pressure in kitchen sink starts with finding where the restriction actually lives.
Most people assume the faucet is broken but the cause is often upstream.
Per EPA WaterSense specifications a kitchen faucet should deliver 1.5 gallons per minute at 60 psi. Anything below that signals a blockage or a supply issue. The diagnostic path below walks you through each branch in order of cost and effort.
Quick Answer
Low kitchen sink pressure usually comes from a clogged aerator or a faulty cartridge. Check hot and cold separately to isolate the problem. Clean the aerator screen first since it solves nearly half of single-faucet cases.
If flow stays weak inspect the cartridge and supply valves. Replace kinked supply lines or adjust the pressure regulator if the whole house runs low.

Image source: Bing (Web (fair-use with source credit))
Why Your Kitchen Sink Pressure Dropped (And How to Tell Where the Problem Lives)
Pressure loss follows a predictable pattern. The water travels from the municipal main or well pump through a pressure regulator then through supply lines to the faucet body. A cartridge or ceramic disc controls flow before water exits through the aerator screen.
A restriction at any point cuts volume. The trick is isolating which point.
Start by asking three questions. Is the low pressure on hot only cold only or both? Is it just the kitchen sink or every fixture in the house?
Did the drop happen suddenly or gradually over months? The answers route you to the right branch. Hot‑only points to the cartridge or the water heater supply.
Cold‑only points to the cold supply line or cartridge. Both sides weak at one faucet means aerator cartridge or supply lines. Whole‑house low pressure means the pressure reducing valve or the municipal supply.
Manufacturer service manuals from Moen Delta and Kohler all recommend the same elimination order. Check the aerator first. Then test supply lines at the faucet connection.
Then inspect the cartridge. Then verify the angle stops. Then check the pressure regulator.
This sequence moves from free and fast to labor‑intensive. Skipping steps wastes time and money.
First Diagnostic: Hot vs Cold Single Faucet vs Whole House
Grab a bucket and a stopwatch. Remove the aerator if it comes off easily. Run hot water for ten seconds.
Measure the volume. Repeat with cold. Compare the two.
A 20 percent difference or more means the problem is downstream of the supply split, usually the cartridge or the faucet body itself. Equal weak flow on both sides means the restriction is upstream, supply lines angle stops or the regulator.
Next check another faucet in the house. The bathroom sink is ideal. If pressure there is strong the issue is isolated to the kitchen.
If pressure is low everywhere the problem is the pressure reducing valve the main shutoff or the incoming supply. Well‑system owners should also check the pressure tank gauge. A reading below the cut‑in pressure means the pump or switch needs attention not the faucet.
Sudden drops often trace to debris from a water heater anode rod or a municipal hydrant flush. Gradual declines usually mean mineral buildup in the aerator or cartridge ports. Hard water regions see this cycle every two to three years.
Knowing the timeline helps you pick the right branch without guessing.
Branch 1: Aerator Clogged — The 5‑Minute Fix That Solves Half the Cases
The aerator is the final filter before water hits the sink. It mixes air with water to shape the stream and limit flow to 1.5 gpm per federal standard. Calcium carbonate and debris catch on the fine mesh screen.
Flow chokes down to a pencil thin trickle. The fix takes a pair of pliers a rag and white vinegar.
Unscrew the aerator counterclockwise. Protect the finish with a rag. If it refuses to turn apply penetrating oil wait five minutes and try again.
Do not force it. A cracked housing means a $15 replacement not a free clean. Once off disassemble the screen flow restrictor and housing.
Soak all parts in vinegar for 30 minutes. Scrub with an old toothbrush. Rinse reassemble and reinstall hand‑tight plus a quarter turn.

Image source: Web (Bing) / chachingqueen.com (Web image (fair-use with source credit))
Test flow with the bucket method. You should see 1.5 gpm or better. If flow stays weak the aerator was not the only restriction.
Move to the next branch. Pro tip: keep a spare aerator key in your toolkit. It fits cache‑style hidden aerators on modern pull‑down faucets from Delta Moen and Kohler.
Standard pliers damage the flats.
Branch 2: Cartridge Failure — When the Faucet Itself Is the Bottleneck
The cartridge is the engine inside the faucet body. It aligns inlet ports with the outlet when you move the handle. Ceramic discs wear out.
Seals crack. Mineral deposits bridge the ports. Single‑handle faucets use one cartridge.
Two‑handle faucets use two, one hot one cold. Pull‑down models add a diverter valve that can stick.
Identify your cartridge before buying. Moen uses the 1225 or 1255 series. Delta uses the RP19804.
Kohler uses the GP1018160. Pfister uses the 974‑042. The model number is stamped on the faucet body or in the installation manual.
Universal pullers work on most but brand‑specific tools grip better and prevent stripped brass.
Shut off both angle stops. Relieve pressure by opening the faucet. Remove the handle set screw usually hidden under a cap.
Pull the handle. Unscrew the retaining nut. Lift the cartridge straight up.
If it resists use the puller. Do not wiggle side to side. That scores the brass bore.

Image source: Web (Bing) / shop.parlos.com (Web image (fair-use with source credit))
Inspect the inlet ports. Soak the cartridge in vinegar if ports are clogged. Blow them clear with compressed air.
Replace if discs are scratched or seals are brittle. Reinstall in reverse order. Torque the retaining nut to manufacturer spec, typically 10 to 15 ft‑lb.
Overtightening cracks the cartridge ears. Test flow. If pressure returns you are done.
If not the supply lines are next.
Branch 3: Supply Valves Not Fully Open — The "I Thought It Was On" Trap
Angle stops under the sink control water to the faucet. Quarter‑turn ball valves show open when the handle runs parallel to the pipe. Multi‑turn compression valves need several full turns counterclockwise.
Both types seize from mineral buildup on the stem. A valve that looks open may be only half open internally.
Check both hot and cold stops. Turn each fully clockwise then fully counterclockwise three times. This breaks loose light scale.
Feel for a positive stop. Quarter‑turn valves should click into the detent. If a handle spins freely the stem is broken.
Replace the valve. If a compression valve weeps from the packing nut tighten it a quarter turn with an adjustable wrench.
Supply lines connect to the angle stops with 3/8‑inch compression nuts. Disconnect the lines at the faucet shanks. Point them into a bucket.
Open each stop fully. Strong flow means the lines and stops are clear. Weak flow means the stop is clogged or the line is kinked.
Reconnect and move to the next branch.
Internal links woven in: When planning faucet access consider cabinet depth clearance for tool swing space. Modern designs often hide stops behind deep drawers. If you are weighing repair versus replacement a full kitchen remodel may shift the budget toward a new faucet with modern ceramic discs.
For tight budgets budget-friendly repairs often start with aerator and cartridge work before supply line replacement. Good cabinet layout planning keeps stops accessible. And modern faucet styles integrate pull‑down hoses with fewer leak points.
External authority: Per EPA WaterSense kitchen faucets must not exceed 2.2 gpm at 60 psi and WaterSense models cap at 1.5 gpm. The IAPMO Uniform Plumbing Code requires pressure regulators when supply pressure exceeds 80 psi.
Branch 4: Kinked or Clogged Supply Lines — The Hidden Restriction
Flexible supply lines run from the angle stops to the faucet shanks. Braided stainless is standard. PEX and copper exist in older installs.
A sharp bend behind the cabinet crushes the inner tube. Flow drops to a trickle. The line looks fine from the front.
The kink hides in the dark.
Disconnect both lines at the faucet. Point them into a bucket. Open the angle stops fully.
Measure flow for ten seconds each. Strong flow means the lines are clear. Weak flow means a kink or internal debris.
Reconnect and test at the faucet. If bucket flow is strong but faucet flow is weak the restriction is in the faucet body or cartridge. If bucket flow is weak the line or stop is the problem.

Image source: Web (Bing) / storage.googleapis.com (Web image (fair-use with source credit))
Replace kinked lines. Do not try to straighten them. The inner liner retains the memory.
A 3/8‑inch OD braided line costs ten dollars. Use two wrenches, one on the fitting one on the nut. Overtightening cracks the faucet shank.
Hand tight plus a half turn seals the compression ring. Turn water on slowly. Check for weeps.
Debris from a failed water heater dip tube can clog supply lines. White or blue particles catch at the faucet inlet screen. Flush lines by disconnecting at the faucet and running water into a bucket.
If debris appears flush until clear. Consider a whole‑house sediment filter if particles return.
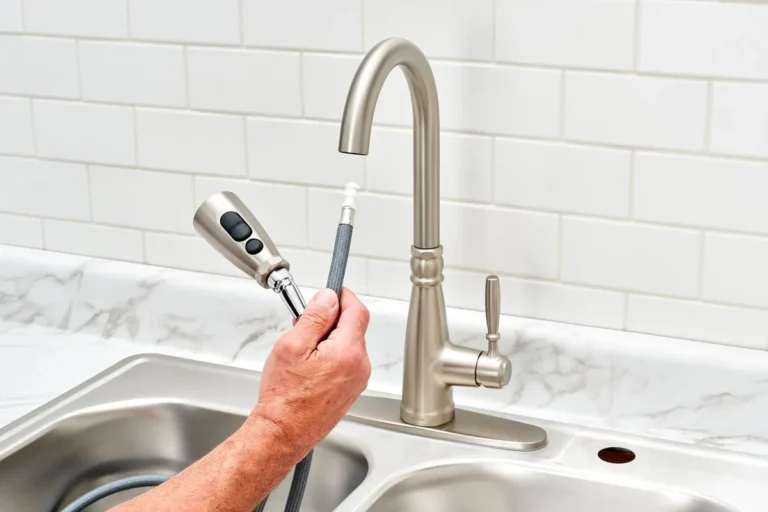
Branch 5: Pull‑Down Hose Check Valve — The Silent Flow Killer
Pull‑down and pull‑out faucets add a weighted hose and a check valve inside the spray head. The check valve prevents backflow when the spray mode is off. Mineral buildup or a broken spring locks the valve shut.
Water trickles from the aerator but the spray mode works fine. This fools many DIYers.
Remove the spray head. Most twist off counterclockwise. Look inside the inlet.
A small plastic or brass check valve sits there. Push the internal plunger with a small screwdriver. It should move freely and spring back.
If it sticks soak the head in vinegar for an hour. If it still sticks replace the spray head. Moen and Kohler heads run thirty to fifty dollars.
Delta heads are similar.
The hose weight under the sink can also bind. If the weight slides too far down it pinches the hose. Reposition it so the hose retracts smoothly.
A binding weight mimics low pressure. Check this before buying parts.
Test flow with the spray head removed. Run water through the bare hose. Strong flow means the faucet and supply are fine.
The problem is the head or hose. Weak flow means the issue is upstream. Go back to the cartridge or supply line branches.
Branch 6: Pressure Reducing Valve — When the Whole House Runs Low
The pressure reducing valve (PRV) sits where the main line enters the house. It is bell shaped with an adjustment bolt on top. Factory setting is usually 50 to 60 psi.
Over time the diaphragm fails. Pressure drops across the board. Sometimes it spikes then drops causing water hammer.
Attach a pressure gauge to a hose bib downstream of the PRV. Open the bib. Read static pressure.
If it reads below 40 psi the PRV may be set too low or failed. Turn the adjustment bolt clockwise a quarter turn. That adds roughly ten psi.
Wait a minute. Recheck. Do not exceed 80 psi.
Code requires a PRV above 80 psi supply.
If adjustment does not raise pressure the PRV is likely failed closed. Debris can also lodge in the seat. A rebuild kit costs twenty dollars.
Full replacement runs one hundred to two hundred dollars plus labor. This is a job for a licensed plumber unless you have sweat or PEX skills.
Well systems use a pressure switch and tank not a PRV. Check the tank air pressure with a tire gauge. It should be two psi below the pump cut‑in pressure.
A waterlogged tank kills pressure. Replace the tank if the bladder is ruptured.
Branch 7: Municipal or Well System Issues — When It's Not in Your House
Call your water department before tearing into pipes. Ask if there is a main break hydrant flush or scheduled maintenance in your zone. Hydrant flushing drops pressure for hours.
A main break can cut it for days. Neighbors with the same issue confirm a supply side problem.
Well owners face different variables. A dropping water table lowers pump output. A worn pump impeller reduces flow.
A faulty pressure switch cycles the pump too fast. Check the pressure gauge on the tank. If it cycles rapidly the switch or tank needs service.
If pressure slowly declines the pump or well screen may be fouled.
Seasonal demand affects municipal systems. Summer lawn watering drops pressure in older districts. Aging galvanized mains restrict flow at peak hours.
If pressure returns late at night the mains are undersized. A booster pump can help but check local codes first. Some municipalities prohibit them.
Document your pressure readings with dates and times. This data helps the utility investigate. It also helps a plumber diagnose if you eventually call one.
Keep a simple log on your phone.
Common Mistakes That Turn a $5 Fix Into a $300 Service Call
Forcing a stuck aerator with channel locks cracks the housing. Use an aerator key or strap wrench. Penetrating oil and patience save the finish.
Buying a universal cartridge puller that does not fit your brand strips the cartridge ears. Get the brand specific tool. It costs twelve dollars and saves the faucet body.
Overtightening supply line nuts cracks the faucet shanks. Hand tight plus a half turn is the rule. Two wrenches prevent twisting the line.
Ignoring the hot versus cold test wastes hours. That single step isolates half the system instantly.
Replacing the faucet without checking the supply lines moves the problem to the new faucet. The kink or clog stays.
Adjusting the PRV without a gauge is guessing. A ten dollar gauge prevents over pressurizing the system. Over pressure bursts supply lines and appliance valves.
Using vinegar on oil rubbed bronze or matte black finishes etches the coating. Check the manufacturer cleaning guide. Mild soap and water is safer for specialty finishes.
Skipping the bucket test at the supply lines leads to replacing good cartridges. Test upstream first.
Forgetting to shut off the water before disassembly floods the cabinet. Always verify stops are closed.
Calling a plumber for a clogged aerator costs the minimum service fee. Clean it first.
Decision Guide: Which Branch Matches Your Symptoms?
Match your observation to the right starting point. Hot only weak → cartridge or water heater supply. Cold only weak → cold supply line or cartridge.
Both weak at kitchen only → aerator then cartridge then supply lines. Whole house low → PRV or municipal supply. Sudden drop after utility work → debris in aerator or lines.
Gradual decline over years → mineral buildup in aerator or cartridge. Pull‑down spray works but stream weak → check valve in spray head. Use the bucket test at the supply lines to confirm upstream versus downstream.
Pro Tips That Save Time, Money, and Knuckle Skin
Keep a spare aerator key and a brand‑specific cartridge puller in your toolbox. They cost twenty dollars combined and prevent stripped parts. Buy braided supply lines with captured nuts, they don't spin off the ferrule.
Label hot and cold lines with tape before disconnecting. Take a photo of the cartridge orientation before removal. Use a magnetic tray for screws.
Apply silicone grease on cartridge O‑rings for easier future removal. Flush lines with the faucet off after any repair to clear debris.
When to Stop DIY and Call a Licensed Plumber
Stop if the PRV needs replacement and you lack sweat or PEX tools. Stop if the main shutoff won't close and you need a curb key. Stop if supply lines are galvanized and corroded, replacement requires pipe threading.
Stop if you suspect a cross‑connection or backflow issue. Stop if pressure spikes above 80 psi after PRV adjustment. A service call costs less than water damage from a blown fitting.
Know your limits.
Frequently Asked Questions
Why is my kitchen sink pressure low but everywhere else is fine?
The restriction is isolated to the kitchen faucet, usually the aerator, cartridge, or supply lines. Follow the branch diagnostics for a single fixture.
Can a bad water heater cause low cold water pressure?
No. The water heater only affects hot water. Cold pressure issues trace to the cold supply line, cartridge, or main supply.
How often should I clean the faucet aerator?
Every 12 to 24 months in hard water areas. Every 3 to 5 years in soft water. Vinegar soak takes 30 minutes.
What pressure should my house have?
45 to 60 psi static per plumbing codes. Above 80 psi requires a pressure reducing valve. Below 40 psi indicates a problem.
Do I need a plumber to replace a cartridge?
Most homeowners can do it with a puller and adjustable wrench. Shut off angle stops first. Match the cartridge exactly.
Why does my pull‑down faucet have good spray but weak stream?
The check valve inside the spray head is stuck. Remove the head, soak in vinegar, or replace the spray head.