How to Fix a Leaky Kitchen Faucet Handle (Step-by-Step)
That steady drip from the kitchen faucet handle wastes water and signals a worn seal inside the valve. Learning how to fix leaky kitchen faucet handle starts with identifying which of the four valve types lives under the handle. Most modern singles use a cartridge or ball valve.
Two-handle models typically run ceramic disc or compression stems. The fix changes completely depending on what you find.
Per EPA WaterSense data a one-drip-per-second leak wastes roughly 3,000 gallons per year. That adds up to real money on the water bill and risks cabinet damage. The repair usually takes under an hour once you have the right part.
Let's walk through the identification and the steps for each valve type.
Quick Answer
Match the valve type under the handle. Buy the exact cartridge or repair kit for that model. Shut off the supply lines.
Remove the handle and retaining hardware. Swap the worn seals or the whole cartridge. Reassemble and test.
Most repairs cost twelve to forty dollars in parts.
Why the Leak Won't Stop Until You Identify the Valve
The handle is just a lever. The real seal lives deeper in the body. A cartridge faucet uses a cylindrical valve with rubber O-rings.
A ball faucet uses a slotted ball with rubber seats and springs. A ceramic disc valve uses two polished plates that shear water off. A compression stem uses a rubber washer pressed against a brass seat.
Each type fails differently. Each type needs a different part. Guessing wastes time and money.
Manufacturers do not standardize stems across brands. A Moen 1225 cartridge will not fit a Delta body. A Kohler ceramic disc will not drop into a Pfister housing.
Even within one brand the hot and cold cartridges can differ. The only reliable path is visual identification followed by exact part matching. That is why the first step is always removing the handle to see what sits underneath.
What You're Looking At: The Four Valve Types in Plain Sight
Cartridge valves show a brass or plastic cylinder with a stem on top. The stem usually has a D-shape or splines for the handle. Ball valves show a metal ball with slots that align with inlet ports.
A plastic cam and packing sit on top of the ball. Ceramic disc valves show a wide flat cartridge with two ceramic plates inside. The stem is often square or rectangular.
Compression stems show a threaded brass rod with a rubber washer at the bottom. You will see a packing nut around the stem.
| Valve Type | Common Brands | Handle Turn | Visual Key |
|---|---|---|---|
| Cartridge | Moen, Kohler, Pfister, American Standard | Quarter turn or full rotation | Cylinder with stem |
| Ball | Delta, Peerless | Quarter turn | Slotted ball under cam |
| Ceramic Disc | Kohler, Grohe, Hansgrohe, premium lines | Quarter turn | Wide flat cartridge |
| Compression | Pre-1990 two-handle | Multiple turns | Threaded stem with washer |
Visual ID Guide: Handle Off, What Do You See?
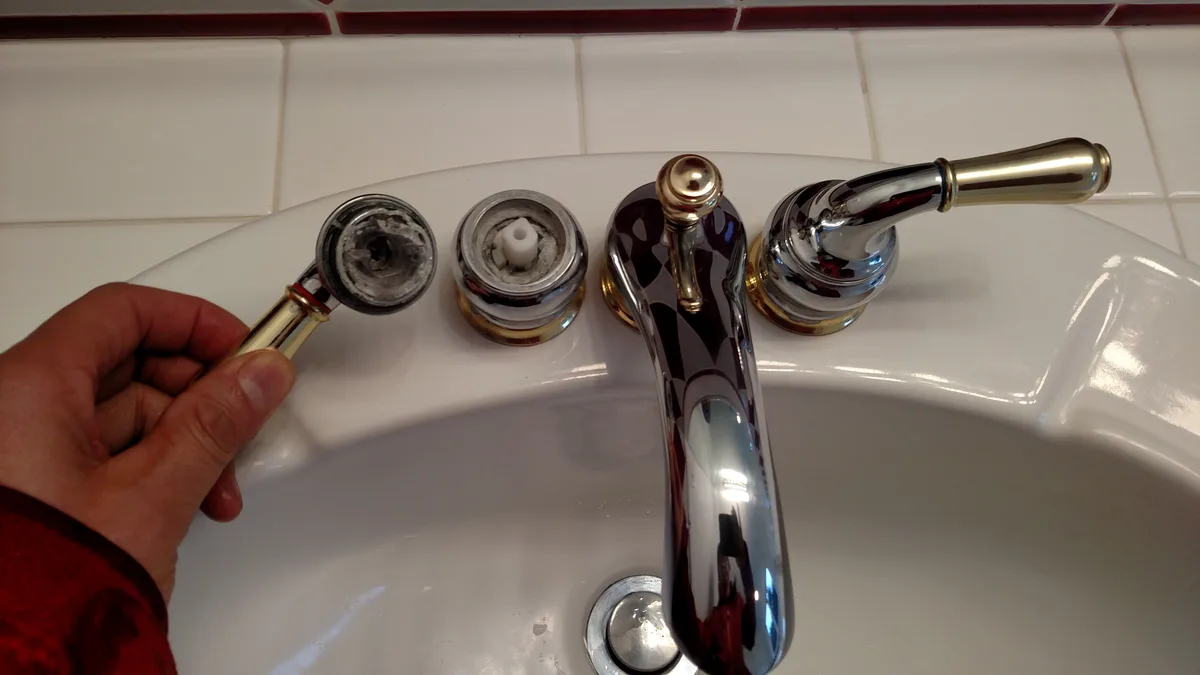
Pop the decorative cap with a plastic spudger. Loosen the set screw two or three turns. Wiggle the handle off.
Shine a light into the opening. If you see a cylinder with a retaining clip or nut it is a cartridge. If you see a dome with two slots and a plastic cam it is a ball.
If you see a wide flat top with a large hex nut it is ceramic disc. If you see a threaded rod with a packing nut it is compression. Take a photo before you touch anything else.
That photo saves you at the supply house.

Most single-handle kitchen faucets sold after 1990 are cartridge or ball. Two-handle models split between ceramic disc and compression. The photo you take becomes your parts counter reference.
Show it to the counter person. They can often match it without the old part in hand.
Cartridge Faucets (Moen, Kohler, Most Modern Singles): Step-by-Step
Shut off the angle stops under the sink. Open the faucet to relieve pressure. Plug the drain.
Remove the handle as described. For Moen pull the retaining clip straight up with needle-nose pliers. For Kohler and others unscrew the retaining nut with an adjustable wrench.
Grip the cartridge stem with channel-locks or use a cartridge puller. Pull straight out. Do not tilt.
Note the orientation of the ears or tabs. That orientation controls hot and cold alignment.

Take the old cartridge to the store. Match length stem shape port positions and hot-cold markings. Buy the brass version if available.
Plastic cartridges cost less but wear faster in hard water. Lubricate the new O-rings with silicone grease. Do not use petroleum plumber's grease.
It attacks EPDM rubber. Insert the new cartridge in the exact same orientation. Seat it fully.
Reinstall the clip or nut. Torque the nut hand-tight plus a quarter turn. Reattach the handle.
Slowly open the angle stops. Check for leaks at the handle base and spout. Cycle hot and cold five times.
Ball Faucets (Delta, Older Peerless): Step-by-Step
Shut off the angle stops and relieve pressure. Remove the handle. You will see a chrome cam with a slot and a plastic packing ring.
Lift the cam off. The ball sits underneath with two rubber seats and springs in the inlet ports. Use a small pick to pull the seats and springs out.
Inspect the ball for scoring or mineral buildup. If the ball is damaged replace the whole ball assembly. If it looks clean just replace the seats springs and cam packing.
Delta RP70 ball assemblies cost around fifteen dollars. The RP19804 cam and packing kit runs eight dollars. Seats and springs come in a two-pack for five dollars.
Buy the genuine Delta parts. Aftermarket seats often sit too high or too low causing a persistent drip. Reinstall the new springs seats ball cam and packing in that order.
The cam slot must face the handle opening. Tighten the adjusting ring with the Delta wrench until the handle moves smoothly without play. Reattach the handle.
Test for leaks.
Ceramic Disc Faucets (Kohler, Grohe, Premium Brands): Step-by-Step
Ceramic discs rarely wear out. The leak usually comes from debris between the plates or a failed O-ring on the cartridge body. Shut off the water.
Remove the handle. You will see a large hex nut holding the cartridge. Unscrew it with a thirty-millimeter or inch-and-three-sixteenths socket.
Lift the cartridge straight up. Check the bottom O-rings. If they are cracked or flattened replace the O-ring kit.
Flush the faucet body by briefly opening the angle stops with a bucket under the cartridge hole. That clears grit.
Kohler GP77759 cartridges run thirty-five dollars. Grohe cartridges are often forty to sixty dollars. Before buying a new cartridge try the O-ring kit first.
It costs twelve dollars and fixes eighty percent of ceramic disc leaks. If the plates are scratched you need the full cartridge. Reinstall with fresh silicone grease on the O-rings.
Torque the hex nut to fifteen foot-pounds. Reattach the handle. Test.
Compression Faucets (Pre-1990, Two-Handle): Step-by-Step
These use a threaded stem with a rubber washer at the bottom. Shut off the water. Remove the handle.
Unscrew the packing nut with an adjustable wrench. Unscrew the stem by turning it counterclockwise. At the bottom of the stem you will see a screw holding a rubber washer.
Remove the screw. Replace the washer with the exact same size. Check the brass seat inside the faucet body.
If it is pitted use a seat wrench to remove it and install a new seat. Reassemble in reverse order. Do not overtighten the packing nut.
Just snug it until the stem turns freely without wobble.
Compression stems are becoming hard to find. Many hardware stores only carry universal kits. Match the thread count and stem length carefully.
A mismatched stem will not seal. If the faucet body is corroded or the finish is peeling replace the whole faucet. Parts for a repair run twenty dollars.
A new two-handle kitchen faucet starts around one hundred dollars.
The Parts Run: What to Take to the Store and What to Leave Behind
Take the old cartridge or stem. Take a photo of the valve body with the handle off. Note the brand name on the faucet base or spout.
Write down the model number if you can find it. Leave the handle and decorative cap at home unless they are broken. Do not buy a universal kit unless you cannot find the OEM part.
Universal cartridges often have loose tolerances that leak within months.

Moen 1225 brass cartridge twenty-eight dollars. Delta RP19804 cam packing kit eighteen dollars. Kohler GP77759 ceramic disc cartridge thirty-five dollars.
Generic cartridge twelve to fifteen dollars. O-ring kit eight to twelve dollars. Seat wrench six dollars.
Cartridge puller twelve dollars. Silicone grease tube four dollars. New supply lines five dollars a pair.
Budget forty to sixty dollars for a complete solo repair with tools.
Common Visual Mistakes That Cost You a Second Trip
Installing the cartridge rotated one hundred eighty degrees. The hot and cold ports swap. The handle will give you cold when you want hot.
Forgetting the retaining clip on a Moen. The cartridge blows out under pressure. Overtightening the ceramic disc hex nut.
You crack the cartridge body. Using petroleum grease on EPDM O-rings. They swell and fail in weeks.
Reusing old supply line ferrules. They weep at the compression nut. Buying a plastic cartridge for a hard water home.
It scores in two years. Brass lasts three times longer. Take the time to match the part exactly.
A second trip to the store adds an hour and frustration.
Pro Cues: What a Plumber Sees That You Miss
A pro checks the faucet body for hairline cracks before ordering parts. A cracked body will leak no matter what cartridge you install. They also test the angle stops for full shutoff.
If a stop weeps they replace it before touching the valve. That prevents a mid-repair flood. They carry a cartridge puller for every major brand.
Without it a stuck cartridge can add an hour of wrestling. They lubricate every O-ring with silicone grease. Dry O-rings tear on installation and leak immediately.
They torque retaining nuts to spec. Hand tight plus a quarter turn is the rule for most cartridges. Overtightening distorts the seal.
They also verify handle rotation after reassembly. Hot must be on the left per code. If it is reversed they rotate the cartridge one eighty degrees.
Real Costs: Cartridge vs Kit vs Pro Call vs New Faucet
| Repair Path | Parts Cost | Time | Pro Labor | Total if Pro |
|---|---|---|---|---|
| Cartridge only | $12–$40 | 45 min | $150–$225 | $162–$265 |
| Ball repair kit | $8–$12 | 60 min | $150–$225 | $158–$237 |
| Ceramic disc O-rings | $8–$12 | 30 min | $150–$225 | $158–$237 |
| Full faucet replace | $100–$300 | 2 hr | $200–$350 | $300–$650 |
A solo repair saves the labor entirely. The highest solo cost is a premium ceramic disc cartridge at forty dollars. A plumber minimum charge covers the first hour.
Most kitchen faucet repairs finish in under an hour. If the faucet is over twenty years old and the finish is failing a new faucet makes more sense. You get a modern cartridge and a fresh warranty.
When the Shutoff Fails: Plan B Before You're Wet
Turn the angle stop clockwise. If water keeps flowing the stop is shot. Do not force it.
You can snap the stem and flood the cabinet. Close the main house valve instead. It is usually near the water meter or where the line enters the house.
Open the faucet to drain residual pressure. Now you can work safely. If the main valve also fails call the city water department.
They have a curb key to shut off at the street. That is a last resort. After the repair replace the bad angle stop.
A quarter-turn ball stop costs ten dollars and lasts decades. Multi-turn compression stops fail more often. Upgrade both hot and cold while the lines are off.
Maintenance That Actually Prevents the Next Leak
Flush the faucet once a year. Remove the aerator and run hot then cold for thirty seconds. That clears grit that scores ceramic plates and cartridge bores.
In hard water areas install a point-of-use softener or a whole-house system. Hard water minerals are the number one cause of premature seal failure. Check the angle stops every six months.
Turn them off and on to keep the stems from seizing. A seized stop becomes a future emergency. Replace supply lines every ten years.
The inner hose degrades and can burst. Use braided stainless lines with captured ferrules. They resist kinks and corrosion.
A little prevention avoids a weekend repair.
FAQ: Stripped Screws, Reversed Handles, Weeping Angle Stops
What if the set screw is stripped?
Use a screw extractor bit or cut a slot with a rotary tool for a flathead driver. Heat the screw with a soldering iron for ten seconds to break corrosion. Penetrating oil helps.
If the screw head snaps drill it out carefully.
Why is hot on the right after reassembly?
The cartridge is rotated one hundred eighty degrees. Remove the handle and retaining hardware. Pull the cartridge rotate it half a turn and reinstall.
Some cartridges have a hot-cold indicator tab. Align it with the marking on the body.
The angle stop weeps after I close it.
The stop seat is worn. Tighten the packing nut a quarter turn. If it still weeps replace the stop.
Do not overtighten the packing nut. You can crack the valve body.
Can I reuse the old supply lines?
Not recommended. Old ferrules deform and leak. New lines cost five dollars a pair.
Replace them every time you open the connection.
How do I know if the faucet body is cracked?
Dry the area completely. Pressurize the system. Watch for water seeping from the casting not the connections.
A flashlight and a mirror help. If the body is cracked replace the faucet.
Repair or Replace: The 20-Year / Corrosion / Finish Rule
If the faucet body shows green crust at the base or the finish is flaking replace the whole unit. A twenty-year-old casting has microscopic stress fractures that will leak again. Corrosion inside the ports cannot be cleaned out.
It will score a new cartridge in weeks. Peeling finish means the protective coating has failed. Water gets under it and lifts more finish.
That looks bad and traps moisture against the countertop.
A new kitchen faucet with a modern ceramic disc valve costs one hundred to three hundred dollars. Installation takes two hours solo. You get a fresh warranty and current water-sense flow rates.
The math favors replacement when the repair parts plus your time exceed half the cost of a new faucet. That threshold hits around forty dollars in parts for most homes. If you are already buying a cartridge puller and supply lines the scale tips toward new.