
How to Choose the Perfect Kitchen Faucet: A Complete Guide
Choosing a kitchen faucet starts with your sink, not the finish aisle. The hole count, spacing, and bowl depth decide which models even fit. Ignore that and you buy twice.
This guide walks through how to choose a kitchen faucet without the guesswork.
Standard sinks come in four hole patterns and three common bowl depths. Manufacturer specs list spout reach in inches but rarely explain how that maps to your drain. We’ll cover the three measurements that prevent returns and the body types that match each layout.
Quick Answer
Match faucet holes to your sink holes. Measure spout reach to your drain center. Check spout height against cabinet clearance.
Pick a sprayer style that fits your bowl depth. Choose a ceramic disc cartridge for longevity.
Why Your Sink Dictates the Faucet (Not the Other Way Around)
Your sink is the fixed variable. The faucet must adapt. A single-hole faucet cannot cover a three-hole cutout without a deck plate.
A widespread body needs eight inches between outer holes. A four-hole sink expects a side spray. Buying the faucet first forces compromises, extra holes left exposed, a sprayer with nowhere to mount, or a spout that misses the bowl entirely.
Retrofit projects are the most common scenario. You keep the existing sink and countertop. That means the hole pattern is already drilled.
The countertop thickness is already set. The cabinet height above the deck is already fixed. Every faucet spec sheet lists maximum deck thickness.
Most allow up to two and a half inches. Thicker stone or stacked edges can exceed that limit. Check before you order.
New construction gives you control. You specify the sink and faucet together. That lets you match a single-hole faucet to a single-hole sink.
Or plan an eight-inch widespread set with a matching soap dispenser. The key is deciding the pairing before the countertop fabricator cuts the stone. Once the holes are drilled the options shrink fast.
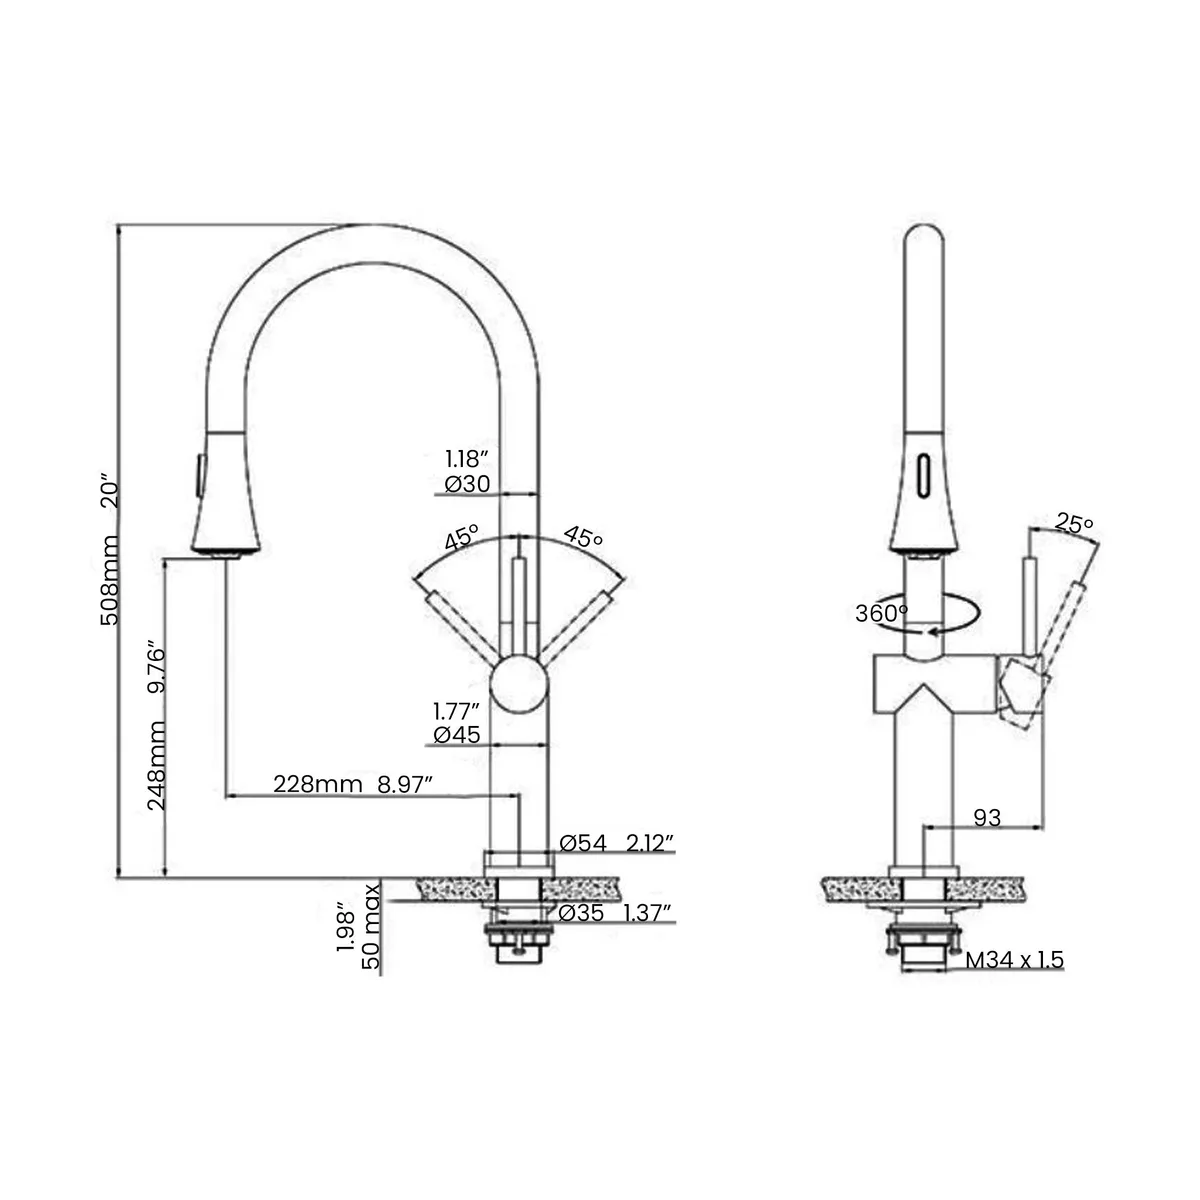
Image source: Web (Bing) / fity.club (Web image (fair-use with source credit))
The 3 Measurements That Prevent Costly Returns
Three numbers determine fit. Miss one and the faucet sits wrong or hits the cabinet. First is spout reach.
Measure from the center of the faucet base to the center of the drain. That distance is your target reach. Most standard sinks need eight to ten inches.
Large single bowls often need ten to twelve inches. A short spout drops water on the rim. A long one wastes counter space.
Second is spout height. Measure from the deck to the highest point of the faucet. Add at least one inch for clearance.
Compare that to the distance from your countertop to the bottom of the upper cabinet. High-arc goosenecks can stand sixteen inches tall. Spring-spout commercial styles go higher.
If your cabinets sit eighteen inches above the counter a sixteen-inch faucet leaves only two inches of gap. That is tight for cleaning and risky for steam damage.
Third is hole spacing. Use a tape measure across the center of the outer holes. Four inches means centerset.
Eight inches means widespread. Single hole is obvious. Four holes means side spray.
Write these three numbers down. Carry them to the store or keep them open while you browse. Every product page lists them in the specifications table.
Faucet Body Types: Match the Hardware to Your Holes
Single-hole faucets are the most versatile. They install in one hole and often include a deck plate to cover three-hole sinks. The plate hides the extra openings cleanly.
This is the default choice for most retrofits. One handle controls both temperature and flow. The footprint stays small.
That matters on tight counters or shallow sinks.
Centerset bodies fit four-inch hole spacing. The handles and spout share a single base plate. They look compact and traditional.
Installation is straightforward. The limitation is fixed spacing. You cannot adjust the handle spread.
If your sink holes are slightly off four inches the base plate may not cover cleanly.
Widespread bodies use three separate pieces. The spout and two handles mount independently. They require eight-inch center-to-center spacing.
This style suits larger sinks and traditional designs. The handles can be placed wider for easier access. Installation takes longer because each piece seals separately.
Flex supply lines connect the handles to the spout beneath the deck.
Four-hole configurations add a side spray. The fourth hole sits to the side of the main cluster. The side spray connects via a dedicated hose.
This layout is common on older sinks. Modern pull-down heads have largely replaced side sprays. If you prefer a separate spray this is your only factory option.
Otherwise cap the extra hole with a matching plug or soap dispenser.
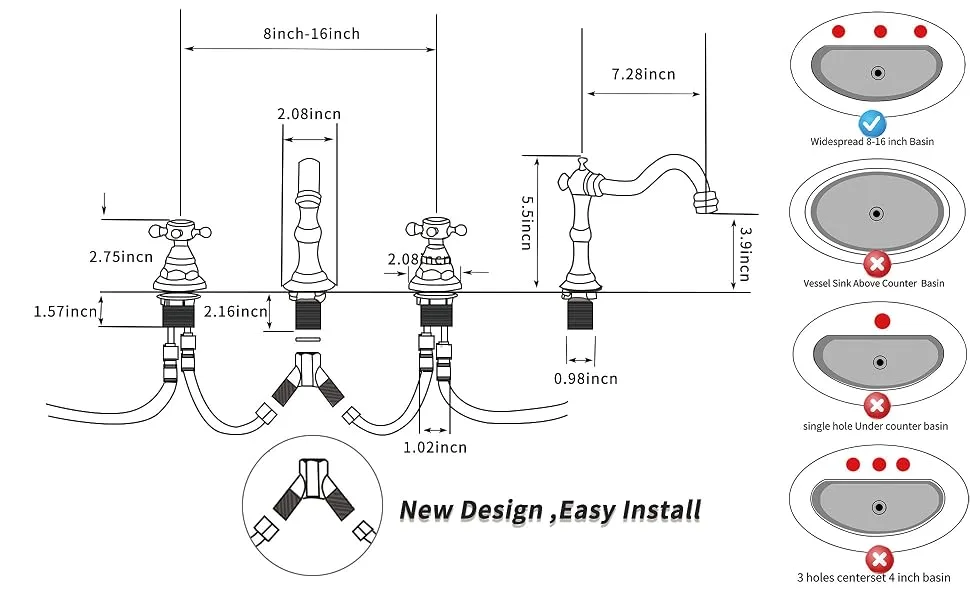
Image source: Web (Bing) / amazon.ca (Web image (fair-use with source credit))
Sprayer Showdown: Pull-Down vs. Pull-Out vs. Side Spray
Pull-down heads dominate the market. The spray head docks into the spout. A magnetic catch holds it firm.
The hose retracts through the spout body. Typical hose length is twenty to twenty-four inches. That reaches the far corner of a standard double bowl.
The high arc clears stock pots. The spray pattern switches between stream and spray with a thumb button. Some add a pause function or a wide sweep blade for sheet pans.
Pull-out heads extend forward on a longer hose. Forty-eight to sixty inches is common. The spout sits lower.
The head pulls straight out toward you. This works well on shallow sinks or wide single bowls where a high arc would splash. The longer hose reaches a second prep sink or a countertop container.
The tradeoff is a lower profile that may not clear tall pots.
Side sprays mount in a separate hole. They operate independently from the main spout. A diverter valve switches flow from spout to spray.
This keeps the main spout clean and simple. The spray head sits on a cradle. Hose length varies.
Side sprays are common on four-hole widespread sets. They add a second control point. Some cooks prefer the dedicated grip.
Others find the extra hole cluttered.

Image source: Web (Bing) / faucetsavvy.com (Web image (fair-use with source credit))
Spout Geometry: Reach, Height, and the Cabinet Clearance Trap
Spout reach is measured from the center of the base to the center of the aerator. That line should land near the drain. If the water hits the front rim you get splash back.
If it lands behind the drain you waste bowl space. Most manufacturers list reach in the spec sheet. Compare it to your sink measurement.
A half inch variance is fine. More than an inch off center causes daily annoyance.
Spout height is the vertical distance from the deck to the highest point. High-arc goosenecks range from twelve to sixteen inches. Commercial spring spouts can exceed twenty inches.
Low-profile pull-outs sit around eight to ten inches. The height must clear your largest cookware. It must also clear the upper cabinet.
The National Kitchen and Bath Association recommends at least one inch of air gap. Two inches is better for cleaning access.
Swivel range matters too. One hundred ten degrees is minimal. One hundred forty degrees covers most double bowls.
Three hundred sixty degrees spins fully. That is useful on island sinks or single bowls where you want to direct flow anywhere. Check the spec.
Some high-arc models limit swing to avoid hitting the backsplash. That can be a surprise after install.
Cabinet depth affects clearance more than height. Standard upper cabinets are twelve inches deep. The faucet base sits roughly two inches from the backsplash.
A sixteen-inch faucet leans forward. The top of the arc may sit only inches from the cabinet face. Open the cabinet doors.
Measure from the deck to the cabinet bottom. Subtract one inch. That is your max spout height.
If the faucet exceeds it you either raise the cabinets or choose a lower profile.

Image source: Web (Bing) / assist.kohler.com (Web image (fair-use with source credit))
Handle Configurations: Single, Double, Touchless, or Touch
Single-handle faucets dominate for good reason. One lever controls both volume and temperature. The motion feels intuitive, lift for flow, pivot for heat.
Most models use a 35 mm or 40 mm ceramic disc cartridge. That size handles high flow without stiffness. The compact base fits single-hole sinks cleanly.
ADA compliance is standard on reputable brands. The lever requires less than five pounds of force.
Double-handle faucets split hot and cold. Each handle turns a quarter turn or full rotation depending on cartridge type. Quarter-turn ceramic discs are smooth.
Compression stems with rubber washers drip eventually. The widespread layout spaces handles eight inches apart. That helps users with limited grip strength.
Temperature memory stays set between uses. The tradeoff is two holes minimum and more countertop clutter.
Touchless models use an infrared sensor near the spout base. Wave a hand to start flow. Wave again to stop.
Power comes from four AA batteries or an AC adapter with a wall outlet under the sink. Battery life runs one to two years. A solenoid valve controls water.
If the solenoid fails the faucet runs continuously or not at all. Most brands cover electronics for five years. The faucet body still has a manual handle for backup.
Touch-activated faucets respond to contact anywhere on the spout or handle. Tap with a wrist or forearm. No sensor window to clean.
The technology uses capacitive sensing. It ignores accidental brushes from a sponge. Delta calls it Touch2O.
Moen uses MotionSense Wave. Both keep a mechanical handle for precise control. Power is battery only.
No AC option. The electronics add cost but reduce handle grime, helpful when handling raw chicken.
Which fits best? Single-handle for simplicity and retrofits. Double-handle for traditional looks and precise temp memory.
Touchless for hygiene and full hands. Touch-activated for a middle ground with fewer failure points. Renters and flippers should stick with single-handle mechanical.
It survives abuse and costs less to replace.
Finish Durability: What Actually Holds Up in Your Water
Chrome is the baseline. It electroplates over nickel over brass. The surface resists corrosion but shows every water spot and fingerprint.
Hard water builds mineral film fast. Wipe it daily or accept the haze. Chrome never fades.
It scratches if scrubbed with abrasive pads. Lifetime warranty covers peeling not wear.
Brushed nickel and stainless hide spots better. The brushed texture diffuses light. Fingerprints vanish.
The PVD (physical vapor deposition) process bonds the finish at molecular level. It resists scratches, tarnish, and cleaning chemicals. Moen Spot Resist and Delta Brilliance are marketing names for PVD.
Expect ten plus years without degradation. Unlacquered brass is different, it patinas intentionally. No warranty on color change.
Matte black exploded in popularity. Most use a powder coat or epoxy over brass. Quality varies wildly.
Cheap coats chip at the aerator and handle base. Premium brands apply multi-layer PVD black. That survives scrubbing.
Check the warranty language. "Finish warranty" on black often excludes scratches. Read the fine print before committing.
Oil-rubbed bronze is a living finish. The dark copper base wears to highlight high points. No two faucets age alike.
Some owners love the patina. Others hate the inconsistency. Clean with water only.
Wax occasionally if you want to slow the change. Avoid harsh cleaners. They strip the protective oil layer.
Polished nickel sits between chrome and brass. Warm tone. Mirror shine.
It shows spots like chrome. PVD versions exist but are rare. Unlacquered polished nickel patinas like brass.
Lacquered holds shine but can peel at stress points. Less common in big-box stores. Specialty showrooms carry more options.
Hard water regions should prioritize PVD finishes. The mineral buildup wipes off without etching. Soft water areas can choose any finish.
Coastal climates with salt air need marine-grade PVD or 316 stainless. Standard brass corrodes at the threads. Galvanic corrosion appears where dissimilar metals meet, supply lines, aerator, handle setscrews.
Cartridge & Valve Quality: The Part Nobody Checks Until It Leaks
The cartridge is the heart. Ceramic disc cartridges use two polished ceramic plates. One rotates against the other.
Water passes when ports align. No rubber washers to wear. No metal seats to corrode.
ASME A112.18.1 requires 500,000 cycles minimum. Quality brands test to one million. That equals twenty years of twenty uses per day.
Diameter matters. 35 mm is standard residential. 40 mm handles higher flow and pressure spikes. Commercial lines use 40 mm or larger. A larger cartridge spreads force over more surface area.
It resists grit damage better. If your municipal pressure exceeds 80 psi ask for 40 mm. Most homes run 45 to 60 psi. 35 mm is fine there.
Diamond Seal Technology (Delta) embeds diamond particles in the ceramic. It reduces friction and resists mineral scoring. Pforever Seal (Pfister) uses a similar ceramic coating.
Both extend life in hard water. Independent lab tests confirm lower torque after accelerated aging. The difference shows at year five not year one.
Cartridge replaceability separates brands. Delta, Moen, Kohler, Pfister, Grohe all sell cartridges separately. Off-brands often seal the cartridge inside the body.
When it fails you replace the faucet. Check the parts diagram before buying. A $15 cartridge beats a $300 faucet swap.
Lifetime warranty only helps if the company still exists and stocks the part.
Pressure balance and thermostatic cartridges belong in showers not kitchen faucets. Kitchen valves are simple on/off mixing. Some commercial pre-rinse units use a ceramic mixing cartridge with check valves.
That prevents cross-flow in high-pressure systems. Residential kitchens don't need it. Don't pay for shower tech in a sink faucet.
Budget Tiers: What $150 vs. $400 vs. $800 Actually Gets You
Entry tier ($50 to $150) covers basic function. Single-handle pull-down. Chrome or brushed nickel. 35 mm ceramic disc.
Plastic spray head. Braided supply lines included. Deck plate often sold separately.
Warranty: five years finish, lifetime cartridge. Fit tolerance is looser. Handle wobble appears at year two.
Spray head dock relies on weight not magnet. Good for rentals and flips.
Mid tier ($150 to $350) is the sweet spot. Magnetic docking standard. Metal spray head.
PVD finish options. 35 mm or 40 mm cartridge. Better hose flexibility. Supply lines pre-attached on some models.
Deck plate in box. Lifetime finish and cartridge warranty. Handle feel is tight.
Spray modes include pause and sweep. Brands: Delta Essa, Moen Align, Pfister Ladera, Kohler Simplice.
Premium tier ($350 to $700) adds refinement. 40 mm cartridge standard. Solid brass body. Touchless or touch option.
Commercial spring spout available. Hose management system (Moen Reflex, Kohler DockNetik). Finish warranty covers corrosion.
Spray head ergonomics improve. Temperature limit stop adjustable. Installation features: tool-less hose connect, pre-set handle limits.
Luxury tier ($700 to $1,500+) buys design and materials. Unlacquered brass, polished nickel, custom colors. Bridge faucets.
Wall-mount rough-in included. Thermostatic mixing on some models. German cartridges (Kerox, Sedal).
Hand-assembled. Ten-year electronics warranty. Concierge support.
Brands: Brizo, Rohl, Blanco, Dornbracht. Not better function, better finish, weight, and status.
Diminishing returns hit hard above $400. A $250 faucet lasts fifteen years. A $800 faucet lasts twenty.
The $550 difference buys aesthetics. If you remodel every decade the mid tier wins. If this is your forever kitchen and you hate the look of mid-range the premium tier pays in satisfaction.
Never buy entry tier for a primary kitchen. The hassle cost exceeds the savings.
| Tier | Price Range | Cartridge | Finish | Docking | Best For |
|---|---|---|---|---|---|
| Entry | $50–150 | 35 mm ceramic | Chrome / basic brushed | Weight return | Rentals, flips, secondary sinks |
| Mid | $150–350 | 35–40 mm ceramic | PVD options | Magnetic | Primary kitchen, best value |
| Premium | $350–700 | 40 mm ceramic / Diamond Seal | PVD standard | Magnetic + hose management | Forever homes, heavy cooks |
| Luxury | $700+ | 40 mm+ German ceramic | Custom / unlacquered | Magnetic premium | Design-driven remodels |
Installation Reality Check: DIY-Friendly vs. Call-a-Pro Signs
Most single-hole faucets install in under an hour. You need a basin wrench, adjustable wrench, and plumber's putty or silicone. Shut off angle stops.
Disconnect supply lines. Remove old faucet. Clean the deck.
Set new faucet with gasket. Tighten mounting nuts from below. Connect supply lines hand-tight plus a quarter turn.
Flush lines. Done.
Three-hole widespread adds complexity. Three separate pieces mount independently. Flex lines connect handles to spout under the deck.
Aligning handles perfectly straight takes patience. The spout base must sit flat. Any tilt leaks.
Allow two hours. A second pair of hands helps hold pieces while you tighten below.
Wall-mount faucets require rough-in inside the wall. The valve body sits behind the tile or backsplash. Supply lines connect to 1/2 inch copper or PEX stub-outs.
The trim mounts later. This is not a retrofit job. It belongs in a gut remodel.
Hire a plumber for the rough-in. You can mount the trim yourself later.
Touchless and touch-activated need power. Battery pack mounts under the sink. AC adapter needs a GFCI outlet within six feet.
Code often requires a dedicated circuit for the adapter. If no outlet exists an electrician must add one. The solenoid valve adds a connection point.
More parts more potential leaks. Budget extra time.
Red flags that mean call a pro: corroded angle stops that won't shut off, supply lines fused to old faucet, countertop stone thicker than faucet max deck thickness, cabinet too shallow for mounting nuts, no access to rear mounting holes, lead supply pipes, galvanized plumbing. Any of these turn a one-hour job into a day of surprises. The $150 service call saves water damage.
Tools checklist: basin wrench (long handle reaches up behind sink), 10 inch adjustable wrench, channel locks, plumber's putty, 100% silicone caulk, flashlight, bucket, towels, supply line extensions if needed. Buy braided stainless lines in 16 or 20 inch lengths. The included 12 inch lines often fall short.
Common Fit Mistakes You Can Spot Before You Buy
Buying a single-hole faucet for a three-hole sink without checking deck plate inclusion. The plate often ships separately. Verify it in the box contents list.
Assuming pull-down reach equals spout reach. The spray head adds two to three inches. Measure from base to spray tip not aerator.
Ignoring handle swing clearance. Lever arcs can hit backsplash or window trim. Check the spec sheet for handle rotation radius.
Overlooking supply line length. Included lines are often twelve inches. Measure from angle stop to faucet inlet.
Buy twenty-inch braided lines if needed. Forgetting countertop thickness. Thick stone or concrete exceeds max deck thickness on many models.
Confirm the limit before ordering.
Quick-Reference Spec Sheet for Your Shopping Trip
Print this table. Fill in your numbers. Carry it to the store or keep it open while browsing.
| Spec | Your Measurement | Target Range | Notes |
|---|---|---|---|
| Hole count | 1 / 3 / 4 | Count visible holes | |
| Hole spacing | 4" or 8" | Center to center outer holes | |
| Spout reach needed | 8–12" | Base center to drain center | |
| Max spout height | Cabinet height minus 1" | Deck to cabinet bottom | |
| Countertop thickness | ≤2.5" typical | Check faucet max deck spec | |
| Supply line length | 16–20" | Angle stop to inlet | |
| Preferred sprayer | Pull-down / pull-out / side | Match bowl depth | |
| Finish priority | PVD / chrome / living | Match water hardness | |
| Cartridge | 35 mm or 40 mm ceramic | 40 mm if pressure >80 psi | |
| Budget tier | Mid $150–350 best value | Entry only for rentals |
Frequently Asked Questions
How many holes does my kitchen sink have?
Count the visible openings in the deck. One hole means single-hole. Three holes spaced four inches apart means centerset.
Three holes spaced eight inches apart means widespread. Four holes means side spray configuration.
What spout reach do I need for a standard double bowl sink?
Measure from the faucet base center to the drain center. Most standard double bowls need eight to ten inches. Large single bowls often need ten to twelve inches.
Can I install a single-hole faucet on a three-hole sink?
Yes if the faucet includes a deck plate. The plate covers the extra holes. Check the product details.
Some brands sell the plate separately.
What is the difference between pull-down and pull-out sprayers?
Pull-down heads dock in the spout with a shorter hose (20, 24"). Pull-out heads extend forward on a longer hose (48, 60") with a lower spout profile.
Do touchless faucets work without batteries?
Most require four AA batteries. Some offer an AC adapter that needs a GFCI outlet under the sink. The manual handle works as backup if power fails.
Which finish hides water spots best?
Brushed nickel and stainless with PVD coating hide spots. Matte black PVD also resists visible mineral buildup. Chrome shows every spot.


