How to Fix a Loose Kitchen Faucet in 5 Easy Steps
A loose kitchen faucet wastes water and damages cabinets. Learning how to fix a loose kitchen faucet starts with identifying which part moves. The handle, base, and spout each fail for different reasons.
A single fix does not cover all three.
Per ASME A112.18.1 testing a faucet base should not shift more than 1/16 inch under normal use. Most wobbles trace to a loose mounting nut or a stripped set screw. The repair takes 30 to 90 minutes with basic tools.
Quick Answer
Tighten the mounting nut under the sink to fix a loose base. Remove the handle cap and tighten the set screw to fix a loose handle. Replace the spout O-rings to fix a loose spout.
Shut off water first. Protect the finish with tape.
Why You Need to See It to Fix It
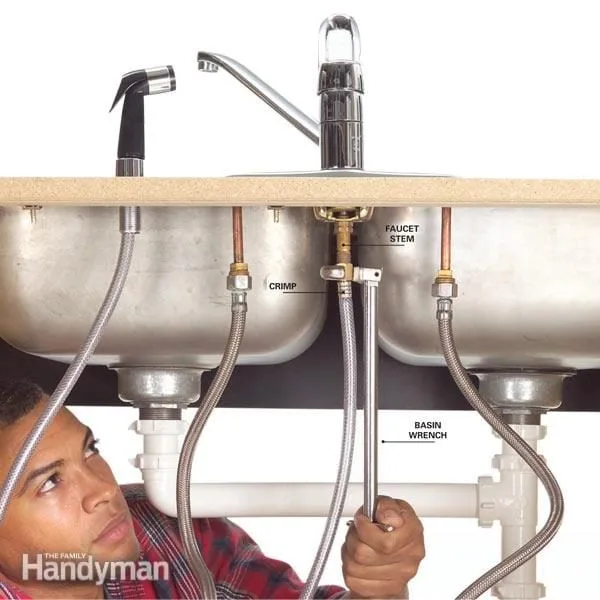
Text describes parts. Photos show where they live. A mounting nut hides behind supply lines and a disposal unit.
A set screw hides under a decorative cap. A spout O-ring sits inside a hub you cannot see.
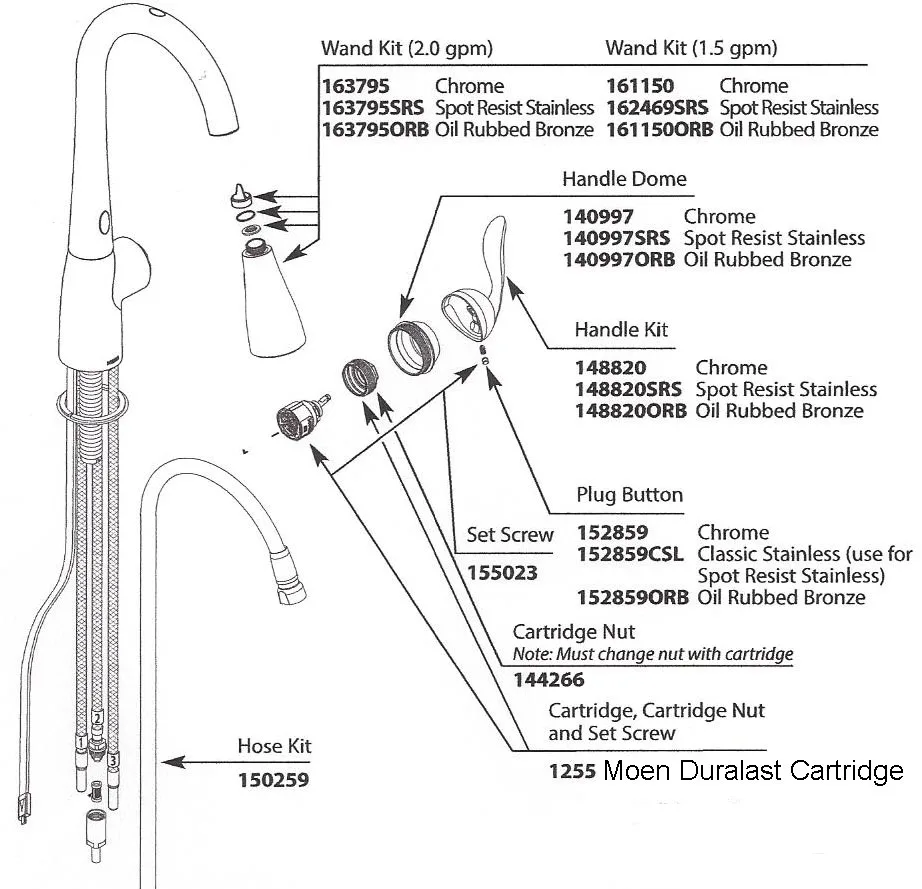
Image source: Web (Bing) / ipipeline.net (Web image (fair-use with source credit))
A diagram reveals the relationship between shank, horseshoe washer, and locknut. A photo shows the basin wrench angle needed in a tight cabinet. Visual reference prevents guesswork.
Guesswork strips threads and cracks porcelain.
Manufacturer service manuals from Moen and Delta use exploded views for this reason. They know technicians need spatial context. You need it too.
The following sections pair each step with the visual cue that matters.
Diagnose First: What's Actually Moving?
Grip the handle. Wiggle it side to side. Does the whole faucet body move?
That is a base problem. Does only the handle rock? That is a handle problem.
Grab the spout. Try to rotate it. Does it turn independently?
That is a spout problem.

Image source: Web (Bing) / storage.googleapis.com (Web image (fair-use with source credit))
Each symptom points to a different fastener. Base wobble means the mounting nut or shank has backed out. Handle wobble means the set screw or cartridge retaining nut is loose.
Spout wobble means the O-rings are worn or the spout hub is cracked.
Do not skip this step. Tightening the mounting nut will not fix a loose handle. Replacing spout O-rings will not fix a loose base.
Match the repair to the motion you feel. The diagram above maps each wobble type to its root cause.
| Wobble Location | Likely Cause | Primary Fix |
|---|---|---|
| Base at countertop | Loose mounting nut | Tighten nut with basin wrench |
| Handle only | Loose set screw or cartridge nut | Tighten set screw or bonnet nut |
| Spout rotation | Worn O-rings or cracked hub | Replace O-rings or spout |
Identify Your Faucet Type Before You Touch a Tool
Single-handle faucets use a cartridge. Dual-handle faucets use cartridges or compression stems. Pull-down models add a hose weight and quick-connect.
Bridge faucets have two handles on a single body. Wall-mounts anchor to plumbing in the wall.
Brand matters for parts. Moen uses 1225 or 1255 cartridges. Delta uses RP19804 or RP50587.
Kohler uses GP77006. Generic kits fit poorly. Note the model number on the tag under the sink.
Take a photo of the faucet body and handle.
Mounting hole count determines deck plate needs. One-hole, three-hole, and four-hole configs each use different hardware. Deck thickness affects shank length.
Standard decks accept up to 2-1/2 inches. Thicker stone may need extended shanks.
Connection type dictates supply line tools. Half-inch NPSM male shanks need adjustable wrenches. Three-eighths compression needs open-end wrenches.
Push-fit needs a release tool. Knowing this before you start saves a hardware store trip.
Tools & Prep: What to Grab and What to Protect
A telescoping basin wrench reaches mounting nuts behind bowls. Adjustable wrenches handle supply nuts. Channel-lock pliers grip bonnet nuts.
Allen keys in 3/32, 7/64, 1/8, 2.5mm, and 3mm cover set screws. A flashlight or headlamp illuminates the cavity.
Penetrating oil frees corroded nuts. Plumber's putty seals the base on stainless sinks. One hundred percent silicone seals on stone.
Silicone grease lubricates O-rings. A bucket catches residual water. Towels protect the cabinet floor.
| Tool | Purpose | Size Notes |
|---|---|---|
| Basin wrench | Mounting nuts | 11 to 17 inch reach |
| Adjustable wrench | Supply lines | 10 or 12 inch |
| Channel locks | Bonnet nut | Wide jaw capacity |
| Allen keys | Set screws | SAE and metric set |
| Penetrating oil | Corroded threads | PB Blaster or Liquid Wrench |
Shut off both angle stops. Open the faucet to relieve pressure. Verify flow stops completely.
Unplug the disposal if present. Cover the drain basket so screws cannot fall. Tape wrench jaws with painter's tape to protect finishes.
Fix a Loose Handle: Set Screws, Cartridges, and Hidden Caps
Pry off the handle cap with a plastic spudger. A flat blade screwdriver risks scratching chrome. The cap hides a hex set screw.
Insert the correct Allen key. Turn clockwise to tighten. Do not overtighten.
Pot metal handles strip easily.

Image source: Bing (Web (fair-use with source credit))
If the handle still wobbles the cartridge retaining nut may be loose. Remove the handle. Use channel locks on the bonnet nut with a cloth barrier.
Tighten 1/8 turn. Reinstall the handle. Test for play.
Moen 1225 cartridges have a retaining clip. Pull it straight out with needle-nose pliers. Delta cartridges unscrew.
Kohler cartridges pull out after the bonnet nut. Note orientation tabs. Install the new cartridge the same way.
A stripped set screw requires a screw extractor or careful drilling. Heat from a hair dryer can break thread locker. Never use a torch near plastic supply lines.
If the handle is cracked replace it. OEM handles match the finish and spline count.
Fix a Loose Base: Mounting Nuts, Shanks, and Basin Wrench Work
Clear the cabinet. Remove stored items. Disconnect supply lines with an adjustable wrench.
Have a bucket ready for trapped water. Label hot and cold lines with tape if they lack color coding.
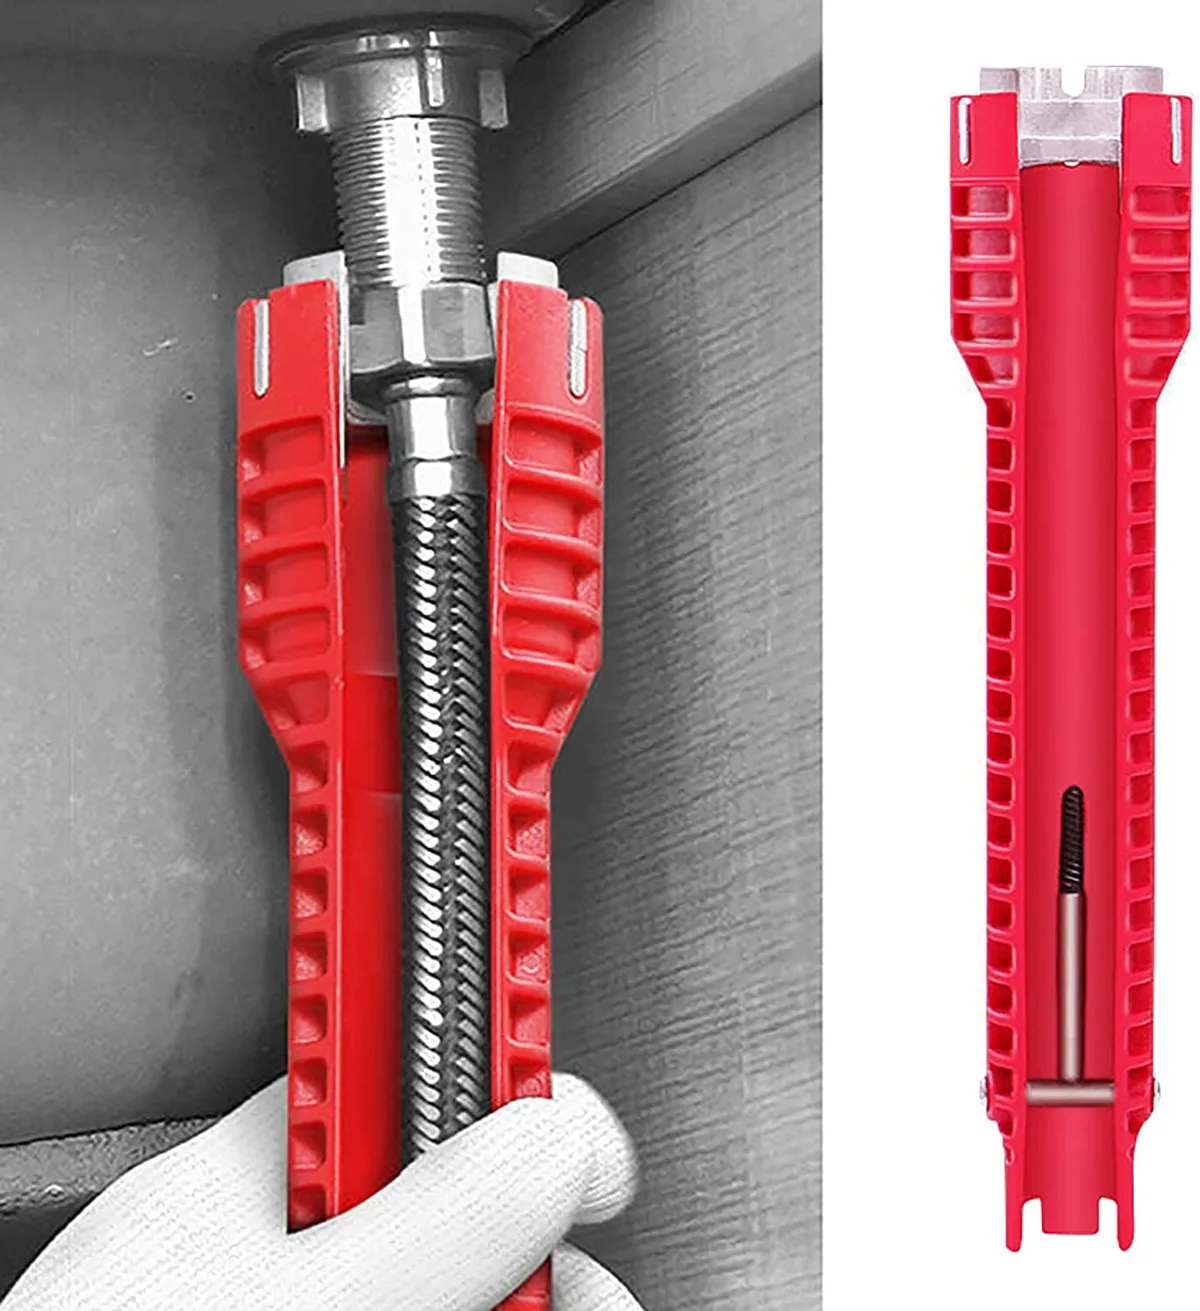
Image source: Web (Bing) / walmart.com (Web image (fair-use with source credit))
Locate the mounting nut. It sits on the shank threads above the horseshoe washer. A single-hole faucet has one nut.
A three-hole deck plate has two or three. Slide the basin wrench up the shank. Engage the nut flats.
The wrench jaw should bite cleanly.
Turn clockwise. Apply steady pressure. The nut needs hand-tight plus an eighth turn.
Overtightening cracks the shank or strips brass threads. If the nut spins the shank hold the shank with channel locks while turning the nut. Protect the shank finish with cloth.
Reconnect supply lines. Half-turn past hand-tight for compression. Fifteen inch-pounds for push-fit.
Open angle stops slowly. Check every joint for seepage. Tighten a sixteenth turn if needed.
The base should not move when you lean on the spout.
Fix a Loose Spout: O-Rings, Spout Hubs, and Pull-Down Hose Clearance
Pull the spout straight up. It may resist from mineral buildup. Twist gently while lifting.
Do not rock it side to side. That cracks the hub. On pull-down models disconnect the hose quick-connect first.
Press the collar and pull.
Inspect the O-rings. Most spouts use two or three. Standard sizes are AS568-210, -211, or -212.
Measure the groove diameter with calipers. Match the cross-section. Swollen rings indicate chemical damage.
Brittle rings indicate age.
Grease new rings with silicone lubricant. Roll them into the grooves. Do not stretch them over threads.
Slide the spout down. Rotate to align the supply ports. The spout should turn freely through its full arc.
A bind means an O-ring is pinched.
Check the hose weight on pull-down units. It must hang free in the cabinet. If it catches on the shelf the spout torques loose every retraction.
Reposition the weight. Some models clip to the hose. Others slide.
Keep clearance above the cabinet floor.
Reassemble & Test: The Sequence That Prevents Callbacks
Reinstall the faucet body if you removed it. Fresh plumber's putty forms a rope around the base groove. Press firmly.
Wipe excess. On stone counters use 100 percent silicone instead. Let it skin ten minutes before tightening.
Thread mounting nuts by hand. Align the faucet square to the sink. Tighten in a star pattern if multiple nuts.
Snug each then final turn. Connect supply lines. Double-check hot to hot cold to cold.
Open stops quarter turn at a time.
Run water two minutes. Watch every connection. Check the base.
Check the handle. Check the spout base. Check the spray head.
Cycle the handle through full hot and full cold. Pull the spray head. Retract it.
Listen for air hammer.
Verify flow rate. Aerator screens clog during reassembly. Unscrew and rinse if flow drops.
The faucet should not move at any joint. A second person leaning on the spout confirms stability. Clean tools.
Store penetrating oil upright.
Common Visual Mistakes That Cost Time and Money
Using pliers on chrome without tape leaves jaw marks. A strap wrench or cloth barrier prevents this. Guessing the Allen size strips the set screw.
Try the metric first on European brands. SAE on domestic. A loose fit rounds the corners.
Overtightening supply nuts cracks the ferrule. A slow leak appears days later. Hand-tight plus half turn is the rule.
Ignoring the hose weight on pull-downs guarantees recurrence. The weight must move freely. Zip-tying it to a pipe creates a new leverage point.
Reusing old putty or O-rings fails fast. Putty dries. Rings take a compression set.
Always install fresh. Skipping the diagnostic step wastes the most time. Tightening the base when the handle is loose solves nothing.
Match the repair to the wobble.
| Mistake | Consequence | Prevention |
|---|---|---|
| Pliers on finish | Permanent scratches | Tape jaws or use strap wrench |
| Wrong Allen size | Stripped set screw | Test fit before applying force |
| Overtight supply nut | Cracked ferrule leak | Hand-tight plus half turn only |
| Reused O-rings | Immediate re-leak | New kit every disassembly |
| Skipped diagnosis | Wrong repair | Wiggle each component first |
When to Stop and Call a Pro (or Replace the Faucet)
A snapped shank requires faucet replacement. Brass shanks do not weld. A cracked body leaks internally.
Corrosion that prevents nut removal risks water damage. If penetrating oil and heat fail after twenty minutes stop.
Cartridge unavailability makes repair pointless. Some brands obsolete parts after ten years. A finish that peels or pits will not hold sealant.
Heavy commercial units on thin laminate flex the deck. The mounting holes elongate.
Replacement costs one-fifty to six hundred for mid-range. Professional install adds two hundred to four hundred. A service call minimum runs one-twenty-five.
If the faucet exceeds fifteen years replacement often costs less than two repairs.
Know your limit. Working blind under a deep sink with a disposal strains backs and patience. A pro has the right wrench and the experience to feel the thread engagement.
There is no shame in calling one. The goal is a dry cabinet.
Quick-Reference Visual Cheat Sheet
Match what you see to the fix below. No guessing.
| Symptom | Visual Cue | Tool Needed | Part to Check |
|---|---|---|---|
| Base shifts on counter | Gap under escutcheon | Basin wrench | Mounting nut |
| Handle rocks side to side | Cap loose or missing | Allen key | Set screw |
| Handle pulls up | Cartridge exposed | Channel locks | Bonnet nut |
| Spout rotates loose | O-ring visible at hub | None | Spout O-rings |
| Spray head droops | Hose weight on floor | Pliers | Hose weight clip |
| Water seeps at base | Putty squeezed out | Putty knife | Fresh seal |
Keep this table on your phone. Compare the photo to your faucet. The right column tells you what to buy before the store trip.
Frequently Asked Questions
How do I know if my faucet base is loose?
Grip the spout and push sideways. Movement at the countertop means the mounting nut has backed off. No movement means the handle or spout is the issue.
What size Allen key for a Moen handle set screw?
Most Moen handles use a 7/64 inch hex key. Some older models use 3/32 inch. Try both gently.
A metric 2.5 mm fits poorly and strips the head.
Can I use plumber's putty on a granite countertop?
No. Putty oils stain porous stone. Use 100 percent silicone or the foam gasket included with the faucet.
Silicone stays flexible and won't discolor the surface.
Why does my pull-down faucet keep loosening at the base?
The hose weight catches on the cabinet floor or shelf. Each retraction torques the faucet body. Reposition the weight so it hangs free through the full hose travel.
How tight should the mounting nut be?
Hand-tight plus an eighth turn with the basin wrench. The faucet should not rotate when you lean on the spout. Overtightening cracks the brass shank.
When should I replace the faucet instead of repairing?
Replace if the shank is snapped, the body is cracked, the finish is peeling, or the cartridge is obsolete. Faucets over fifteen years old rarely justify parts and labor.