How to Install Kitchen Cabinet Hardware in Minutes
If you've ever wondered how to put hardware on kitchen cabinets and put it off because it felt fiddly, you're not alone. It looks simple, but one mis-marked hole can ruin a nice drawer front. The good news?
With a few basic tools and a repeatable process, you can nail it every time.
Manufacturer specifications indicate that most standard cabinet doors and drawer fronts are 3/4-inch thick, and the most common screw size for cabinet hardware is #8-32. As of 2026, that remains the dominant standard across US-made hardware. Once you understand the measurement rules and the drilling sequence, the whole project takes just a few hours.
Let's walk through it step by step.
Quick Answer
Measure your door overlay and decide on knob or pull placement. Mark the hole centers with an awl or pencil. Drill a pilot hole with a 5/64-inch bit for #8 screws.
Drive the screw into the hardware and stop before it's overly tight. For pulls, use a jig to keep spacing consistent across all drawers. Always test on a scrap piece first.
First, Measure Your Cabinet Doors and Drawers
Before you buy anything, you need to know what kind of cabinet you're working with. That's because where you place the hardware depends entirely on the door style and cabinet frame. This is the step most people skip, and it's exactly why their handles end up looking crooked or out of place.
There are two main cabinet construction types you'll run into. Face-frame cabinets have a solid wood frame across the front of each box, and the doors sit on top of that frame. Frameless cabinets, also common in modern kitchens, have no front frame.
The doors attach directly to the sides of the cabinet box and cover nearly the entire front surface.
Your door overlay tells you how much the door covers the cabinet opening. Full-overlay doors cover the entire face of the cabinet with just a small gap between doors. Partial-overlay doors leave part of the frame visible.
Inset doors sit flush inside the cabinet frame rather than on top of it. Each type changes where your hardware should go.
For standard overlay cabinet doors, the classic rule is simple. Place the knob 1-1/2 inches from the non-hinge edge and 1-1/2 inches up from the bottom corner of the door. That works for most upper and lower cabinets.
It gives you a comfortable reach and looks visually balanced across a row of cabinets.
For inset doors, you'll want to adjust slightly. Usually, the knob sits about 1-1/2 inches from the non-hinge edge but can be centered on the stile rather than placed at the corner. If you have glass-front cabinets, the hardware often goes near the corner rather than in the middle of the frame.
Drawer fronts are a different story. Pulls on drawers are typically placed horizontally, centered on the drawer face. The vertical position depends on the drawer height.
A common guideline is to position the pull 2 to 3 inches up from the bottom edge of the drawer front. That gives your wrist a natural angle when you grip the handle.

Image source: Web (Bing) / cabinet.matttroy.net (Web image (fair-use with source credit))
The 3 Key Decisions Before You Buy Hardware
Once you know your cabinet type and the basic placement rule, you can make the fun decisions. But a few choices will directly affect the drilling process, so think them through before you commit.
Knob vs. pull on cabinet doors. Knobs are single-screw mounts. They're simple to install and leave only one hole if you mess up. Pulls require two screws spaced a set distance apart, usually called the center-to-center measurement.
Pulls on doors give a more modern, linear look. Knobs feel more traditional and are easier to grab with a full hand.
If you're choosing between them, think about who uses the kitchen. Pulls are generally easier for people with arthritis or limited grip strength. Knobs can be slippery if your hands are wet or greasy.
Aggregate user reviews also report that pulls loosen less over time because two screws distribute the stress better than one.
Horizontal vs. vertical pulls on drawer fronts. Horizontal pulls are the standard choice for most lower and upper drawers. They align with the natural pulling motion. Vertical pulls on drawers work best on tall, narrow drawers like those in a pantry column or a built-in dresser.
They also add visual interest when used on a few select drawers in a bank of cabinets.
Stick with horizontal pulls unless you have a specific design reason not to. It's the safest, most ergonomic choice. If you want to mix both directions, keep the same center-to-center spacing so the cabinet row still looks intentional.
Determining center-to-center spacing for your new hardware. This is the measurement between the two screw holes on a pull. Common US spacings are 3 inches (76mm), 4 inches (102mm), and 5 inches (128mm). European hardware often uses 96mm and 128mm instead.
Before you drill anything, know exactly what spacing your pull uses.
The pull itself won't tell you the spacing, so measure it. Hold the pull against a ruler and measure from the center of one screw hole to the center of the other. Write that number down.
You'll use it for every single drill mark.
The Tools You'll Need (and What You Can Skip)
You don't need a workshop full of gear to install cabinet hardware. Most of what you'll use is probably already in your toolbox. Here's the short list.
- Cordless drill or screwdriver. A drill with an adjustable clutch is best. The clutch prevents you from overdriving screws.
- Drill bits. A set with a 5/64-inch bit for pilot holes and a #2 Phillips or #1 square drive bit for the screws.
- Measuring tape or ruler. A 12-inch ruler works better than a long tape for small measurements.
- Pencil and awl. The awl creates a small starter dimple so your drill bit doesn't wander.
- Level. A small torpedo level helps align pulls across multiple drawer fronts.
- Painter's tape. Useful for marking rows of doors, especially on a full kitchen installation.
The one tool worth buying is a pull jig. A jig is a plastic template that slides over the drawer front and locks into position, giving you exact hole locations every time. For a full kitchen, it saves you hours of measuring and eliminates most alignment errors.

Image source: Web (Bing) / desertcart.in (Web image (fair-use with source credit))
A good jig costs between $15 and $40. That's less than the cost of one ruined drawer front. If you're only installing a handful of knobs, you can skip it and measure manually.
But if you're replacing hardware across an entire kitchen, buy the jig. It pays for itself in time alone.
You can also pick up a self-centering drill bit. It has a spring-loaded sleeve that centers the bit in an existing hole, which is handy if you're re-drilling or enlarging holes. It's not essential, but it's a nice upgrade if you'll be doing multiple hardware projects.
Step-by-Step: How to Install Knobs on Cabinet Doors
Knobs are the easiest hardware to install because they only need one hole. The process is straightforward, but there's a specific sequence that keeps you from making dumb mistakes.
Step 1: Mark the hole location. On an overlay door, measure 1-1/2 inches from the non-hinge edge and 1-1/2 inches up from the bottom of the door. Use a pencil to mark the intersection. If the door has a rail-and-stile construction, make sure your mark lands on the stile, not in the panel groove.
Step 2: Create a starter dimple. Place the point of your awl on the pencil mark and give it a firm tap with your hand. This leaves a small indentation that guides your drill bit. Without this, the bit can skate across the surface and scratch the finish.
Step 3: Drill the pilot hole. Choose a 5/64-inch bit for a #8-32 screw. Drill straight through the door from the front. Go slowly and keep the drill perpendicular to the door surface.
For a 3/4-inch door, you'll feel the bit break through the back.
Step 4: Drive the screw. Insert the screw from the back of the door and thread it into the knob from the front. Hold the knob in place and drive the screw until it's snug. Then back off a quarter turn.
Over-tightening strips the threads in softer wood and can crack the door.
The most common mistake here is skipping the pilot hole. Without it, the screw pushes wood fibers apart, which can split the door panel. Always drill a pilot hole, even on plywood and MDF.
If you're working with laminate or thermofoil, the pilot hole also prevents the outer layer from cracking.
Another mistake is placing the knob too close to the edge. If you go under 1-1/4 inches from the edge, the screw can poke out the side of the stile. If you go much past 1-1/2 inches, the knob starts to look crowded toward the center of the door.
Stick to the standard and you can't go wrong.
For upper cabinet doors, the same rule applies, but you measure from the top of the door instead of the bottom. That's because upper doors hinge on the top and you want the knob near the lower corner of the door for easy reach. Lower doors hinge on the bottom, so the knob goes near the upper corner.
This keeps all knobs within a consistent reach zone.
Step-by-Step: How to Install Pulls on Drawer Fronts
Pulls require two holes, which means double the measuring and double the chance for error. This is where the jig becomes your best friend. But even without one, you can get perfect results with the right process.
Step 1: Find the horizontal center. Measure the width of the drawer front and mark the center point. For a standard drawer, the pull sits centered left-to-right. Use a ruler to draw a light pencil line across the width at your desired vertical position.
Step 2: Find the vertical position. Measure up from the bottom edge of the drawer front. The standard is 2 to 3 inches, depending on the drawer height. For taller drawer fronts, 3 inches from the bottom looks better.
For shorter drawers, 2 inches is safer.
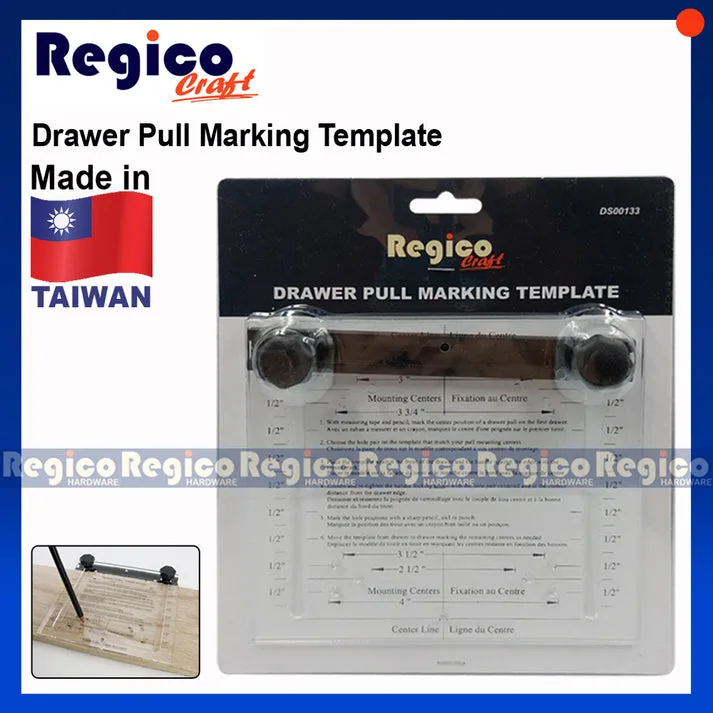
Image source: Web (Bing) / pjregico.com (Web image (fair-use with source credit))
Step 3: Mark both screw holes. If you're not using a jig, you'll measure from the center line. Mark the center of your pull spacing on that line. Then measure half your center-to-center distance to the left and half to the right.
Mark both spots. Double-check that both marks are equidistant from the center.
Step 4: Drill pilot holes. Use the same 5/64-inch bit as with knobs. Drill through the drawer front. If the drawer front is decorative only and backed by a sub-front, drill through both layers.
Measure the thickness before you choose screw length.
Step 5: Mount the pull. Insert the screws from the back. Thread them into the pull from the front. Snug them evenly, alternating side to side.
Then back off a quarter turn on each. You want the pull to be stable but not torqued down hard enough to compress the wood.
Screw length matters more than most people realize. A screw that's too long pokes through the back or bottoms out inside the pull. A screw that's too short doesn't grip the pull threads properly.
Standard 3/4-inch drawer fronts take a 1-inch screw for a pull with a stud, or a 3/4-inch screw if the pull is threaded all the way through.
The trickiest part of drawer hardware is keeping pull alignment consistent across a bank of drawers. If one pull sits at 2-1/2 inches from the bottom and the next sits at 3 inches, you'll notice it immediately. Use a ruler to verify every drawer front before you drill.
Or better, use a jig that self-locates and removes the guesswork entirely.
If you're installing pulls on cabinet doors instead of knobs, the process changes slightly. Measure 1-1/2 inches from the non-hinge edge, then position the pull vertically so it's centered on the door's height or aligned with pulls on adjacent drawers. For upper cabinets, place the pull near the bottom edge.
For lower cabinets, near the top. Keep the same rule as knobs for consistent reach.