How to Replace a Kitchen Faucet: Step-by-Step DIY Guide
That drip isn't going to fix itself. If you've been avoiding the plumber's bill because you suspect replacing the fixture yourself is doable, you're right. Learning how to change a kitchen sink faucet is one of the most satisfying weekend DIY projects a homeowner can tackle.
It's a job that looks intimidating but rewards careful preparation with immediate, tangible results.
Once you understand the visual layout under your sink, the process becomes straightforward. Per ASME A112.18.1, the standard that governs kitchen faucet performance and installation, the physical connections are remarkably standardized across brands. You're dealing with a few shut-off valves, two supply lines, and a mounting system held by nuts.
Let's figure out what you're looking at before you pick up a single wrench.
Quick Answer
To change a kitchen sink faucet, shut off the water supply valves. Disconnect the hot and cold supply lines. Remove the old faucet's mounting nuts from below.
Lift the old unit out. Clean the deck. Install the new faucet and tighten the locknuts.
Reconnect the supply lines and turn the water back on.
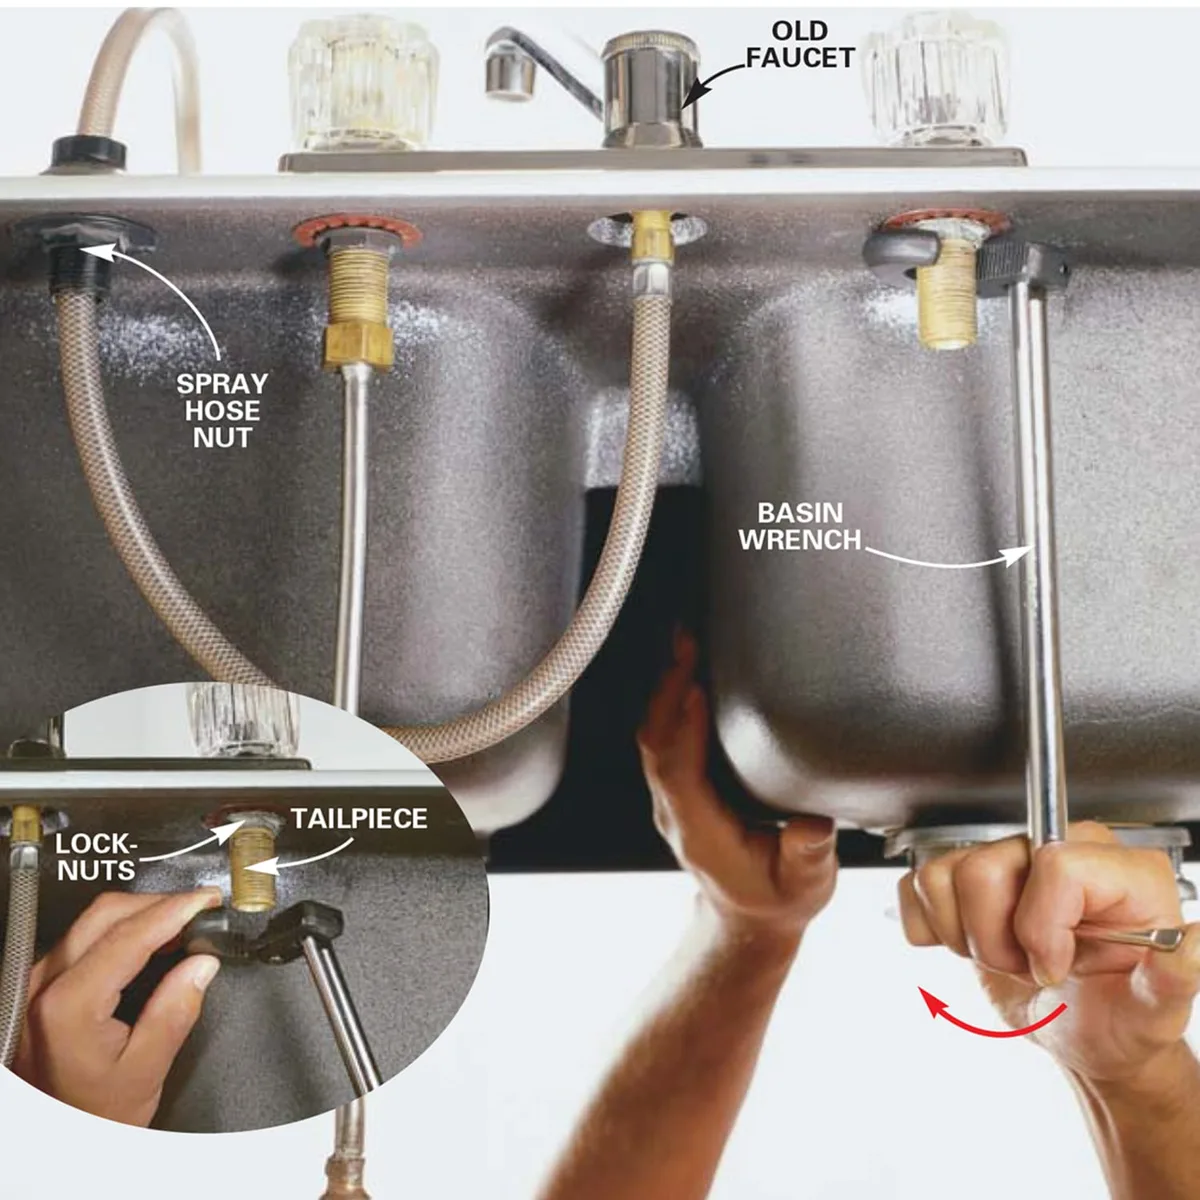
Image source: Web (Bing) / storage.googleapis.com (Web image (fair-use with source credit))
Why This Job Is More About Seeing Than Wrenching
Here's the truth that separates a smooth install from a frustrating one: most of this job is visual identification. Before you disconnect anything, you need to see exactly what kind of shut-off valves you have, how the old faucet is mounted, and what kind of supply lines run from the valve to the faucet tailpieces.
A seasoned plumber will tell you that 80 percent of the work is done in the first five minutes of crawling under the sink. You're taking inventory. Once you know what you're working with, the mechanical removal is simple.
The process gets tricky only when you can't see what's happening. That's why the basin wrench exists. It's a specialized tool designed for reaching up into dark, tight spaces.
This job is about learning what to look for, then using the right visual cues to confirm each step worked.
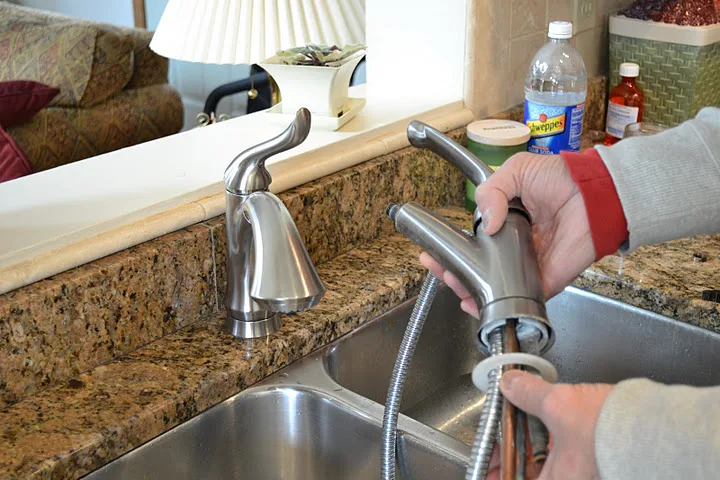
Image source: Bing (Web (fair-use with source credit))
If you're also planning a bigger refresh, understanding the plumbing layout is crucial before you start moving things around. Getting the water supply right matters just as much as the surface design.
First, Look Under the Sink: Identify Your Shut-Off Valves and Supply Lines
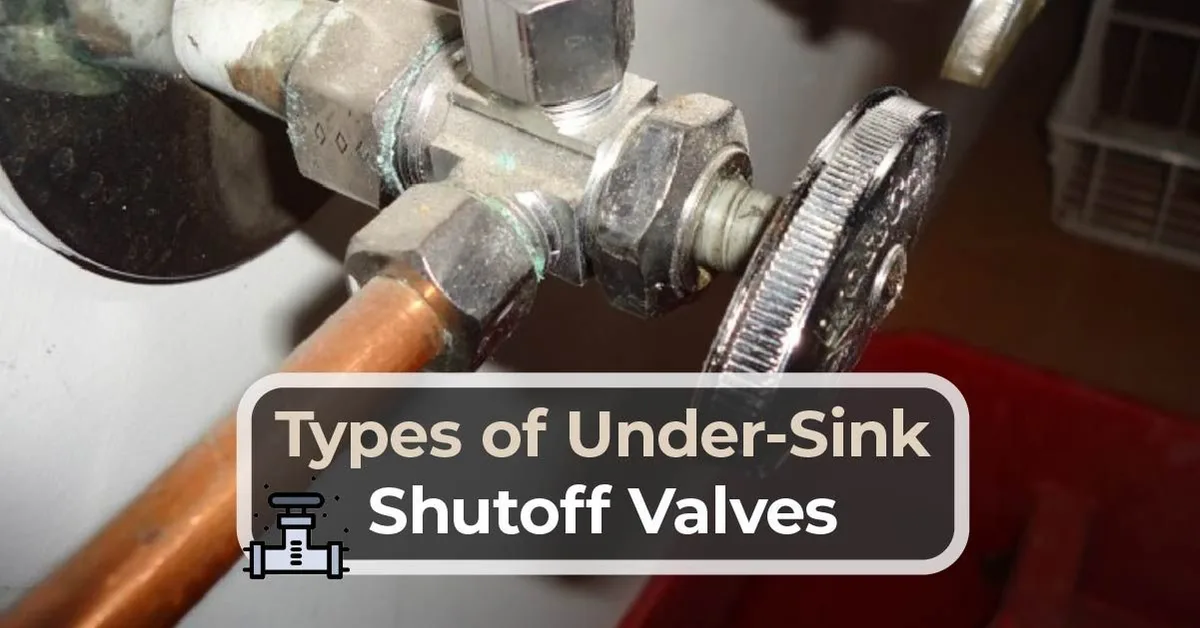
Image source: Web (Bing) / drainbrainllc.com (Web image (fair-use with source credit))
Crawl under there with a flashlight. Look at the wall or the floor where the pipes come up. You should see two valves.
One is for hot water, one for cold.
These are your shut-off valves, often called angle stops or straight stops. They sit between your home's main water supply and your faucet. The ones closest to the sink body connect to the faucet via supply lines.
| Component | What It Looks Like | What It Does |
|---|---|---|
| Shut-off valve | Small brass or chrome valve on the pipe | Stops water flow to your faucet |
| Supply line | Braided stainless steel or copper tube | Carries water from the valve to the faucet |
| Escutcheon plate | Trim ring around the pipe at the wall | Covers the hole where the pipe enters |
Supply lines come in two common materials. Braided stainless steel is the modern standard. Flexible, durable, and easy to remove with a wrench.
The older copper lines are rigid and harder to work with. If you have copper lines, you'll need extra patience and possibly a tubing cutter if they're soldered in place.
Look at how the supply line connects to the valve. Is it a compression fitting? A flared fitting?
Most modern setups use a compression nut over a threaded adapter. Your new faucet kit will include braided lines with standard fittings that screw directly onto the valve threads.
If you're planning a full kitchen overhaul, checking the valve condition now saves headaches later. Replacing tired shut-offs during a bigger renovation is much easier than doing it later through a finished cabinet.
Know Your Mounting System: Single-Hole, Three-Hole, and Deck Plates
Now look at the sink deck itself. That's the flat area around your sink basin where the faucet sits. Count the holes.
Most older kitchens have three holes. One for the spout, one for a handle, and one for a side sprayer. Newer faucets often consolidate everything into a single hole, with a pull-down sprayer integrated into the spout.
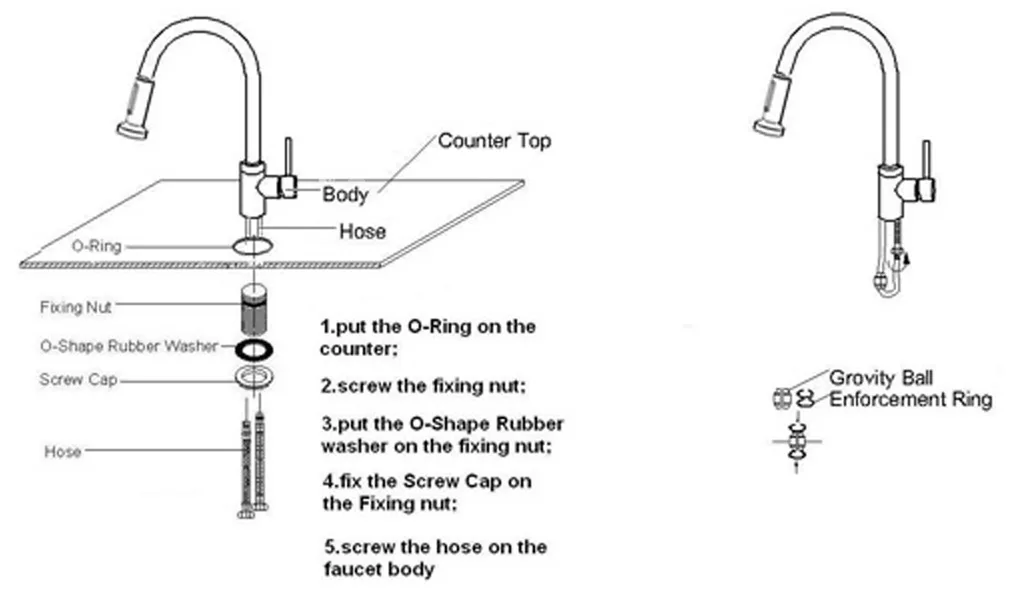
Image source: Bing (Web (fair-use with source credit))
Your mounting holes are measured on centers. The distance from the center of one outer hole to the center of the other outer hole. The standard is 4 inches for three-hole setups, sometimes 8 inches for wider spreads.
Here's the thing. You can install a single-hole faucet over a three-hole deck. Your faucet kit will include a deck plate, also called an escutcheon or base plate.
That's a flat metal plate that covers the unused holes. It sits under the faucet base and hides the extra openings.
Know your mounting type before you buy the new faucet. If you have three holes, you need either a three-hole faucet or a single-hole faucet with a deck plate. If you have one hole, a three-hole faucet won't work without drilling.
Match the new faucet's footprint to your existing holes. Manufacturers list this compatibility clearly on the box. When planning a modern kitchen layout, considering the faucet deck configuration early in the design process helps you avoid callbacks later.
The Basin Wrench: What It Looks Like and How to Use It Blind
The basin wrench is the one tool that makes this job actually possible. If you don't own one, put it at the top of your shopping list. It's inexpensive, often under $20, and it's designed specifically for removing the nuts that hold a faucet in place.
Look at its shape. It has a long handle with a claw at the bottom. The claw grips the nut from the side, and the long handle lets you reach up behind the sink basin.
You can't see the nut while you're turning, because your body is twisted under the cabinet. You work by feel.
Here's how it works. The claw has a spring-loaded jaw that bites into the flat edges of the mounting nut. You turn the handle, the jaw rotates the nut, and the gripping force comes from the direction of your pull.
Pull toward you to loosen, push away to tighten.
The trick is getting the claw seated correctly. Slide it over the nut, then rotate the handle slightly until you feel the jaw catch the edge. Apply steady pressure.
If the nut is stuck, spray it with penetrating oil and wait ten minutes before trying again.
A basin wrench works beautifully on standard hex nuts. But some newer faucets mount with plastic clips or threaded studs that require a socket wrench instead. Look at the underside of your faucet base.
If you see threaded studs extending down, you'll need a deep socket or a paddle bit tool.
The visual difference matters. Hex nuts turn with a basin wrench. Studs need sockets.
Plastic clips twist off by hand. Identify yours before you commit to a method.
Step 1: Shut Off the Water — and Verify It Visually Before You Start
This step sounds obvious, but it's where the panic happens. People turn the handle, assume the water is off, and then get a face full of cold spray when they disconnect the supply line.
Each shut-off valve has a small handle. Turn it clockwise until it stops. That closes the valve.
Do this for both hot and cold.
Then verify it. This is the visual part that saves you. Walk back to the sink and turn on the faucet handle.
If water trickles out for a few seconds then stops, the valves are working. If it flows steadily, your valves are either broken or not fully closed.
There's a second verification step. Touch the supply lines. They should feel cool and relaxed.
If they're tight with water pressure, the valve is still open. If you feel a warm line, the hot side is flowing.
One common issue. Some older shut-off valves fail. They look closed but still let water through.
If that happens, you'll need to shut off the main water supply to the whole house. That valve is usually near the water meter or where the main line enters your home. Once you've turned that off, you can safely proceed.
Aggregate user reviews consistently report the same sequence. Close the angle stops. Open the faucet to relieve pressure.
Confirm no flow. Then disconnect. That order never fails.
If you're renovating an older kitchen and those shut-offs look corroded, consider replacing them while you have access. A torqued valve is a common broken part during this process. Learning how to handle the full renovation flow helps you see where this kind of maintenance fits in the bigger project timeline.
Step 2: Disconnect Supply Lines Without Stripping the Shut-Off Valve
Put your adjustable wrench on the coupling nut where the supply line meets the shut-off valve. Hold the valve body steady with a second wrench so you don't twist the pipe. This two-wrench approach protects the valve fitting from stress damage.
Turn the coupling nut counterclockwise. Braided stainless lines loosen easily. Copper ones may fight you.
If they're tight, apply penetrating oil and wait five minutes. Always turn with a steady pull rather than a jolt.
One thing to watch. The nut on the valve is brass, and it's soft. Stripped threads on the valve mean a new shut-off valve, which means shutting off the main water supply.
That's a bigger job than changing the faucet.
Once both lines are loose, pull them through the sink deck holes. Unclamp the lines from their clips or retainers. Set the old lines aside.
Now you're looking at the mounting hardware upside down.
Step 3: Remove the Old Faucet, Stuck Nuts, Dried Putty, and Patience
The old faucet is held in place by the setup you saw earlier. Look for a threaded stud extending down from the body with a metal locknut, or a nut threaded directly onto the faucet tailpiece. Remove those.
Use your basin wrench for the locknut, but if you see hex nuts on threaded studs, a deep socket on a ratchet works better. The socket has a shallow 12-point profile, so it grips the nut squarely without slipping, which is a huge advantage over the basin wrench.
Water won't be leaking, so you have the time to work slowly. Apply penetrating oil to the stud threads if they look rusted. Give it ten minutes to soak in.
If the faucet has a deck plate, find the edge where it meets the sink. Spray that seam with penetrating fluid too. Dried plumber's putty can make the base stick like epoxy.
Sometimes the faucet twists out of the hole. Other times it needs a wiggle to break the adhesive free. Work the body side-to-side while pulling up.
Once the putty seal breaks, the whole assembly lifts out through the top.
Collect every washer and O-ring that falls down. It doesn't matter if they're damaged, but it does matter that none are left behind in the hole. Clear the area completely.
Step 4: Clean the Deck — Gasket vs. Putty vs. Silicone
Now the hole is empty. Look at the area around the mounting hole. You'll see old putty, silicone residue, or a dried rubber gasket.
Scrape it all off with a putty knife. Work gently and watch the finish.
Scratched sink surfaces are permanent. If the sink is solid surface, clean carefully. If it's aluminum or stone, use a suitable cleaner and avoid harsh scrapers.
Don't think you need to apply new putty just because the old install used it. Most modern faucets ship with a flat rubber gasket that sits on the underside of the deck plate. That gasket creates the water-tight seal.
If your new faucet includes one, you don't need any extra sealant.
If the old install used putty, check the gasket. A factory-installed gasket mated to a sink deck is usually enough to stop the filled water from leaking down. Silicone only needed if you're mounting onto a deep deck stud with an exposed edge.
Manufacturer spec sheets show the recommended sealing method. Per ASME A112.18.1, a connection that seals only with a gasket is acceptable. The gasket compresses into the countertop.
Tightening the mounting nut compresses the gasket, which forms the seal.
Step 5: Set the New Faucet and Thread the Locknuts Right the First Time
Drop the new faucet through the mounting hole from the sink deck side. The supply lines and sprayer hose are beneath the sink. Pull the lines down so the faucet base sits as close to the deck as possible.
Any slack above the deck means the base isn't sealed.
Now mount your new system. Most new faucets come with a pre-installed rubber gasket underneath. Shift the faucet so the gasket is centered and the spout is straight at the sink.
The moment it's aligned, hold the faucet in place while you secure it from below.
Thread a plastic or metal washer over the studs above the mounting nuts. The nuts should be eliminated from this. Hand-tighten the locknuts first.
A rubber gasket compresses evenly. Only after hand tight should you switch to the basin wrench for a quarter-turn tightness.
Do not forget the sprayer hose. Pull down the sprayer hose below the sink. A loop at the end keeps the fitting from slipping back up.
Losing the loop means the hose slides down and won't reach the faucet.
Now you see why the process is visual. You can't see the exact order of the gasket, washer, and lock nut without reaching a hand up. Don't push too hard off the bat.
Thread the nut, then use the wrench with fingers to feel the path.
Step 6: Reconnect Water Lines and Read the Visual Signs of Cross-Threading
Your new faucet comes with supply lines already attached to the faucet tailpieces. Now reattach the other end to the shut-off valves. Start by hand-threading the compression nut onto the valve threads.
This is the most fragile step in the entire job.
Fit the nut on straight. Jiggle it while turning by hands until it spins freely. That spinning is your visual cue that the nut sits in the threads correctly.
If it catches, turn back and gently adjust the skirt. A misaligned nut bites hard.
Once hand tight, finish the fit with an adjustable wrench. Quarter-turn on both sides. Tight until the flange stops turning.
Over-tightening damages the ferrule. Leave a quarter-turn spare on the main.
Turn on the supply. Open the shut-off valves a quarter-turn. Watch the new line right at the point where it meets the valve.
Look for drips along the fittings pool, and the area where the sprayer hose enters the faucet base.
If you see a drip at the valve connection, tighten the line nut half a quarter-turn. If the drip appears at the faucet base base, check your lock nuts. That tighten will seal the base gasket flat.
Too much and you split the washer. Go slow.
Step 7: Turn On the Water and Check These Leak Points First
Open both shut-off valves fully. Turn them counterclockwise until they stop. Listen for the sound of water moving through the lines.
Now check the connections. Start with the supply lines where they meet the shut-off valves. Feel underneath with a paper towel.
Any moisture means the compression nut needs a quarter-turn more.
Then check the base of the faucet where it meets the sink deck. Water pooling there means the gasket isn't seated or the mounting nuts are loose.
Finally, open the faucet handle. Let water run for thirty seconds. This flushes any debris from the lines and confirms the valve works.
If you have a pull-down sprayer, activate it and check the hose coupling under the sink.
Common Visual Mistakes That Ruin a Faucet Install
Cross-threading the supply line nut is the most frequent error in our research. The first two threads carry all the alignment. When a nut's threaded diagonally, the line will weep slowly for months.
Overtightening the mounting nuts leads to a different problem. Compress the rubber gasket too much and it splits, which creates a leak point on the sink deck.
Forgetting to install the sprayer hose's counterweight. The weight hangs it so the line doesn't catch. Skipping it makes the sprayer retract poorly or bunched.
Reversing hot and cold connections. Confirm which line is which by tracing them to the shut-off valves before you connect.
When to Stop and Call a Plumber
Some situations are beyond the scope of a straightforward replacement. If the shut-off round valves won't turn at all, call a pro to replace them. The risk of brute force breaking the pipe connection is real.
If the old supply lines are soldered copper rather than threaded fittings, deciding to stop is smart. Removing soldered joint takes a torch and professional skill.
If your house lacks individual shut-off valves entirely, that valve means the main supply must be closed, and if that main valve is also seized, you need a professional's intervention. Continuing puts your water and property at stake.
Quick Reference: Wrench Sizes, Hole Spacings, and Seal Options
- Basin wrench fits hex nuts up to 1-1/2 inches.
- Deep socket 13/16 inch handles many faucet locknuts.
- Hole spacing: standard three-hole sinks use 4-inch centers.
- Seal type: rubber gasket for flat decks, putty for uneven surfaces. Silicone works as a filler, though not as a primary.
After the install, check the aerator within a few weeks. Debris in the water system can clog it. Unscrew it and clean it if the new faucet runs weak.
Rebuilding the whole kitchen or tightening inconsistent cabin pieces is easier when you understand the layout.
Frequently Asked Questions
How long does it take to change a kitchen faucet?
Plan on one to two hours for a standard replacement on accessible deck. Most time goes into removing the old unit. A straightforward swap with clear space under the sink handles in sixty minutes.
Do I need plumber's putty a kitchen faucet?
Not if your faucet has a rubber gasket. Putty is historical or intended for the sprayer. Check the spec sheet in the box.
A thick, clean, and even gasket mated to the deck seals adequately.
What if the supply line refuses to disconnect?
Stop force. Apply penetrating oil around the fitting joint. Wait ten minutes.
Both minimal. Second wrench to steady the valve. Pull snug with the loosen direction.
If the ends of the surface are still stuck, you may be dealing with corroded, and the main supply close and change the valve.
The old faucet pan won't pull out after the locknuts are off?
Putty seals the base dry around the plumbers. Slide a putty knife flat against the sink to the seam. Work it around the circumference.
Lift-up horizon with the faucet. Freezer, or remove the decorative component, such as base plate collar.