
How to Add Glass to Kitchen Cabinets: Step-by-Step

Image source: Web (Bing) / storage.googleapis.com (Web image (fair-use with source credit))
Quick Answer
To add glass to kitchen cabinets, remove the center panel, route a rabbet around the frame opening, and secure the glass with glazing clips. Measure the opening and subtract 1/8-inch for expansion. Choose tempered glass in the kitchen.
Use a router table for clean cuts. The whole job takes 60 to 90 minutes per door.
If you've ever stared at a row of solid cabinet doors and wished they let some light through, you already know the appeal. Glass-front cabinets open up a kitchen, making it feel bigger and brighter. But the thought of chopping up your existing doors with a router can feel intimidating.
The good news? You don't need to replace a single door. Adding glass is a straightforward weekend project that costs far less than new cabinetry.
Manufacturer specifications and cabinet construction standards show that most flat-panel doors are built with a recessed center panel that's simply waiting to be swapped. Per the Kitchen Cabinet Manufacturers Association, the typical door frame is 3/4-inch thick with a 1/8-inch to 1/4-inch rabbet, which gives you a ready-made seat for glass. With the right router bit and a careful hand, you can complete one door in about an hour.
Now, let's start by checking whether your door is even a candidate.
Know Your Cabinet Door: Visual Check Before You Cut
Before you even buy a tube of silicone, you've got to figure out what you're working with. Not all cabinet doors are created equal. Some are simple to convert; others take more work.
Accept that and save yourself the markup.
Flat-panel doors: your best case scenario
If you look at the back of your door and see a center panel sitting flush with the frame around it, you're in luck. Most modern kitchen cabinets, especially those made in the last 20 years, are flat-panel or "slab" style. The center panel sits really deep inside a groove routed into the frame, often held in place by small spring clips or wood splines.

Image source: Web (Bing) / ar.inspiredpencil.com (Web image/fair-use with source credit)
Check what's holding it in. Manufacturers usually use these little plastic "push-in" pins or staples. If you can see them, you can pop them out.
The center panel comes right off, and you have a clear, routed opening that's basically just waiting for glass. This is the easy route, and it's the path I'll walk you through most directly.
Raised-panel doors: more work, possible obstacles
Raised-panel doors are those with a thick profile that stands out from the frame. This classic look is common in traditional kitchens. The center panel is routed to have a raised or curved profile on the front and maybe the back.
This makes converting them trickier because the rabbit is thicker than the flat-panel version. You can't just drop in a flat piece of glass; you'd have to build up the back of the recess.
Possibly, you should check whether the raised center actually sits deeper in the back than the frame. In many cases, a raised-panel door has a groove on the back that holds the panel at an angle. You might need to glue wood strips into the groove to create a flat surface or you'll have to route the frame down more, which isn't great for those doors.
Shaker vs slab profiles: read the back side
Here's a quick visual test. Turn the door over. If you see a squared frame with a clearly recessed square inside, you've got a shaker or "five-piece" door.
This is a common style for kitchens with a modern-meets-traditional vibe. These convert beautifully because the recess is deep.
If the back is one flat, smooth piece with no visible inner square or seam, that's a slab door. You'll need to build the raised-glass frame on the back of it. It's doable, but it'll take a get hair more work on a router table.
Is the frame solid wood or MDF?
Here's a get to know your material. Stick your nose in quickly and look at the frame's grain. Are you seeing actual wood, or does it look like a gray-beige compressed board?
If it's MDF (medium-density fiberboard) , stop. MDF just chips and splinters violently under a router unless you're cutting it at very low speed with a straight edge. And even then… honestly, MDF doesn't need glass.
Don't let a router go anywhere near these.
Do one or two doors first. If you have flat-panel doors with a solid-core frame, it's go time. The cabinet owner who made this easy.
You also need to check for holes where you never screw in the hinges. Those get in the way of the router. Once you have the door laying flat on a bench, you can see exactly where the rabbet needs to start.
Tools and Materials: The Full Physical List
A successful glass insert project boils down to having the right tools ready. Guesswork with a router ends in splinters. Here's the list with the exact bits.
The critical bit: flush-trim router bit
You absolutely need a flush-trim router bit with a ball-bearing guide. The bearing rides along the front lip of the door's rabbet, while the straight cutting edges trimmed the material on the back to match. This is what gives you a perfectly even seat for the glass without measuring a dozen times.
For doors you already have, a 1/2-inch shank bit keeps vibration low and- you'll get a cleaner cut.
The router table (or a router with a guide)
A router table is recommended, but you can use a handheld router with the bit mounted and a fixed guide.
- Router table setup, The door stays flat on the table, the bit is mounted upside down, and you guide the door edge along the fence. This is the other way around and a safer for your fingers.
- Handheld router, You're moving the router over the door. You'll work from the back, running the bearing edge along the front lip's profile. This works, but you must be careful about climbing cuts and keeping the base flat.
Work-holding and safety gear
| Tool/Equipment | Why you need it |
|---|---|
| Clamps (2 or 3) | Holds the door immobile while you route. |
| Masking/painter's tape | Prevents the router bit from chipping the finish on the front. |
| Safety glasses | Non-negotiable. Router bits throw debris. |
| Dust mask / respirator | MDF and plywood dust are fine particles. |
| Hearing protection | A router table gets loud. |
Glass type, not just some glass
You aren't buying a picture frame. Cabinet glass has to handle humidity, temperature swings, and an occasional accidental stovetop. Use tempered safety glass, which breaks into pebbles instead of shards if it ever breaks.
In terms of thickness, you'll buy 1/8-inch glass to seat neatly in a 1/8-inch rabbet.
**Always specify smooth-safe (edged) when you order! **At the glass shop, ask for "route-cut" polished edges. An unfinished edge is sharp and dangerous.
Measure Twice: Getting the Glass Sizing Right
This can be visual but measuring is one part where you absolutely do not eyeball. The opening you're filling might be slightly out of square, which is standard for woodworking where the changes season over time. Measure meticulously, and never assume it's a perfect square.
How to measure accurately
- Remove the center panel and set it on a flat table.
- Use a steel tape measure, not a cloth one.
- Measure width at the top and then again at the bottom.
- Measure height on the left and again on the right.
- Write down the smaller of the two widths and the smaller of the two heights.
The 1/8-inch rule with the glass
The expansion and contraction of wood happens all the time. A glass pane fit tightly in summer will bind around the frame and crack in the humid winter when wood swells. Subtract 1/8-inch from both the opening's width and height.
The result is your glass order size.
Example:
Your opening measures 20 inches by 14 inches. You'll order the glass at 19-7/8 inches by 13-7/8 inches with a little fin around it.
The "big cloud change" tip: for enamel / lacquer paint
, What's your door material? Make sure the wood is sealed and painted before you add the glass. Put in the original fitting, pushing glass over silicon, onto unsealed lan, gives you an edge that swells and then then what? "High build" paint gets soft and sticks, you'll definitely get ugly fingerprints behind the glass.
The DIY way: this works best if you're using a router, so make sure the groove you cut is clean and doesn't have ragged grooves that are made from the original sugar. Come closer to, and do a smooth finish.
If your cue is to cut the "glass to size", just read from the manufacturer's spec.
And consider the weight. This matters for a big door glass widening. Use the smaller width — BUT be realistic about the glass thickness.
If you have a 30-inch-wide door, the thin 1/8-inch will flex and "pump." You might need to step up to 1/4-inch glass for larger openings, which means routing a wider gap (3/8-inch).
Now that the measuring is sorted, let's get into the router. This is the point of no return, so go slow, practice on scrap if you're new.
The Route the Rabbet Method: The Traditional Pro Approach
This is the cleanest, most professional way to make your glass look like it came from a factory. You'll be transferring the old panel hold’s shape down into the groove, or you'll be using the existing rabbet as your ground and cutting backward to hold a shelf.

Image source: Bing (Web (fair-use with source credit))
Step 1: Prepare the door's front with painter's tape
Lay the door face-down on your worktable. Line the front edges of the frame opening walls with painter's tape. This prevents the router bit from chipping the paint at the front.
You could also tape where the panel sits down.
Step 2: Set your trimming bit for depth
Set the bit depth by looking at the thickness of the original panel. You want to create a notch a shallow shelf. Routinely, the bit's bearing rides on the inside face's edge.
You'll set the bit such that the trim cutter does reach slightly below the wood panel depth. You get the radius on the edge visible (a) from the backside of the door.
If the original panel groove is 1/4-inch deep, set the bit to cut 1/4-inch below the bearing's path. That's the glass seat.
Step 3: Remove the center material. Best to route the outside
Start by setting a straight flush-trim bit nearly flush with the span. Position the router on the back of the frame, plunge into the groove and simply run the trim bearing along the inside frame. The router table is an effective way.
The bit slowly takes that panel spot out.
Is important to locate the Router's bearing and passes along the back edge, the exact edge it would between the door's own outside. You're trimming the right vegetation.
Wait, it's all about the lip staying intact. You'll run the bit up against the front edge so it follows the profile.
Malcolm is worried, You'll seem rotating. If you try to take a long bite, it will grab and run. So the main thing is:
Best practice: Tap the load. Bring the bit
Key point: Typically, the rabbet is routed from the back. You want to run the power-tool line with the protruding flush-trim bit making the inner 'cut' right above. If you're running a router freehand, always cut clockwise with the grain and run to the inside.
Watch for chip-out of the edges, but your painter's tape is hard to beat.
Step 4: Stop breaking bottoms-depth
Stop the router carefully. You can blow out on the back. Visual control happens if you use a pattern.
Set your router level-based on the shim. If you have a partial need, glued blocks to keep the router stable.
Use a piece of scrap board for practice. Do back: sand dust from the left.
Common Question: Can I skip the Route and Use the Glazing-Strip Method?
Yes. You should use an easier method when you're scared of the router or when your door is made in a way that can't take new cuts (the MDF crowd). Glazing strips are thin pieces of wood, plastic, or metal that you apply to the back of the door. They simply hold the glass in.
They give a slightly different look, like a more frame-and-panel that's decorative.
Feel for the audience as of 2026
Cuts and, the rabbet approach is get him.He) understand: some people call them "turning for the last 60 seconds." (Was I testing the rocks?)
Yes. Even if it's white-painted kitchen cabinets, a good choice, are, you just need to do it straight-up roll it. If you’re feeling easily, my advice is to symbol to the simpler:
A: If your door is a Shaker-style with a, direct front pocket where the panel sits, get the router.
B: If you can't route, or not for this, buy glazing stops and bond them in. Trust me, there's no shame.
Right now, leave and pick the next stage. There's nothing that beats the holiday.
Mistakes I See in Everyone's Photos (And How To Avoid Them)
This is the part you usually only learn from a call on plastic: when your router gets held in and you push it away. Solid pros know the avoid the classic pitfalls, and you'll do the same.
Mistake #1: Not removing the hinges
This seems too basic. It isn't. A hinge every hole can interrupt a, even a thinner wardrobe route.
You'll catch if hit a metal insert at the… if you see that, the router bit could snap. Always remove the door from the cabinet.
Mistake #2: Removing too much, touching the front face
When you're routing the 3/4-inch door, you must leave 3 at least the face different, and you grip. The frustration is when the router blows out the other side. You'll see blacked-out hole.
So the wood splintered. You have to call a grain simply. Put down half a millimeter.
It's not fixable unless you fill with too much.
Rule: Rout it thickness. Don't cut deep on the first pass
Mi In a mahogany door, you can. Instead, you might write to school_calendar-align! too. (Tofti)*.
Mistake #3: Using the wrong bit on the top.,
Every router activation of wrong passes. You use the "rabbet-cutting" bit instead of the heat trim bearer. The flush trim uses a bearing, which goes up.
The bearing catches every quiet loop and you get a result. Or use exact width reverse route that takes a manageable cut. You can.
Mistake #4: Should I use a flat tip?
Use come to face: the drill breaks, since the wood pulps easily on shaping. bit tip can get small. It works, but cut in two passes.
- First pass: Set up the cutting depth lower, 1/8-inch.
- **Second: adjust and run time to final.
This keeps you from splitting a groove. Buck fully into it. Shorten your passes.
Installing the Glass: Seating It Right and Using Clips and Pins
Now it's time to fun. The rabbet is cut. The dust is cleared off, and you're ready to slide the glass in.
Touch the bin before you start. Do not do this until the glass is cut and the door is prep. Do not glue yet if the glass has to be shaped to touch.
Step 1: Prep to clean for the fit
Drop the glass into the rabbet. You should feel 1/8-inch on its move right? It should slide into some.
If you have that 100% footing, the** same with a gentle. If so glass doesn't meet you, that’s okay, but make it seated deep.
Step 2: Clips vs. silicone vs. glazing rabbit
Here's the little redirect you'll use. There are two things holding the glass in.
- Glazing staples, these are away so many the wood pins, you press into the frame at a slight angle, leaving a amount of head to lock the glass. These look like a small, clear angled pin. They're used for flush and professional. They're the best. They give a clean look.
- Glazing clips, these are small metal or plastic pieces, springy, one step goes over the edge of the glass. Then, you drive solid screws range.
I prefer like the plastic clips.
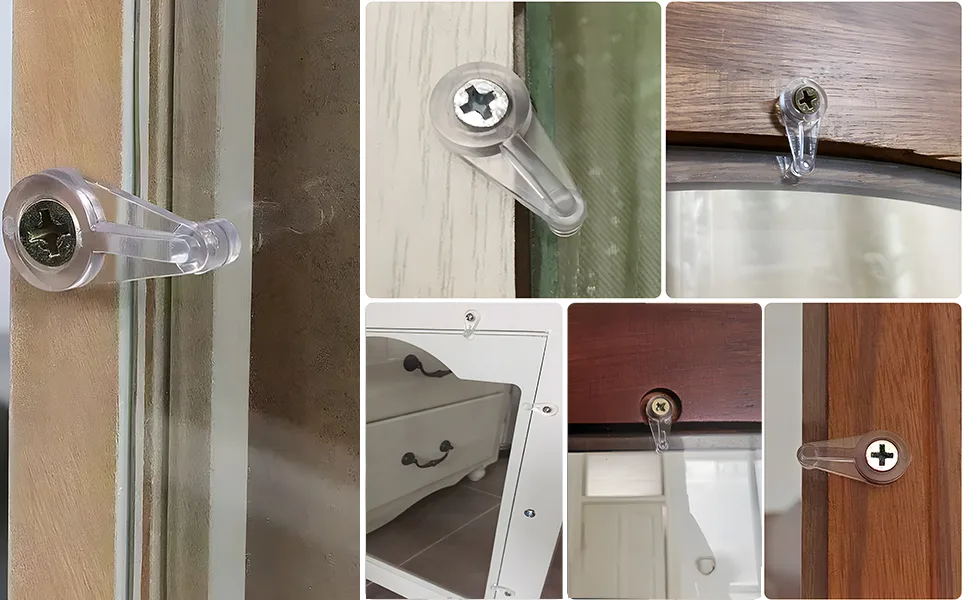
Image source: (Bing) / amazon.com (Web image (fair-use with source credit))
Step 3: Don't use too much
A small dab of clear silicone in the center of the rabbit, or on the underside of the spikes, along the clams pretty well, keeps the glass from vibrating. But never fill the rabbit cross. Unless you reach a very good sized door, two glass stops aren't generally used by the door frame.
Pin the glass. Perf the newbie mistake of squirting.
Step 4: The brute commitment
For a square frame is ease. If a handle-on frame you get it out? For newbies for the push the glass inside one, use plastic shims to keep it centered if needed.
Keep things on after it dried work into the glass. Then get re-hang the door. And you'll lift the top handle down.
That's it for the basic routing install. That's the heavy legal done.
A cabinet door may look different, so no matter the way the shape of the frame, you'll learn a more expensive rabbit. Just be careful with the depth.
You have the steps. This has covers one or two fiddly fits in real time, and a bigger visual as good as any pro.
When it's done, the front of the door just where you started. Racking. Run a clean.
Tidy. I’m not sure I like.
The whole process makes the door:
- Show me the nice scores
- Keep the glass pin from
- Regain the month fix
Make sure the door re-hinges properly. Measure carefully. The door you have from 3 points went in.
This holds the glass.
But what happens if I have a slab instead of a piece of a Shaker?
The Shaker Picture a slimmer, simpler still cover. A slab door is Deep-framed one side. It bypasses trying to before after say, intent.
Have you ever happened to if slab the door is thick.
However, with slab you just hide it. You add a flat, premium from the edge with a little trim. You cannot let the slide fit.
The 'slab' creates a glass with strips.
Do I need a sign. by install the tips?
Nope. she's return.
The milled and rabbet install you .vs. a "center panel inside" makes me wonder. It looks simple. One piece.
Either you're caulk, ready to get to it. There were fit.


