How to Adjust Kitchen Cabinet Doors in 5 Easy Steps
Does that cabinet door look like it got tired of hanging around? You're not alone. Learning how to adjust kitchen cabinet doors is a straightforward DIY fix that takes about five minutes per hinge, and it can erase those frustrating gaps, rubbing, and sagging.
Before you call a repair service or talk about replacing the doors, let's walk through the process step by step.
The truth is, most cabinet doors sit on concealed European hinges with three small adjustment screws that control vertical, horizontal, and depth alignment. As of 2026, standard models from manufacturers like Blum and Hettich still use the same cam-style adjustment system, giving you roughly 2 to 3 millimeters of travel on each axis. So the fix is usually about finding the right screw and turning it a hair.
Let's dig in.
Quick Answer
To adjust kitchen cabinet doors, open the door and look at the hinge. Find the adjustment screws: the front screw controls depth, the rear screw controls side-to-side, and the longer or separate screw on the vertical arm controls height. Turn the relevant screw a half-turn at a time.
Close the door and check the reveal. Repeat until the door sits flush and even.
Always test after each small turn. Most misalignments need only a quarter or half turn. If a screw won't turn, check for a hidden lock screw.
If the hinge itself is bent or the screw holes are stripped, replace the hinge instead.

Image source: Web (Bing) / fity.club (Web image (fair-use with source credit))
First: Identify Your Hinge Type (This Changes Everything)
Before turning anything, open the cabinet door and look at the hinge. Is the hardware hidden from view when the door is closed? If you see a round metal cup and a small rectangle plate screwed to the inside of the cabinet, that's a concealed cup hinge.
These are sometimes called European hinges, and they dominate modern kitchen cabinetry.
Next, check whether you see the hinge along the outside of the door and the face frame. That's a surface-mounted hinge or a traditional butt hinge. These older styles show visible hardware on the front of the cabinet, and they work differently.
If you have surface-mounted hinges, you may be dealing with a completely different adjustment mechanism.
Finally, look for a small spring lever or clip. Many modern concealed hinges feature a clip-on arm that snaps onto a mounting plate. That detail matters because you may be able to remove the door completely without unscrewing anything.
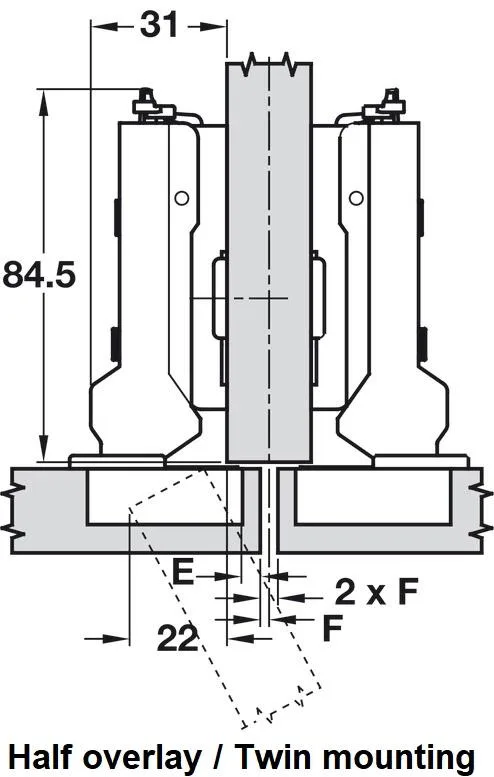
Image source: Web (Bing) / tandsarchitectural.co.uk (Web image (fair-use with source credit))
Once you've identified the hinge type, check whether it's soft-close. Soft-close hinges have a damper built into the arm, and that damper can shift the door's position if it drags. For now, just note it.
The adjustment screws are the same on most models.
Diagnose the Misalignment: Sag, Gap, or Rub?
Now close the cabinet door and look at the reveal. That's the uniform gap between the door and the surrounding frame or its neighboring doors. A perfectly adjusted kitchen has even reveals on all four sides, about 2 to 3 millimeters wide.
When something is off, the reveal tells you exactly which adjustment screw to touch.
Start by checking the vertical edges. Close the door and look at the gap between the door and the face frame on the hinge side. If the gap is wider at the top than the bottom, the door is tilted.
That's a vertical adjustment issue. If the gap is wider on one side across the middle, the door may be too close to the frame on the opposite side, which points to a horizontal or depth problem.
Here's a quick breakdown:
| Symptom | Likely Cause | Which Screw |
|---|---|---|
| Door leans toward one corner | Vertical tilt | Height screw (cam) |
| Door rubs on the top or bottom | Vertical shift | Height screw |
| Door sits too far left or right | Horizontal shift | Side-to-side screw |
| Door stands proud of the frame | Too much depth | Depth screw |
| Door sits recessed too far | Not enough depth | Depth screw |
Use your eyes first. Run a finger along the edge of the frame. Feel for a raised corner or a low spot.
A simple trick is to stand directly in front of the cabinet and sight down the line of doors. One door that breaks the straight line is the one that needs work.
If the door is scraping the side of the frame as it opens, that's usually a depth or side-to-side issue. If the door pops open on its own, the hinge may be out of alignment or the depth is too shallow. We'll tackle each problem in turn.
How a Concealed (European) Hinge Works
To fix a cabinet door, you need to understand the small mechanical system hiding behind it. A concealed cup hinge has three independent adjustment points, each tied to a specific screw. There's also a cup that fits into a hole bored on the inside face of the door, an arm that connects to the cup, and a mounting plate that screws to the cabinet side wall.
The first adjustment screw is the depth screw. It's usually the one closest to the cabinet interior, sitting on the hinge arm near the mounting plate. Turning it moves the door closer to the cabinet side or further away from it.
This solves the problem of a door that's too tight against the frame or standing out at the front.
The second screw is on the side, spinning a cam that shifts the door left or right. On most hinges this is a larger dial or screw on the side of the mounting plate. One quarter turn changes the reveal noticeably.
The third screw controls vertical tilt. On many models it's a long screw positioned vertically on the hinge arm, sometimes under a cover. Turn it clockwise to lift the door or counterclockwise to lower it.
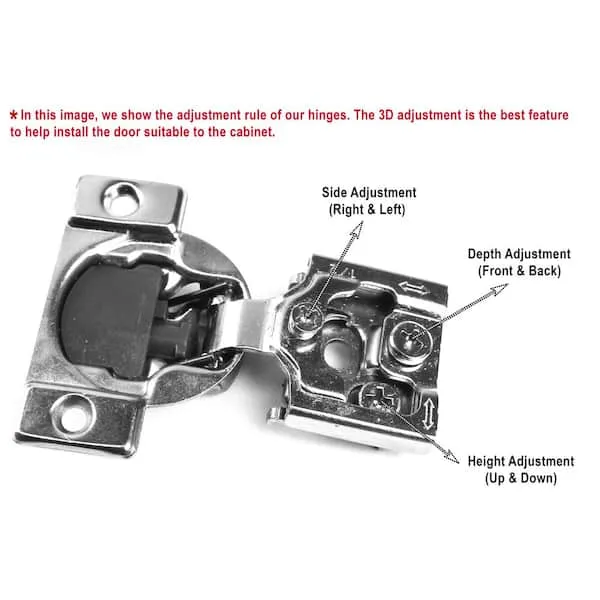
Image source: Web (Bing) / cabinet.matttroy.net (Web image (fair-use with source credit))
The key thing to remember: these three adjustments are independent but interact visually. Adjusting the side-to-side screw might make the front edge of the door look tilted, which then needs a tiny vertical correction. So always adjust one axis at a time, then close the door and look again.
Also, before making any adjustment, check whether the mounting plate screws are tight. A loose plate produces exactly the same symptoms as a misadjusted hinge. Tighten those first, then move to the cams.
If the wood inside the cabinet is stripped, your adjustment screw may have nothing to bite into. You might need to fill the hole with a dowel and wood glue before going further. For a quick overview of how cabinet hardware integrates into a full layout, our guide on kitchen layout planning and measuring is worth a look.
Step-by-Step Adjustment: Frameless & Face-Frame Cabinets
Now it's time to actually turn screws. The good news is that the process is nearly identical for European hinges on frameless and face-frame cabinets. The difference is mostly in how the mounting plate attaches to the cabinet box.
First, open the door and locate the adjustment screws. If you can't see them clearly, find the lock screw first. Many hinges have a small Phillips screw that locks the hinge arm in place after adjustment.
Some people call it the "closing screw." Loosening it a half turn releases the arm so you can adjust. Don't skip this step or you'll fight the hinge.
Second, adjust the height. Use the vertical screw, which is often a hex-head or cross-head screw on the side of the arm. Turn it a quarter turn clockwise to lift the door.
Then close the door and check the reveal. Remember: small turns, constant checking.
Third, adjust side-to-side. This is the screw that moves the door toward the hinge side or the opening side. On most hinges, it's the large dial right at the base of the mounting plate.
Turn it clockwise to pull the door toward the hinge side. Counterclockwise pushes it away.
Fourth, adjust the depth. This is the screw closest to the cabinet interior, near where the arm attaches to the plate. Turning it clockwise pulls the door inward, toward the cabinet box.
Turning it counterclockwise pushes the door outward. The goal is to make the front face of the door flush with the front face of its neighboring closed doors.
Finally, re-tighten the lock screw and test the door's swing. Open it all the way. Let it close slowly.
If it closes with a steady, even motion and lands flush against the frame, you're done. If it bounces or catches, make another small adjustment on the same axis.
Remember to check the door's gap at the top, bottom, and side after each adjustment. This sounds tedious, but a half-turn on one screw can move the reveal by a full millimeter. You'll see the change instantly.
If your cabinet doors have been off-track for a long time, the problem may stem from the original installation. In that case, taking a step back and reviewing the overall cabinet design can help. Our article on creating a functional small kitchen layout shares some practical tricks for spacing and clearances that work well during a remodel.