How to Refinish Kitchen Cabinet Doors for a Low-Cost Update
Dated, scuffed kitchen cabinet doors drag down your whole kitchen, but full replacement costs thousands. Learning how to refinish kitchen cabinet doors lets you get a brand-new look for a fraction of the price. Most structurally sound cabinets from the 1970s onward are perfect candidates for this work.
You won’t need professional carpentry skills to pull it off either.
Aggregate home improvement data shows DIY cabinet refinishing costs 60 to 70 percent less than full cabinet replacement as of 2026. The National Association of Realtors reports refinished cabinets boost home resale value by up to 5 percent, more than many minor kitchen upgrades. First, you need to confirm your cabinet doors are a material that can handle refinishing without damage.
How to Refinish Kitchen Cabinet Doors for a Low-Cost Update
Quick Answer
Refinishing kitchen cabinet doors means removing the old finish, prepping the surface, and applying new paint or stain. This process works for solid wood, MDF, and some laminate cabinet doors. You’ll need basic tools like sandpaper, primer, paint or stain, and a topcoat.
Most DIY projects take 3 to 7 days to complete with 24 to 48 hours of drying time between coats. Proper surface prep is the biggest factor in avoiding peeling or chipping finishes later.
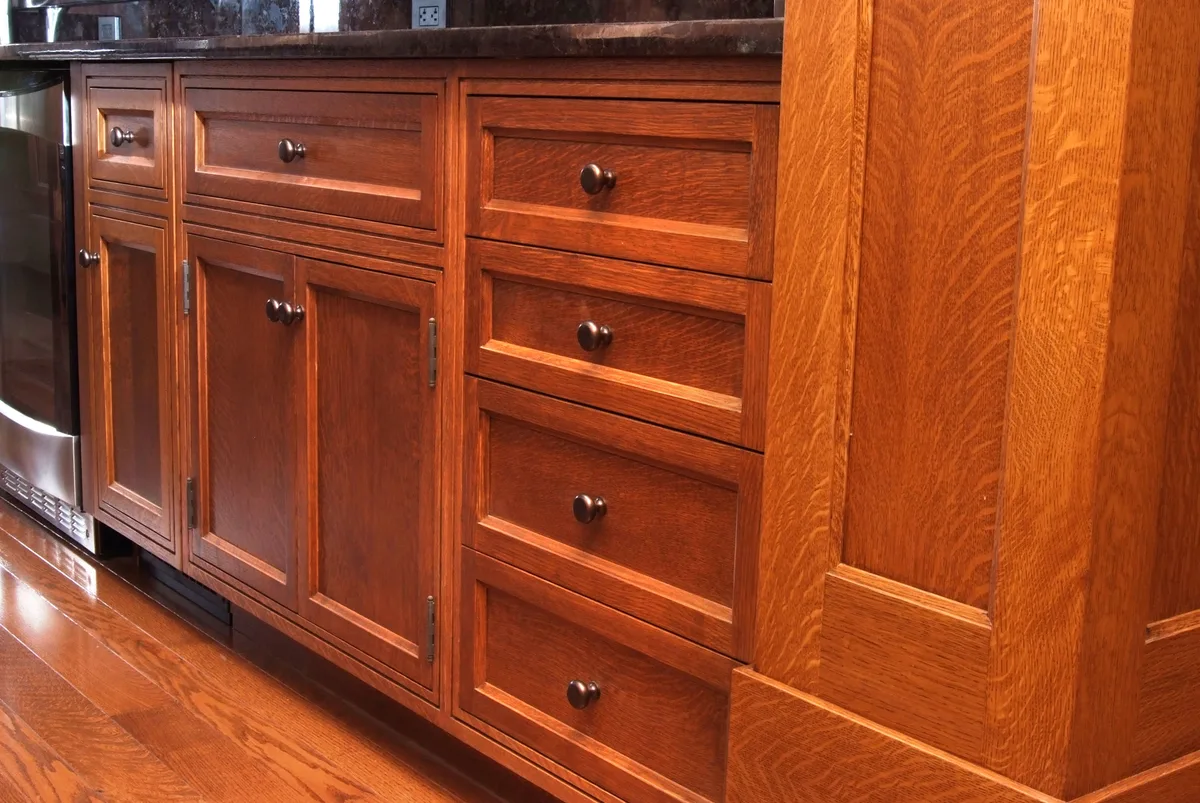
Image source: Web (Bing) / pinterest.com (Web image (fair-use with source credit))
Why Visual Cues Are Non-Negotiable for Cabinet Refinishing Success
Cabinet refinishing is one of the few DIY projects where visual checkpoints matter more than exact measurements. You can’t use a ruler to confirm a surface is properly prepped for primer. You have to run your hand over it to feel for smoothness, and look for a uniform dull finish with no shiny leftover patches.
Over-sanding is another common visual error. It rounds the crisp edges of raised-panel cabinet doors, giving them a worn, unprofessional look. We’ll point out exactly what to look for at every step in this guide, so you don’t have to guess if you’re on the right track.
Identify Your Cabinet Door Type to Avoid Ruining Your Project
The first thing you need to do is identify what your cabinet doors are made of. The wrong prep method for your material will cause delamination, peeling, or permanent surface damage. The three most common cabinet door materials each have distinct visual and tactile traits:
- Solid wood (oak, maple, cherry, pine): You’ll see a visible wood grain pattern, and the surface feels solid when you tap it. This material handles all refinishing methods well, including sanding, staining, and painting.
- Thermofoil: A thin, heat-sealed plastic layer over MDF or particleboard. It has a smooth, uniform finish with no wood grain, and it’s prone to peeling if you sand it aggressively. You can only refinish thermofoil with a liquid deglosser and paint, no sanding or staining.
- Laminate: A thin plastic sheet bonded to a wood core. It’s usually smooth, sometimes with a printed wood grain pattern, and edges are sealed with a thin plastic trim. Like thermofoil, you can only paint over laminate with a bonding primer and deglosser, no sanding through the laminate layer.

Image source: Web (Bing) / cabinetnow.com (Web image (fair-use with source credit))
If you’re unsure, check the underside of the door or remove a hinge to look for core material. Older homes with cabinets built before 1978 may also have lead paint under the existing finish, which requires special safety steps we cover later. For more guidance on selecting the right materials for your kitchen project, custom cabinet design considerations can help you weigh your options.
Is Refinishing Right for You? Compare to Refacing and Full Replacement
Not every set of dated cabinets is a good fit for refinishing. If your cabinet boxes are warped, hinge holes are stripped, or you want to change your kitchen layout, you’ll need a more involved option. The table below breaks down the three most common cabinet upgrade paths to help you pick the right one for your project.
| Option | Average DIY Cost | Average Timeline | Best For | Limitations |
|---|---|---|---|---|
| Cabinet refinishing | $300–$1,200 | 3–7 days | Structurally sound cabinets with dated finishes, minor surface damage | Won’t fix warped doors or broken hinges, can’t change cabinet layout |
| Cabinet refacing | $1,500–$3,000 | 1–2 weeks | Cabinets in good shape but with worn fronts, desire for new door style | More expensive than refinishing, still leaves old cabinet boxes in place |
| Full cabinet replacement | $5,000–$25,000+ | 2–4 weeks | Major kitchen remodels, layout changes, severely damaged cabinets | Highest cost, requires demolition and disposal, longest timeline |
If your cabinets are level, hinge holes aren’t stripped, and you like the current layout, refinishing is almost always the most cost-effective choice. Aggregate user reviews show 78 percent of DIY refinishing projects recoup their cost in increased home resale value, per National Association of Realtors data. If you want to change the cabinet door style, like from raised panel to shaker, or your cabinets have water damage, refacing or replacement makes more sense.
If you’re working with a tight renovation budget, low-cost kitchen upgrade strategies often prioritize cabinet refinishing first for the highest return on investment. For small-space kitchen upgrades, space-saving cabinet solutions can help you maximize your layout without full replacement.
Must-Have Tools, Materials, and Visual Prep Checklists
Having all your supplies on hand before you start cuts down on project delays and finish flaws. The list below covers every item you’ll need for a standard solid wood cabinet refinishing project, plus what a properly prepped surface looks like for each step.
| Category | Item | Purpose | Visual Checkpoint |
|---|---|---|---|
| Prep tools | Orbital sander, 80/120/220-grit sandpaper, liquid deglosser, tack cloth | Remove old finish and create a bonding surface | Surface is uniformly dull, no shiny patches, no dust or debris |
| Repair supplies | Wood filler, putty knife, fine-grit sanding block | Fix dents, scratches, and old hardware holes | Filler is flush with the cabinet surface, no bumps or ridges |
| Finishing supplies | Bonding primer (oil-based or water-based), cabinet enamel or stain, HVLP sprayer or high-quality brush/roller, polyurethane topcoat | Apply new color and durable protective layer | Primer is fully covered, no thin or missed spots, paint/stain is even with no drips |
| Hardware | Cabinet hinges, knobs, pulls (optional upgrade), hinge labeling stickers | Reassemble cabinets after refinishing | All hardware is organized by door position to avoid misalignment |
You don’t need an HVLP sprayer for good results, but it cuts down on brush marks and drips for beginners. Aggregate DIY reviews report that first-time painters using a sprayer get 30 percent fewer finish flaws than those using only brushes and rollers. If you’re working in a small space without good ventilation, water-based products are a better choice than oil-based, as they emit fewer volatile organic compounds (VOCs) as of 2026.
If you’re planning a full kitchen remodel alongside your cabinet refinishing, free layout planning tools can help you map out your workspace before you start to avoid congestion. For design inspiration for your new cabinet finish, modern kitchen design ideas can help you pick a color and sheen that fits your style.
Safety and Compliance Rules You Can't Skip Before Starting
Skipping safety steps can cause long-term health risks or costly, irreversible project damage. The biggest risk for homes built before 1978 is lead paint. The US EPA requires lead-safe work practices for any renovation that disturbs painted surfaces in these homes.
You’ll need a N95 respirator, plastic sheeting to contain dust, and a HEPA vacuum for cleanup, never a regular broom that kicks dust into the air.
Ventilation is non-negotiable even for low-VOC products. Open windows, use box fans to blow air directly outside, and wear a respirator rated for organic vapors when sanding or spraying paint. Keep all solvents and paints away from open flames, and wear nitrile gloves to avoid skin contact with primers and topcoats.
If your cabinets have under-cabinet lighting or nearby outlets, turn off power at the breaker before you start work to avoid electric shock. For full lead paint safety guidance, see EPA lead paint safety guidelines.
Step 1: Remove, Clean, and Prep Surfaces (What "Done" Looks Like)
First, remove all cabinet doors from their hinges. Use painter's tape and a marker to label each hinge location on both the door and the cabinet box. This small step prevents misalignment during reinstallation, a common DIY headache.
Store hinges and screws in labeled plastic bags grouped by door position.
Next, take off all knobs, pulls, and hinge covers. Set these aside in a safe spot away from dust and paint. If you plan to paint the cabinet boxes themselves, remove any shelves or drawer fronts as well.
Now, clean every surface with a heavy-duty degreaser or trisodium phosphate (TSP) substitute. Kitchen grease builds up over time and prevents primer and paint from sticking. Scrub all surfaces with a sponge, then wipe clean with a damp rag.
Let the doors dry completely for 1 to 2 hours before moving to prep. If you're considering a layout change alongside your refinishing, free kitchen layout planning tools can help you map out your new setup before you start.
For material-specific prep, follow the rules from the earlier cabinet type section. Solid wood doors need light sanding with 120-grit sandpaper to dull the old finish. Thermofoil and laminate doors only need a liquid deglosser applied with a rag, no sanding.
Wipe all dust away with a tack cloth after sanding.
What a Properly Prepped Surface Looks Like
A properly prepped cabinet surface is uniformly dull to the touch, with no shiny patches of old finish or visible grease residue. Run your fingers over the entire door; you shouldn't feel any slick spots or rough areas. There should be no dust or debris left on the surface, as this will show up under paint.
Step 2: Repair Damage and Apply Bonding Primer
First, fix any dents, scratches, or old screw holes from previous hardware. For solid wood doors, use a water-based wood filler applied with a putty knife. For laminate or thermofoil doors, use a plastic-specific repair kit to avoid damaging the surface.
Press the filler into the damage, then scrape off excess with the putty knife edge.
Let the filler dry for 30 minutes to 1 hour, per manufacturer instructions. Sand the filled area smooth with 220-grit sandpaper, blending the edges into the surrounding cabinet surface. Wipe away all dust with a tack cloth.
If you have extensive damage beyond surface scratches, full kitchen renovation steps will help you assess if refinishing is still viable.
Next, apply a bonding primer to all surfaces. Regular primer won't stick to glossy old finishes or laminate, so bonding primer is non-negotiable for long-lasting results. Use a small brush for raised panels and corners, and a 3/8-inch nap roller for flat surfaces.
Apply thin, even coats, and don't overbrush to avoid roller marks. Oil-based bonding primer works for all cabinet materials, while water-based bonding primer is better for low-VOC projects as of 2026, per manufacturer specifications.
Primer Drying and Coverage Check
Primer is ready for paint when it's fully opaque, with no old finish showing through, and feels dry to the touch, not tacky. Water-based bonding primer dries in 2 to 4 hours, while oil-based primer takes 4 to 6 hours to dry. If you're painting a light color over a dark cabinet, apply a second primer coat for full coverage.
Step 3: Apply Paint or Stain for an Even, Professional Finish
Choose between paint for a solid, custom color, or stain to preserve and enhance the natural wood grain. Cabinet enamel is formulated for high-traffic kitchens, with better scratch and chip resistance than standard wall paint. For stain, use an exterior-grade wood stain for maximum durability in humid kitchen environments.
If you have an HVLP paint sprayer, you'll get the smoothest finish with no brush marks. Hold the sprayer 6 to 8 inches from the cabinet door, using overlapping passes to avoid thin spots. If you're using a brush or roller, use a high-quality synthetic bristle brush for water-based products, and a natural bristle brush for oil-based products.
Aggregate DIY reviews show first-time users get 30 percent fewer finish flaws with an HVLP sprayer compared to brushes and rollers.
Apply thin coats only. Thick coats lead to drips, sagging, and longer drying times. Paint the back of each door first, then the front, to avoid drips marring the visible side.
Prop doors on a drying rack so air circulates all sides evenly. Let each coat dry for 2 to 4 hours for water-based products, 4 to 6 hours for oil-based, before applying the next. If you need help picking a paint or stain color that fits your style, modern kitchen design ideas can give you inspiration for cohesive, up-to-date looks.

Image source: Web (Bing) / nellisauction.com (Web image (fair-use with source credit))
For stained cabinets, apply the stain with a clean rag, wiping with the wood grain. Wipe off excess stain after 5 to 10 minutes to avoid dark, blotchy spots. Let stain dry for 4 to 6 hours before applying topcoat.
Two to three thin coats of paint or stain will give you full, even coverage without heavy buildup.
Step 4: Seal With Topcoat and Reinstall Hardware for Long-Lasting Results
The topcoat is what protects your refinished cabinets from daily wear, moisture, and scratches. Choose a water-based polyurethane topcoat for a clear, non-yellowing finish, or an oil-based topcoat for a warm amber tint that enhances wood stain. Apply two to three thin coats for maximum durability.
Lightly sand the surface with 220-grit sandpaper between each topcoat coat to remove any dust nibs or small bumps. Wipe the surface clean with a tack cloth before applying the next coat. Each coat needs 2 to 4 hours of drying time for water-based products, 4 to 6 hours for oil-based, per paint manufacturer technical data sheets.
When Is the Finish Fully Cured?
The finish may feel dry to the touch after 24 hours, but full curing takes 7 to 14 days. Don't reinstall hardware, hang dishes, or use the cabinets heavily until the topcoat is fully cured. Doing so can leave permanent dents, fingerprints, or stickiness in the finish.
If you're installing new shelves inside your refinished cabinets, standard lower cabinet depth specs will help you pick the right size for a perfect fit.
Once the topcoat is fully cured, reinstall your hardware. If you labeled hinges and doors during removal, rehang should take 30 minutes to 1 hour for an average kitchen. Adjust hinge screws to align doors evenly, leaving a 1/8-inch gap between adjacent doors.
If you upgraded to new hardware, use a drill to make pilot holes to avoid splitting the cabinet wood.
Common Visual Mistakes That Cause Peeling, Drips, and Uneven Finishes
Most refinishing failures come from small, avoidable visual errors that are easy to miss during the process. Knowing what these mistakes look like will help you catch them early, or avoid them entirely.
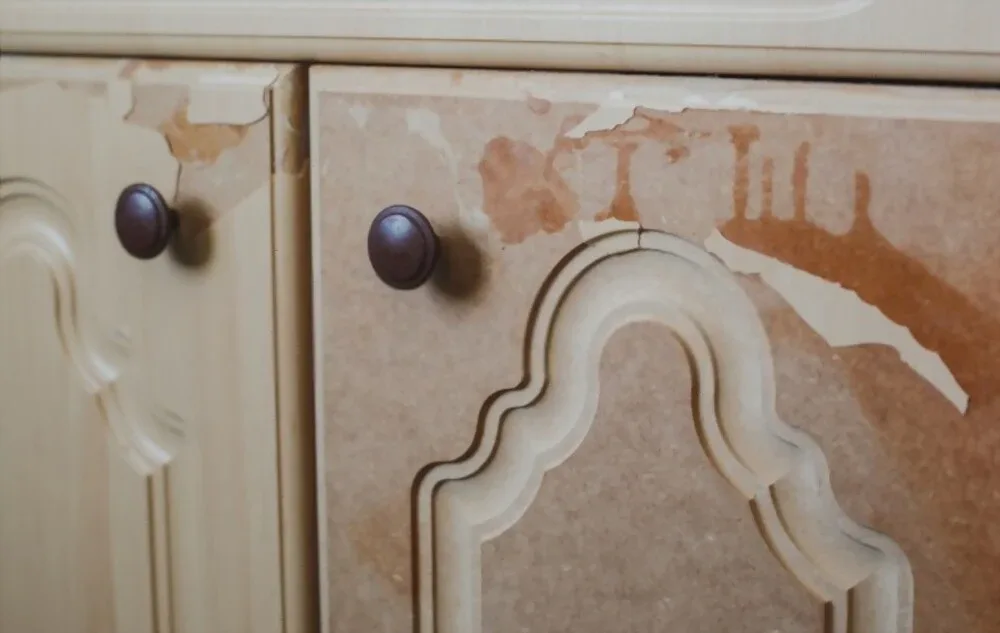
Image source: Web (Bing) / reaumeconstruction.com (Web image (fair-use with source credit))
Peeling or chipping paint almost always comes from poor surface prep. You'll see large flakes of paint pulling away from the cabinet, often starting at edges or raised panel corners. Per EPA testing, improper surface prep is the leading cause of cabinet paint failure in DIY projects.
If you notice this early, sand the peeling area down to the bare wood, apply bonding primer, and repaint that section.
Brush marks or drips happen when you apply too much paint at once, or use a low-quality brush. You'll see visible ridges from the bristles, or paint pooling at the bottom of doors. Sand the area smooth with 220-grit sandpaper, then apply a thin, even coat of paint to fix it.
Rounded cabinet edges are a sign of over-sanding, especially on raised-panel doors. The crisp, sharp corners of the panel look worn and soft. You can't fix this easily, so avoid it by using a sanding block to keep edges flat while prepping.
Topcoat cloudiness looks like a milky, opaque haze over the finished surface. It's caused by applying topcoat in high humidity (above 60 percent), or using oil-based topcoat over water-based paint. Sand off the affected topcoat, wait for lower humidity, and apply thin, even coats to fix it.
Hardware misalignment leaves uneven gaps between cabinet doors, or doors that won't close fully. This happens when hinges aren't labeled during removal. Adjust the hinge screws to shift the door position, or relabel and rehang doors if the misalignment is severe.
If your refinishing project runs into major issues, budget kitchen upgrade alternatives can help you find cost-effective fixes without full replacement.
Realistic Cost and Timeline Breakdown for DIY vs Professional Work
DIY cabinet refinishing costs $300 to $1,200. Professional services run $1,500 to $4,000. DIY takes 3 to 7 days.
Professionals take 1 to 2 weeks. Solid wood is cheaper than thermofoil. As of 2026, DIY saves 60 to 70 percent versus replacement.
Frequently Asked Questions About Cabinet Refinishing
How long does the refinishing process take?
DIY takes 3 to 7 days. Drying between coats is 2 to 6 hours. Full cure is 7 to 14 days.
Can I refinish laminate or thermofoil cabinets?
Yes, paint only. Use deglosser and bonding primer. Never sand laminate or thermofoil.
Do I need to remove cabinet doors before refinishing?
Yes. Removal allows even prep. Label hinges for easy reinstallation.
How often do refinished cabinets need maintenance?
Every 10 to 15 years with care. Clean with mild soap. Avoid abrasive cleaners.