How to Use a Drain Snake on a Kitchen Sink (Step-by-Step)
Your kitchen sink fills with greasy water and the plunger just splashes it back. Learning how to use a drain snake kitchen sink starts with knowing where the clog actually lives. Most blockages sit past the P-trap in the horizontal branch line.
A snake reaches 15 to 25 feet into that pipe where chemicals and plungers cannot.
The International Plumbing Code limits trap-arm length to 30 inches for a 1-1/2-inch kitchen drain before a vent is required. That short run means the clog is usually close enough for a 25-foot manual drum auger. If water backs up into the other bowl or the dishwasher air gap, the stoppage is farther down and may need a sectional machine.
Let's match the tool to your exact setup.
Quick Answer
A manual drum auger with 1/4-inch cable clears most kitchen sink clogs. Remove the P-trap first. Feed cable into the branch line.
Crank clockwise only. Feel for resistance type. Retrieve slowly.
Reassemble with new slip-joint washers.
Why Your Kitchen Sink Won't Drain — And When a Snake Is the Right Tool
Kitchen drains collect grease soap and food particles that coagulate into a soft plug. Hot water melts it temporarily then it re-solidifies farther down. A plunger only pressurizes the trap.
Chemical cleaners eat pipe glue and rarely touch the real blockage. A snake physically breaks or retrieves the mass.

Image source: Web (Bing) / ipipeline.net (Web image (fair-use with source credit))
If the disposal hums but does not grind the clog is likely in the disposal or the tee below it. If both bowls back up the stoppage is past the baffle tee in the common branch. If the floor drain gurgles when you run the sink the main line may be involved.
That changes the tool choice entirely.
A 25-foot manual drum auger costs $25 to $45 and handles 90 percent of residential kitchen clogs. Rental sectional machines run $55 to $85 per day. Professional service averages $225 for the first hour as of 2026.
The math favors owning a hand spinner if you have older pipes or cook heavily.
Pick the Right Snake: Manual Drum vs. Powered Sectional for Kitchen Lines
Manual drums spin a 1/4-inch or 5/16-inch music-wire cable inside a plastic housing. You feed by hand crank clockwise. They weigh 5 to 8 pounds and store easily.
Best for grease soap and light root intrusion in 1-1/2-inch to 2-inch lines.
Powered sectional machines like the Ridgid K-45 or General Mini-Rooter drive 5/16-inch to 3/8-inch sectional rods. A foot pedal controls rotation. They deliver more torque and reach 50 to 75 feet.
Necessary for cast iron heavy roots or main-line access.
| Feature | Manual Drum Auger | Powered Sectional Machine |
|---|---|---|
| Cable diameter | 1/4 in or 5/16 in | 5/16 in to 3/8 in |
| Max reach | 25 ft | 50 to 75 ft |
| Torque | Hand force only | Motor driven 30 ft-lb limit |
| Weight | 5 to 8 lb | 40 to 60 lb |
| Cost to buy | $25 to $45 | $400 to $900 |
| Cost to rent | N/A | $55 to $85 per day |
| Best for | Grease soap light roots | Cast iron heavy roots main line |
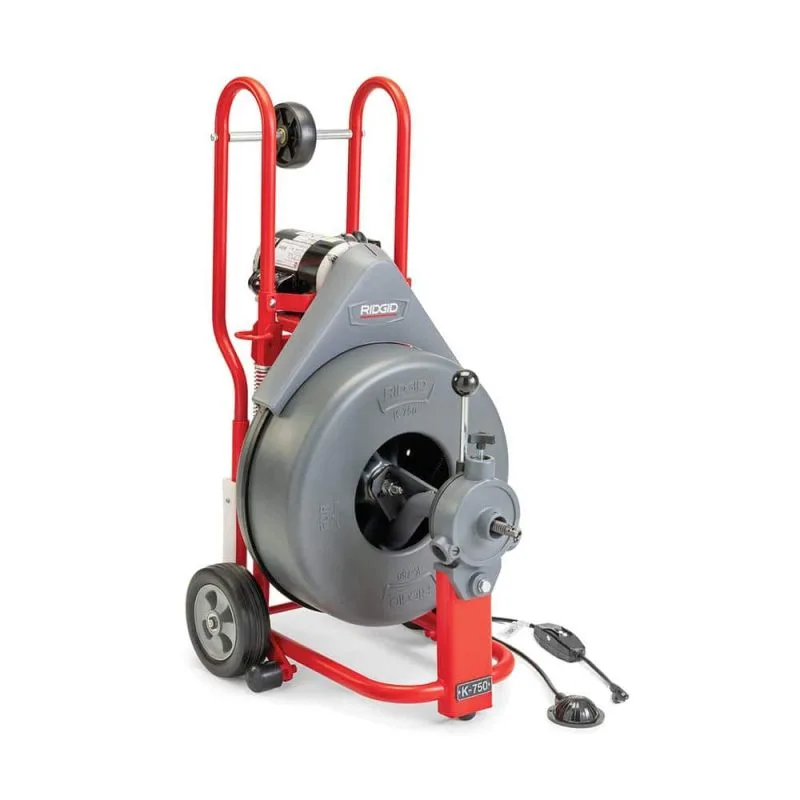
Image source: Web (Bing) / fasalus.com (Web image (fair-use with source credit))
Choose manual if the clog is within 20 feet of the sink and the pipe is PVC or ABS. Choose powered if you must reach a roof vent or the line runs under a slab. Never force a manual cable past a tight 90-degree elbow.
It kinks and snaps.
Know Your Sink Setup: Disposal, Double Bowl, and Pipe Material Change the Approach
A garbage disposal adds a grinding chamber and a side-outlet tailpiece. The cable cannot pass the splash guard safely. You must disconnect the disposal or remove the tailpiece entirely.
Unplug the unit first. Loosen the mounting ring. Set the disposal aside.
Double-bowl sinks share a baffle tee. The cable enters one side but the clog may sit in the common arm. Feed from the bowl with the straightest path to the tee.
If both bowls drain slowly the blockage is past the tee. Snake from the cleanout if accessible.
Pipe material dictates force limits. PVC and ABS tolerate moderate torque. Cast iron cracks under impact.
Galvanized steel corrodes internally reducing diameter. Lead traps deform easily. Identify your material before applying pressure.
A magnet sticks to galvanized and cast iron not to copper or plastic.
Homes built before 1970 often have 1-1/4-inch tailpieces stepping up to 1-1/2-inch trap arms. That reduction catches debris. Modern codes require 1-1/2-inch minimum throughout.
If you feel a hard stop at 12 inches you may be at a size transition not a clog.
Choose Your Entry Point: Through the Trap, Past the Disposal, or Roof Vent
The cleanest entry is the P-trap cleanout plug. Unscrew the countersunk or raised-head plug with a pipe wrench. Feed the cable directly into the trap arm.
No disassembly required. This works only if the plug is accessible and not seized.

Image source: Bing (Web (fair-use with source credit))
If no cleanout exists remove the P-trap. Place a bucket. Loosen both slip-joint nuts with channel locks.
Inspect the trap for sludge. That alone may solve it. Reassemble with new washers hand-tight plus a quarter turn.
For disposals disconnect the tailpiece at the baffle tee. The cable enters the branch horizontally. Support the disposal weight or remove it fully.
Never snake through the disposal grinding chamber. The cable wraps the shredder ring and destroys the seal.
Roof vent access is a last resort. It requires ladder safety fall protection and a second person. Feed downward from the stack.
You lose tactile feedback. Use only when the branch has no cleanout and the trap arm is glued solid. Per PHCC guidelines vent snaking should be performed by licensed technicians.
Step-by-Step: Feed, Crank, Feel, and Retrieve Without Wrecking the Pipe
Run hot water for two minutes. If it drains slowly the clog is past the trap. If it stands completely the blockage is total.
Put on leather-palm gloves and safety glasses. Cable snap-back causes serious eye injury.
Remove the P-trap or cleanout plug. Feed three feet of cable into the pipe. Tighten the drum setscrew.
Crank clockwise only. Reverse rotation unspools the cable inside the pipe creating a bird's nest.
Advance in one-foot increments. Pause every foot to feel resistance. Soft spongy drag means grease.
Hard solid stop means a foreign object. Grabby uneven pull suggests roots or a collapsed pipe. Stop cranking immediately at any hard stop.
If the cable binds do not force it. Reverse the crank half a turn. Push gently forward.
Repeat. Forcing kinks the cable or punches through old pipe. A kinked 1/4-inch cable yields at roughly 30 foot-pounds.
You will feel the sudden give.
When the cable breaks through keep cranking two more feet. This clears the full diameter. Retrieve slowly.
Wipe the cable with a rag into the bucket as it exits. Inspect the head. Grease coats it.
Roots tangle it. Forks or bones bend the bulb auger.
Reassemble the trap with new slip-joint washers. Hand-tighten then snug with channel locks one-quarter turn. Overtightening cracks the nuts.
Run both bowls full of water. Watch every joint for leaks. Tighten only if needed.
Clean the cable with a disinfecting wipe before storage. Oil lightly with WD-40 to prevent rust. Coil loosely in the drum.
A tight coil sets a memory that causes binding next use.
What the Resistance Tells You: Grease, Roots, Forks, or a Crossed Vent
The cable transmits distinct tactile signatures. Learning to read them prevents wasted time and pipe damage. Grease feels like pushing through cold butter.
The cable advances with steady drag then releases suddenly when the plug breaks. You will see a thick white coating on the bulb auger when you pull it back.

Image source: Bing (Web (fair-use with source credit))
A hard solid stop at a consistent depth usually means a foreign object. Forks bones and bottle caps lodge at the first long-radius elbow. The cable hits and cannot rotate past.
If you feel a sharp click the bulb may have jumped the object. Switch to a C-cutter or spade bit to chew or hook it.
Roots produce a grabby uneven pull. The cable jerks as cutter teeth catch fibrous strands. You will see green or brown fiber on the head.
Roots enter through joints in clay or cast iron. They indicate a pipe breach that snaking alone will not fix. Hydro-jetting or pipe lining follows.
A crossed vent feels like a soft wall at the vent tee connection. The cable pushes upward into the vertical stack instead of continuing horizontally. You will notice the cable length inserted exceeds the trap-arm run.
Pull back slightly rotate the drum to reorient the head then advance with light pressure.
If resistance increases steadily with no breakthrough the pipe may be collapsed or severely offset. Old Orangeburg or deteriorated cast iron deforms inward. Continuing forces the cable through the pipe wall creating a new leak.
Stop immediately and call for a camera inspection.
Reassemble and Test: New Washers, Torque Specs, and Leak Checks
Slip-joint washers compress and harden over time. Reusing them is the most common cause of post-snaking leaks. Buy a multi-pack of 1-1/2-inch beveled polyethylene washers.
They cost pennies and seal reliably on PVC ABS and metal.
Slide the nut onto the tailpiece then the washer bevel facing the joint. Push the tailpiece fully into the hub. Hand-tighten the nut until the washer seats.
Give one-quarter turn with channel locks. That is roughly 15 to 20 inch-pounds. No torque wrench needed.
Feel for the sudden firm stop.
Double-bowl baffle tees have two slip joints. Tighten both evenly. Alternate a half turn on each side to keep the tee centered.
Uneven pressure cracks the tee body. Check alignment by eye before final snugging.
Run the garbage disposal briefly with water flowing. Vibration can loosen a marginally tight joint. Retighten if you see any seepage.
Wipe all connections dry then place a dry paper towel under each joint. Run both bowls full and drain simultaneously. Watch the towels for five minutes.
If a joint weeps loosen the nut slightly reseat the washer and retighten. Do not overtighten chasing a drip. Cracked nuts leak worse.
If the leak persists replace the nut and washer set. They are standardized and inexpensive.
When to Stop and Call a Pro: Cable Snaps, Cast Iron, or Main Line Backup
A snapped cable inside the pipe is a retrieval nightmare. If you feel sudden loss of torque and the drum spins freely the cable has parted. Do not keep feeding.
The broken end will tangle with any new cable. A pro uses a retrieval spear or camera-guided grabber.
Cast iron installed before 1975 is brittle. Aggressive power snaking cracks the hub or splits the barrel. If your home has cast iron and the clog resists a manual auger stop.
Hydro-jetting at 1500 psi or pipe lining preserves the system. Snaking is a temporary patch on failing iron.
Water backing up into the floor drain or basement laundry tub means the main line is blocked. Kitchen branch snaking will not reach it. You need a 3-inch or 4-inch cutter head on a sectional machine fed from the main cleanout.
That is a two-person job with heavy equipment.
Multiple fixtures gurgling simultaneously confirms a main line or vent stack issue. The kitchen sink is just the lowest victim. Snaking the branch clears the symptom not the cause.
A camera inspection locates the true blockage. Per ICC IPC Section 708 main line cleanouts are required at the base of every stack.
If you have snaked 25 feet with no resistance change the clog is farther than your cable reaches. Renting a 75-foot sectional makes sense only if you have the cleanout access and the skill to operate it. Otherwise the $85 rental plus your time exceeds a pro service call.
Common Mistakes That Turn a Clog into a Repair Job
Forcing the cable past a bind is the number one error. The music wire yields at 30 foot-pounds. You exceed that with body weight on a manual crank.
The cable kinks inside the pipe. A kinked cable cannot be straightened. It will snap on the next use.
Snaking through a garbage disposal without disconnecting it destroys the splash guard and shredder seal. The cable wraps the rotating plate. The motor stalls.
The disposal housing cracks from torque. Always unplug and remove the disposal or at least the tailpiece.
Using chemical drain cleaner before snaking creates a splash hazard. The caustic liquid coats the cable. When you retrieve it the chemical flies onto your skin and eyes.
Rinse the pipe with hot water for five minutes if chemicals were used recently. Wear a face shield.
Reassembling with old washers guarantees a leak. The bevel takes a permanent set. It will not reseal.
Keep a washer assortment in your tool bag. They cost less than a service call for a preventable drip.
Skipping the P-trap inspection misses the easy win. Half of slow drains clear by simply cleaning the trap. Remove it first.
Look inside. Scrub it out. Reassemble.
Test. Only then break out the snake if needed.
Safety Gear, Chemical Residue, and Rental Liability You Can't Ignore
Leather-palm gloves are non-negotiable. Nitrile tears on the first cable burr. The cable spins at up to 300 rpm on powered units.
A catch pulls your hand into the drum. Long sleeves protect forearms from splash and scrapes.
Safety glasses must wrap the temples. Cable snap-back travels at bullet speed. A broken strand whips 180 degrees.
Standard shop glasses leave a gap at the cheek. Use ANSI Z87.1 rated wraparound lenses. A face shield adds neck protection for powered machines.
Never snake a line recently treated with sulfuric acid or lye crystals. The residue remains active for days. It eats cable coatings and burns skin on contact.
Flush with copious cold water for ten minutes before inserting any tool. Ventilate the cabinet.
Rental centers require a signed liability waiver for sectional machines. You accept responsibility for cable damage pipe damage and personal injury. Read it.
The daily rate does not include replacement cable at $40 per section. Inspect each rod for fraying before you leave the lot.
If your home has asbestos-cement (Transite) vent stacks do not power snake them. The vibration fractures the pipe releasing fibers. Manual auger only with gentle pressure.
Encapsulation or replacement is the long-term fix. Check with your local building department for abatement rules.
Quick Decision Guide: Match Your Situation to the Right Move
| Scenario | Tool | Entry Point | Max Time |
|---|---|---|---|
| Single bowl no disposal grease clog | Manual drum 1/4 in | P-trap cleanout | 20 min |
| Double bowl both sides slow | Manual drum 1/4 in | Trap arm after P-trap removal | 30 min |
| Disposal hums no grind | Manual drum 1/4 in | Disconnect tailpiece at tee | 25 min |
| Cast iron pipes pre-1975 | Manual drum gentle only | Cleanout or trap | 30 min |
| Main line backup floor drain gurgling | Pro sectional 3 in cutter | Main cleanout | Pro only |
| Roof vent only access | Pro only | Roof vent stack | Pro only |
If the clog clears in under 15 feet with a manual auger you likely had a routine grease plug. Run hot water weekly and scrape plates to prevent recurrence. If you hit the same spot twice in six months the pipe has a belly or root intrusion.
Schedule a camera inspection.
For rental units keep a manual drum on site. Tenants can clear simple clogs without emergency calls. Train maintenance staff on trap removal and cable feeding.
One avoided service call pays for the tool.
Frequently Asked Questions
How far should I snake a kitchen sink drain?
Feed the cable until you feel the clog break or reach 25 feet. Most kitchen branch lines run 15 to 20 feet to the stack. Stop if resistance increases without breakthrough.
Can I snake through a garbage disposal?
No. The cable wraps the shredder plate and destroys the seal. Always disconnect the disposal or remove the tailpiece at the baffle tee before snaking.
What size cable for kitchen sink?
Use 1/4-inch cable for 1-1/2-inch and 2-inch lines. Thicker cable binds in tight elbows. Thinner cable kinks and snaps under torque.
Why does my sink gurgle after snaking?
Air trapped in the line escapes through the trap. Run water for two minutes. If gurgling persists the vent may be blocked or the clog was not fully cleared.
How often should I replace the auger cable?
Inspect before each use. Replace when you see fraying broken strands or permanent kinks. A 1/4-inch cable lasts 20 to 30 jobs with proper care.
Do I need a permit to snake my own drain?
No permit required for homeowner maintenance on private property. Some jurisdictions restrict powered sectional machine use to licensed plumbers. Check local code.