How to Refinish Kitchen Cabinets Without Removing Them
A few years ago, "how to refinish kitchen cabinets" was the first search most homeowners with tired oak cabinets ever made. The idea of ripping out solid wood and hauling it to the landfill feels wasteful, and splashing out on a full replacement can cost as much as a small car. Refinishing is the middle path, and when it's done right, it's genuinely impossible to tell the difference from factory work.
The trick is you can't just slap paint over grease and call it a day. Around 80% of refinishing failures trace back to bad surface prep, according to manufacturer testing and aggregate contractor reviews. This guide walks you through the entire diagnostic first, then the step-by-step workflows that you can actually use.
Quick Answer
To refinish kitchen cabinets, you clean, sand, prime, and repaint or restain them. On solid wood, you can light sand and recoat or strip completely. On laminate or veneer, you must use a bonding primer and a specific topcoat.
Budget one to two weeks for the job. The average project costs $200 to $400 in materials.
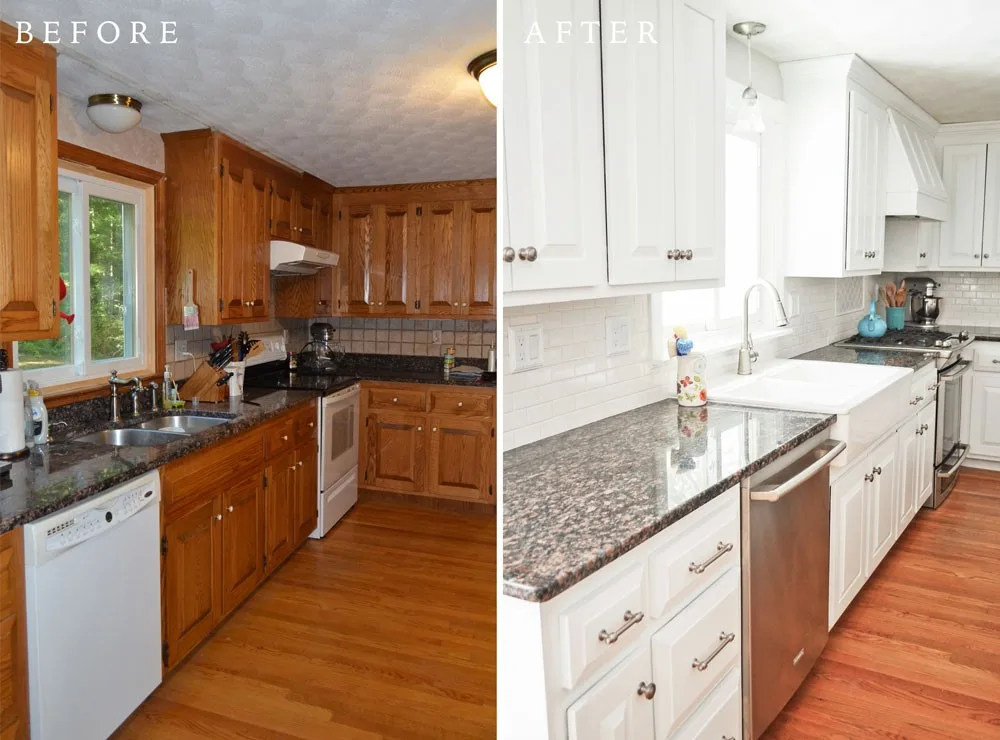
Image source: Web (Bing) / storage.googleapis.com (Web image (fair-use with source credit))
Quick Answer: Can You Actually Refinish Your Cabinets?
Yes, in most cases you can refinish your kitchen cabinets. The catch is that "yes" only applied after you've checked the material, condition, and the existing finish. The only real showstoppers are 事 thermofoil doors where the covering is beginning to peel away, or cabinets that have water-logged and swollen particleboard like the bottoms of some under-sink.
So before buying any sandpaper or paint, answer these three questions:
- What material are the cabinet boxes and doors? Solid wood, MDF, or plywood = you can paint or stain. Laminate or thermofoil = paint only, and only with the right primer.
- What's the condition of the surface? Clean, intact and your easy to refinish. But if the laminate's lifting or the wood has water damage, you have additional repair work ahead.
- What's the current finish? Raw wood. Scuffed and light varnish. Glossy poly. They all require slightly different route.
If you can honestly walk through that assessment, you're already further along than most people who start the job. The good news is you find yourself DIYing not actually as hard as it looks, but it is very much a process of patience and careful work. The whole kitchen is in pieces, and you can't just walk away mid-coat.
And that's the actual secret. The actual damaging part is having a full working kitchen out of commission while you wait. So before you start, have a game plan.
Expect to spend six to ten days, and plan for two full weekends plus the week in between.
The Core Problem: Why Most Cabinet Refinishing Fails
It's not that people skip prep. It's that they don't actually know what "prep" means. And the most common mistake is putting grease, oil, or silicone against the topcoat.
These invisible deposits sit between that new finish and the wood.
They can cause cracking, peeling, or other finish issues later. And it's going to happen exactly a month after you're done, and you'll have to sand everything off.
There's also the issue of gloss, especially on old kitchen cabinets. If he's finished with a smooth, shiny polyurethane or old factory lacquer, you can't just paint over it. It's almost like painting over glass.
The paint will be on it, but it has zero adhesion, and within week one, you'll see unsightly flaking, the finish coming off. You need to degloss or scuff-sand, so all the microscopic grooves give the new paint something to hold onto.
Another classic failure point is no primer at all. Paint is not built to create its own adhesion to an old surface. Primer is the bridge.
Some bonding primers, like the one Sherwin-Williams makes, will stick to a high-gloss surface without sanding. And that truly makes some jobs faster. But if you use a generic primer on old, greasy cabinets, you've literally wasted every hour.
Tip: Our research into kitchen cabinet design principles, shows that you also have to match your material to your family's daily habits. If you have kids, a super-flat matte sheen will show every single smudge. You want to think practically here.
The Big Decision Branches: What You're Working With
Before you pick up a brush, you need to find what you're choosing. A refrigerating job starts to look three entirely different ways depending on the answer to this question.
Branch 1: Identify Your Cabinet Material
This is your #1 decision driver. Go to the inside edge of your door, where it's not visible, and look at the exposed edge. You'll see:
| Material | Look & Feel | Refinishing Options |
|---|---|---|
| Solid Wood | Wood grain visible on the face and on the edge, solid all the way through | Paint or strip+stain |
| Plywood | Thin wood grain line over several inner layers that are visible at the edge | Paint only (staining will show the veneer lines later) |
| MDF | Smooth, dense, uniform tan color, no wood grain anywhere, sometimes a bit fuzzy when sanded | Paint only (MDF absorbs stain unevenly) |
| Laminate | Shiny or textured plastic thin layer glued over an MDF or particleboard core | Paint only, with a careful bonding primer |
| Thermofoil | The aluminum foil-like plastic that's a single piece wrapped over a door to create panels | Paint only when smoothly, but consult first. Painted thermo occasionally peels. |
Branch 2: Painting vs. Staining
- Paint covers the grain, hides all imperfections, and gives you a uniform, opaque color. It's excellent for cheap wood and for covering up a dingy old finish.
- Stain highlights the inherent beauty of the grain, but only works on solid or plywood with good face material.
If you want the lighter, cleaner look, 9 times out of 10, the homeowner is painting rather than staining, because it's more forgiving. If you're going for a character-filled warm, natural oak look, stain it. Also, paint gives you a "sprayed" look, but a stained finish is definitely the domain of solid wood.
Branch 3: Existing Finish and Condition
Here's what an expert would say right now: You aren't refinishing the wood. You're refinishing the paint or the varnish on the wood. The old finish controls the entire session.
- Existing paint, peeling and chipping = needs thorough stripping to bare wood.
- Existing paint, fine roughness = sand it flat, prime, paint.
- Existing varnish/poly, glossy = scuff it thoroughly and prime.
- Greasy, shiny, sticky = de-grease first, always.
You Can Paint and Workflow: From Removing Doors to Rehanging Them
For wood, MDF, and plywood. This is the most popular and the most forgiving roadmap.
Image source: Web (Bing) / knapppainting.com (Web image (fair-use with source credit)
Step 1: Take Apart and Label
Every door stays its own. A kitchen that's come in pieces has to go back together and you want to do it without first trying to guess which hinge belongs to which door.
- When you remove each door, label the top right, top left, bottom right, etc., on the back using a painter's tape and a marker. Never write on the front.
- Keep all of the old hinges, screws, and drawer slides in a labeled plastic bag or container.
- There is a trick on the drawers as well. Label them with a number on the front of the rail before pulling them out.
This way, you can put the whole thing back together without stress. It's the difference between a weekend of assembly and a set of levers.
Linking to our guide on the kitchen layout and how it all goes together can help. A tiny, ill-laid cabinet will feel more complicated than a big one.
Step 2: Clean and Degrease Everything
This is the step that's above and beyond almost anything else. Nobody wants to clean more than they want to paint, but this step is really the layer that holds it all together.
- Mix any low-VOC TSP substitute with warm water.
- Wipe down every single surface, all inside and out, the doors, the drawers, the frame.
- Pay special attention to the space near the stove and above the sink and the top corners of doors.
Any grease residue left behind will dead-beam the adhesion. Also, it's the last time you'll be able to clean the inside of the cabinets, and you're going to save time later. Wipe parallel to, not across, any dividers or frames.
It's not a fast scrub, it's 10 minutes per press-mounted section.
After you've cleaned, rinse with same clean water and dry thoroughly. This is a "s queue" step. It's the equivalent of doing the dishes before you cook a restaurant meal.
It's understood.
Step 3: Scuff-sand Every Surface
Now that everything is clean, it's easy to effectively de-gloss. You're not removing the old finish. You're simply scratching it up slightly so that the primer can grip.
- Use a random orbit sander with 120 or 150-grit for flat surfaces.
- For paneled areas, you can use a sanding sponge to get into the grooves.
- Sand the face,Edges and all drawer fronts.
- Always sand evenly, and stop when the surface feels slightly dull and matte. If the sanded surface looks like it's gone through a coat, then you over-sanded. The primer will tell you if you did.
If you don't have a sander because you are intending to do this on a budget, you can use a liquid deglosser (suspension) instead. It works on glossy painted surfaces, and you don't get the air as a result. But it's still a chemical process where the old surface has to be bare, and can surprises with you on different paints.
Lots of users never get it right without sanding. We always say: sanding is more consistent.
Step 4: Fill, Patch, and Smooth
Once you see the plain. You'll spot minor dings, tiny nail holes, and scrapes. Those are holes and gouges, and they can be easily fixed with wood filler.
- Press a small sand cone of wood filler into the hole with a putty knife.
- Let it dry completely.
- Sand it flat with 220-grit sandpaper.
Then, take a tack cloth and remove all the dust. Also review the gaps between the face and the cabinet, if they look like foundation expansion joints, use a small bead of paintable silicone caulk to fill them. Silicone top and on spaces will show as lines.
Step 5: Primer: The Most Important Screen
Pick the primer that matches the rest of your build:
- For stained wood = use a stain-blocking primer like BIN or Zinsser Bulls Eye 1-2-3 water-based.
- For MDF or a glossy old paint = use a deep bonding primer.
Priming is not optional. And you want to use one coat, coat it evenly, and then wait for it to dry. Then, with a fine grade (220-grit) take it too lightly, just for chaos.
Step 6: Topcoat: Brush, Roll, or Spray?
This is where you're going to get the results. The tool determines your final texture.
Brush + Roll:
- Slower and not perfectly smooth, but it's almost foolproof. Use a 3/16" or a 4mm microfiber roller, and a high-quality synthetic brush, applied thin.
- Expect more cleaning and anticipation. Not more rapid results.
Spray Gun (HVLP):
- The best result. Glass-like, zero clouds, professional cabinet finish.
- Requires practice, spray booth or garage, respirator, and lots of protection.
- Use two to three thin coats.
Here's the key thing: You're not just going to do this once. You're going to apply at least 2 coats of paint, maybe 3 for hardwood. Apply the first coat, let it dry for a full day before you sand it again.
The drying timeline
| Step | Time to Wait |
|---|---|
| After cleaning, before sanding | 1-2 hours (dry) |
| After primer, before sanding | 2 hrs in manual, 24 hrs to cure |
| After sanding primer, before paint | 24 hrs is ideal |
| After painting, before reinstall | 24-48 hrs minimum |
| After install and full cure | 7 days before scrubbing |
Step 6: Curing, Rehinging, and Adjustments
Do not rush this. The paint can feel dry to the touch in two hours, but it physically takes three to 7 days to fully cross-link into a hard film. If you hang the doors too early, you'll get stripping, sticking, and scratching.
After a regular night, it's okay to hang them, but you'll have to be careful closing them for the first few days. The base coats for the inside edges of the doors are essential. Test them by closing once, then opening and checking for sticking.
You might need to let those edges rest longer before it's safe to use the kitchen.
The More Direct Staining Workflow: For Solid Wood
Alright, you want a wood grain to show. That only works on solid wood. If you truly want natural grain, you get to choose from.
Check.
You can do a "naked wood look": stripping off the oil and varnish down to bare wood and then applying a coat of raw stain. This is the most labor intensive but uncompromisingly beautiful.
Step 1: Stripping to the Wood
This usually means using a chemical stripper to remove the old finish. Apply a generous layer of stripper with a brush or a thick cloth. Let it bubble and lift.
Use a plastic scraper to peel the tacky varnish away. Take the corners and carving out with a nylon brush.
When it's off, you'll want to neutralizer (water or mineral spirits) and a light sanding. If you see old varnish in the corners, always do another pass.
Step 2:, Conditioning the Wood
If you skip this step on common wood like Oak, Birch, Pine, or Maple, you will get blotchy patches. Wood conditioner (also called a pre-stain) soaks into the porous areas and evens out how the wood absorbs.
- Apply a thin, even coat.
- Wait for about 10 to 15 minutes.
- This step is a one-way ticket to blotch foto, so don't skip it.
Now you're ready for your first layer of your stain.
Step 3: Staining: Technique and Timing
Stain is part of the color layering process, not a coat of paint. This means that no matter how much you push in, you get a consistent color. It does not look like caked paint.
- Work in sections, and always keep a wet edge.
- Apply the stain with a good brush, and wipe off the excess with a clean, lint-free rag.
The longer you leave the stain on, the darker the color. At two minutes, it's a light honey. At ten minutes, it's a rich amber.
Let the stain dry fully for 24 hours, then apply the next coat, or proceed to the topcoat.
Step 4: Top Coat
For a cabinet, you need a durable, no- yellowing, water-based Urethane (or a hybrid oil+water) to protect the wood. Some oil-based polyurethane are lightly amber, which can actually be good for a warm, classic look, but they yellow badly on light woods.
- Use a very high quality 2-1/2" synthetic brush from a manufacturer like Purdy or Wooster.
- Apply in thin, even coats.
A standard rule for cabinet finishes: 3 total coats building up from a 320-grit light sand and between each layer.
Step 5: Reassembly and Repairs
Reattach the doors with the original hinges. After you screw, drop in place and test the door is what you expect. If finding nine m screws, you can place some a cord in the new hole with a toothpick and reinstall the screw.
Let the finish cure for a solid week before you start slamming that cabinet door shut. The wood is finally trying to get to a durable, hard stage. It's a commitment, but it's kitted out for years.