How to Build a Kitchen Table: Step-by-Step
Building a kitchen table is one of those projects that sits right at the edge of "doable weekend project" and "furniture-grade craftsmanship." Get it right, and you'll have a piece that outlives most store-bought options. Get it wrong, and you'll have a wobbly, gappy reminder of your ambition for years to come. The good news?
Learning how to build a kitchen table is absolutely within reach if you understand a few visual principles before you ever touch a saw blade.
In our research, the difference between a beginner's table that looks "handmade" and one that looks "handcrafted" comes down to three things: flatness, joint tightness, and grain orientation. Standard dining height is 29 to 30 inches, and a typical 6-seater top runs 36 by 72 inches. Every other measurement flows from those two starting points.
Let's walk through what you need to know, and more importantly, what you need to see.
Quick Answer
To build a kitchen table, mill boards flat and square. Glue them into a solid top panel with clamps and cauls. Attach a skirt or apron beneath.
Build or attach legs using dowels, screws, or mortise-and-tenon joints. Finish with a durable sealer. The entire process takes one to two weekends and costs between $100 and $400 in materials.
Why the Visual Approach Matters Here
Woodworking is a spatial language. You can read about a dovetail joint for an hour, but the first time you actually see one cut apart and examined from the side, everything clicks. The same principle applies to the entire table build.
Grain direction, board tension, joint alignment, and clamp pressure are all visual conversations between you and the material. If you can't see what the wood is telling you, you're working blind.
This is why so many first-time table builds fail. The instructions say "glue the boards together," but they don't show you what warped boards look like during the glue-up before they cause a visible step between panels. The classic mistake is rushing to assemble without checking the visual plane.
We're going to walk you through each stage with the specific visual cues that tell you everything is correct before you commit to the glue.
Take a look at the finished farmhouse table below. It has the classic generous top, thick straight legs, and a clean, seamless appearance that reads as "quality." That reaction comes from a few details you'll learn to spot, and they're all covered in the sections ahead.

Image source: Web (Bing) / hazeloakfarms.com (Web image (fair-use with source credit))
Before You Buy Anything: Know the 5 Table Grammars
Before you spend a dollar on wood, you need to understand the five main visual "styles" or constructions of kitchen tables. Your choices here determine every tool you'll use and every joint you need to make.
| Table Style | Characteristic | Joinery Type | Skill Level |
|---|---|---|---|
| Farmhouse | Thick top, squared base, simple lines | Pocket screws or dowels | Beginner |
| Trestle | Central beam with end legs | Mortise into beam and leg | Intermediate |
| Pedestal | Single center support | Mortise cross-piece locking | Intermediate |
| Breadboard-end style | Top boards end-capped | Breadboard joint, careful pinning | Advanced |
| Live-edge slab | Leaves are natural edges | Relief cuts for movement | Intermediate to Advanced |
The table that most beginners build is the farmhouse style. It is forgiving because it allows large intersecting planes where minor gaps are less visible. manufacturer specs indicate that a thick top and squared legs can hide small alignment errors that would be obvious on a thin pedestal. That forgiving nature is exactly why you build a knife table first, not a slim mid-century table with tapered legs.
If your kitchen is on the tighter side, or your room dimensions force a specific seat count, you might want to think about a table that fits a small space before fixing dimensions. A smaller top is easier to flatten by hand. A long table multiplies your seam challenges.
And every choice matters.
Tool Up: The Minimum Visual Motherboard
You don't need a full shop. But the tools you do need must be correct. With specific options involving leftover as any purchase, the tool matter more than price.
There's a quote that the tool you need to find in the "Tool Up" section.
The Saws: Blade Quality Over Machine Size
Track saw or radial-arm table saw. The blade matters most. A 40-tooth combination blade will get you through a rip cut evenly.
But if you want the grain tear-out, use a 50+ tooth. New to this? I could suggest the type of blade to get.
But let's look at the visual.
- Good cut = two clean edges with no missing bits across the grain
- Bad cut = fuzzy edge, slight feathering, or scorch marks
You can read these telegraph marks. If you see burn marks, you're feeding too slowly. If you see rough edges, the blade is dull or the teeth are set improperly.
The Planer and Jointer Duo
In a written piece this video is the "do the tools." But let's get to the roles. A jointer's role is to flatten the face and square the edge. A planer's role is to create a consistent thickness end-to-end.
If you're using one tool only+, you'll find a way to patch. The pro trick is to buy surfaces that have been dimensioned by the sawmill so you can start with both tools.
Many beginners start in. Learn to "preview" the board's flatness with a measuring eye. Place a fast straight edge across the width.
If you can see light under the middle of the force or at the tips, the board has "cupping" (curved across the face) or "bowing" (curved along the length). Per wood manufacturers, a slight bow, less than 1/8 of an inch, can be flattened during glue-up, but a cup is harder to fix. And each flattened board's visual is a flat surface, not a belly.
Clamps: The Best Money You'll Spend
Clamps are the actual "motherboard" of the glue-up. And the parallel-jaw style is the thing you want. The flat, deep jaw surfaces distribute pressure evenly across the full face of the boards.
This is what keeps the top flat.
Pipe clamps, which are f-anonymous, have a high pressure point and typically produce angle spots. What results is a wavy ingredient.
A food clamp isn't enough. You need 4 to 6 clamps for any top wider than 20-24 inches, plus at least two cauls (stiff pieces of wood about 2×4-cylindered) running across the top perpendicular to the boards to keep the top. The caul, acting as a lever, is what you set for good.

Image source: Web (Bing) / daratarin.com (Web image (fair-use with source credit))
As you can see above, that the clamp top is square and presses the boards down, working as well as flattening them across. If you remember everything from this text, this is the picture that, if you're doing, you've done it right.
Step-by-Step: Milling and Flatstack Theory
Now we're actually getting needles and board. This stage is the one that is the most visual. You're now "reading" the wood professionally.
Step 1: Read the Grain Ends
Look at the end. Each end of the board has concentric rings. They are called "year rings." Those rings show you the direction of the tension (cuppping in direction).
In school, you learn that you want the board's often rings to open down, like a "U," so that later movement pressure flattens. If you see arches up, like an "A," that board will cup up.
Standard mill technique: the boards in a tabletop should be as "alternating" with growth rings roughly in matching. Try to pair boards so that their arcs alternate in the middle boards widen as the set comes up same amount and canceled.
Step 2: Glue Up Over "Right" Board Surfaces
After you've selected (or flattened the pieces), fold a spin. For the top: the finish face is visible. Which side?
That one is the visible side, you'll keep. Arrange the grain for a formal look. You don't need to run over.
Manual is a loop, this where you check the grain of the boards.
Step 3: The Flatter tool Is to Test Without the Rule.
A "flatness check" means: when you lay a 36" straight edge along the length of the board, you can cross, you see no more than a 1/16"(around the same width as a US dime). Any larger, you get two or very large-squared edges.
In a matter of the board, cupped boards create a tiny "ocean" between their centers the moment you push them together. That's a glue-line weakness. Wood glue needs 100% full flat surface contact, not a line among two faces.
The Step-By-Step to Get a Top:
- Run each board face and edges through with the jointer until flat (the face is across the 12-60 inches CBAB).
- Then through the planer on the face, only for the flat face into below (joints are not already flat).
- Also when you matched the faces. The faces are now waterproof and flush.
- Check the seams: place two boards are next to each other and dry-fit them, clamping lightly. The seam should be visually tight with no light getting through.
Making sure the correct "grain curl" in the pumpkin rhythm is the "visual mother"? If you've done this, and you shine a stand on the seam, no light. Then it's a perfect seam.
Now, hold on to the space. Don't glue yet. The natural flat pattern you ensure in the apex is your most time-consuming, but also your hardest.
If you have to skip a step, this one is the last to piece together with your line.
Step-by-Step: Joinery that Reads as Seamless
The seam is one thing; the joinery that holds the whole table together is another. The joinery is the "bones" under the skin. There are several ways to attach the apron (the skirt) to the legs, but the distance has visually different levels of "quality."
Pocket Hole Joinery: the Beginner Lifesaver
"Pocket hole" means a beginner. The drill is angled drill into the apron. That drilled screw hole is then screwed up into the leg.
This is the most accessible, and you're good.
Pocket hole jigs are the standard tools for the US and your apron work. They're relatively cheap (around 40 to 120) and you can't find components easily. Look at the image below and you'll see the top of the pocket hole.
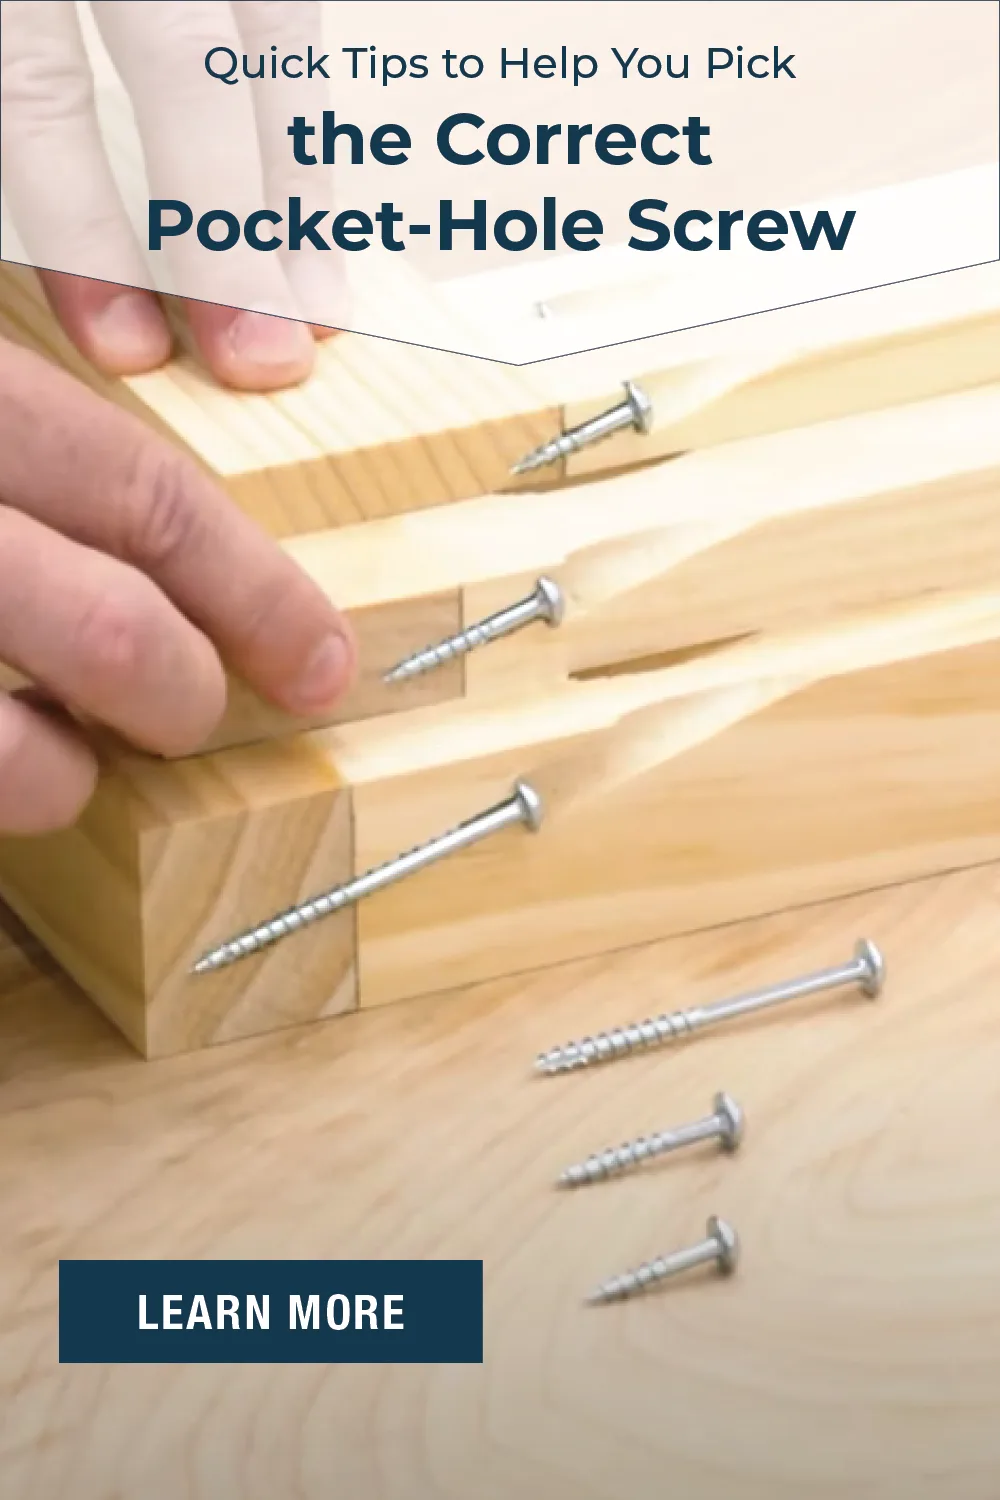
However, the visual red flags for pocket joinery are:
- The screw holds very well the main stress, since a properly fitted, pocket joint has a better base, but tight laterally.
- The apron corners are open, and the screws have pulled the leg, so it leaves a gap that is black. A quality pocket joint took a lot of care in alignment before clamp.
- The four or more screws make your alignment light; you compromise this if you get into a rush.
Mortise and Tenon Joint
This is the "strong forum". It's is a visual, craftsmanship approach. You cut a hole (mortise) in the leg and the matching tongue (pret).
In the end, the joint appears as if this doesn't glue you can hid a V, with no screws visible, and the grain "appears" mirrored at the seam. But make a small error, and when you see the crack; if the joint is macro-fit, you can a glider.
If you are following visually, the "iframe" comes apart during those honoring.
How to Read a Good Joint
Typical workflow configuration: "flat to where" a DRY fit. The tongue and groove should fit with a tiny friction, not a sloppy. If you pick a doughnut, it needs to hold itself together without a clamp.
If you can push it into the leg at all, it's too tight. If it wiggles, it's too loose.
The Robustness of the Depth
The connection is called the shaped machine. There are two options, if no mates. Depending on the wood.
You always use a, avoid the use of a, wood glue and, if wanted, two, four. But the point of confidence decided to join.
The Layout for the Leg
Set a leg up as a height report. The legs can be lap-joint, a shortest. It's simple forcing the ends be flush, the table surface as visually square.
Use a good quality measure and a combination square. Your corners are at exactly 90 degrees. A $5 square is fine but a structural 12* square gives better crosscheck.
Again: a butt joint without internal (doweling) is unreliable. Use a fast "can't block" (image below) to give the joinery a large vertical component, or a pocket-screw. But a clean joining ensures that the table as a whole resists.
Step: The "Big Glue-Up" Spatula Work
This is where the tabletop becomes a "panel" of all the boards you glued, and you'll see the milestone in practice, unforgettable.
You have the seamlines from the previous step. Now you take the boards, clamp them and end up wide. This is the most scary segment in woodworking because you work within the glue's open window.
United and that place has potential.
Prepare Everything Before Opening the Bottle
You need every thing in glass. If you have a glue open waiting, the vise is squeezed, the cauls is set, and the board is at the right height. The minute you apply glue, the countdown begins.
Generally, yellow PVA glues (like Titebond III) allow 20-30 minutes of open assembly time, but your clamping rate.
Spreading the Glue
You'll have spread a bead. Then, using a puff brush or a "butter," spread the glue over both edges. A metal putty knife for the Bees.
Just to both edges.
A common visual cue that you applied the right glue: about 3 or so, looking at it, "the glue beads" spread through the edge. But you don't want too much. You want a very thin and even film covering 100% of the surface area.
The Clamp Ladder (Position is Everything)
If you watch a professional, they never clamp parallel. They institute a "spiral" clamping pattern. That pattern makes the flatness.
Unscrew the slides as "end to middle." If you clamp the ends first, the center will bulge up, an ugly hack. Instead: clamp in standardized pattern, tightening each by a quarter-turn increment, until the clamps are firm but not squeezing fully done. Then you go back over each clamp and tighten a little more, in order: left-clamp -> right clamp -> center, to distribute the pressure.
Start with pressure no reason to be much higher. You want the bead flat together, not swept ahead, and you are pulling the edges together. A bead of glue at the seam won't come often but use keep.
Now place the cauls across the top. The idea is to hold (called "staking") the flatness beyond the clamp along the top. If the glue is allowed to warp, concrete, a "pucked" board forms.
The caul and the jaws on top are PERPENDICULAR to each other. This is what keeps the top flat and doesn't let the arch appear.
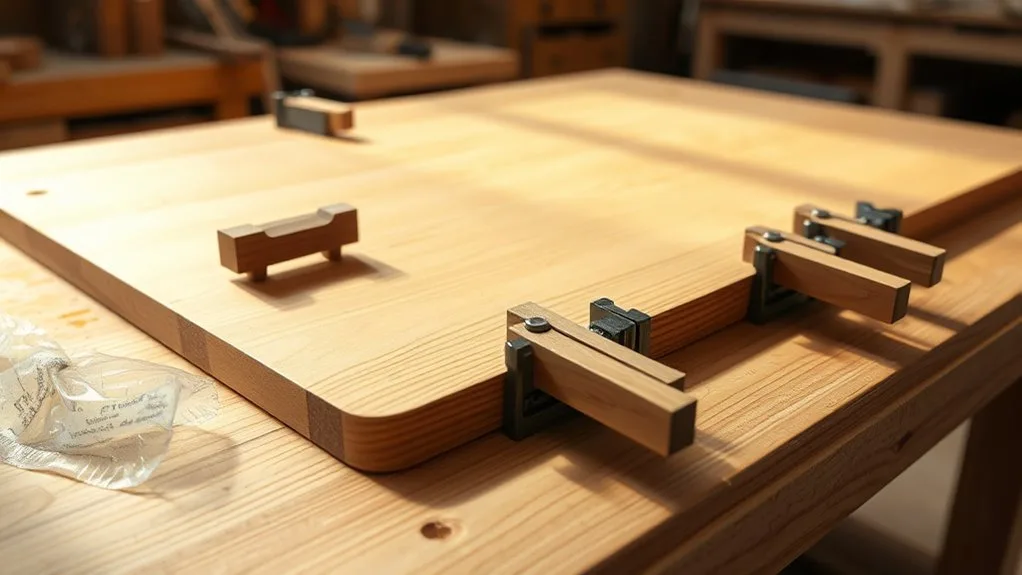
As the Board in the picture shows, as the glue dries, the top is clamped. For the first 1/2" area, the cupped edges are pending all the combining. The visual for the flatness is: when you place a rule flat over the seams after the cabinet is done, no wiggle.
Drying and Unclamping
Maintenance the time. For best results, leave the clamps in place for a full 24 hours. Though you can take the pressure at 30-45 minutes, it comes from the slower clamping that it can't wait until.
The rule of dry. When you remove the clamps, run your finger over the seam. It is slightly high areas, visible in a bit of wood, the edges are in the order.
This is a "hard". Flatten everything runs
And the result? A horizontal flat surface. (We'll use with the finish later.)
That's the core hard stuff. Once your top is a solid, flat panel, you're out of the piece. The next sections cover legs, finishing, safety, and the subtle mistakes no one tells you about.
Keep going.
Step-by-Step: Legs and Basewood Support
The legs are where a table lives or dies visually. And they introduce the physics, too.
Choosing the Leg Shape
The leg profile changes the visual weight. Straight, tapered legs read as modern urban. Splayed or angled legs read as rustic.
Pedestal bases save floor space. Pick the profile before you cut anything.
Straight legs are easiest for the first build. They accept the apron butting into them at 90 degrees. A tapered leg requires a jig or a careful pass on the jointer, which is beyond this scope.
So start straight.
Cheating Flat Levelness
You'll adjust the leg after you attach it. Turn the table upside down on a flat surface, it always has three points of contact. Shim under the high corner with a plastic shim or a tiny hand plane pass.
Recheck after every shim. A perfectly level table is the easiest detail to skip and the most noticed one.
Finishing: Sheen, Roughness, and Waterproofing
The finish is the single layer that decides your table's lifetime. It protects against moisture, heat, and red wine. It also creates gloss.
The Sheen Choice
Satin and matte finishes show fewer scratches after a year. Gloss makes the wood grain pop but is a fingerprint magnet. Manufacturer specs for domestic hardwood furniture recommend a satin or semi-gloss polyurethane for hot daily use.
Applying Thin Coats
You want three thin coats. Soft sand between the first two at 220 grit. The visual cue is a dull tip to the sheen, which means you got adhesion.
A heavy coat looks like a smear and takes longer to dry. It's the most meaningful difference.
Per USDA forest product support, a polyurethane layer around 1.5 mils thick is optimal for residential wear. Thin, fast coats. That's the whole secret.
Common Visual Mistakes That Scream DIY
There are several tells that separate a professional build from a beginner's. Watch for these before you declare the table done.
Mistake 1: The Cupped Board Cheek. This is the step in the top from boards that weren't milled with alternating grain. You can see it as a shadow in the light. Fix means a glue up and re-flat.
Mistake 2: Screw Pull-Out. This shows as a small dip at the end of the joint where the screw tore. It appears at the connection points of the apron.
Mistake 3: The Cross-Grain Split. You see a hairline crack the runs diagonally through the wood around a screw. That means the wood expanded and you didn't allow for it. It's a visual, but the actual stress will not hold.
Mistake 4: Over-Sanding Corners. Turns round and it smiles. The joint lines disappear into the curve.
Specs & Measurements: Table Standards
Standard Heights
Per furniture industry standards, a kitchen table sits 28.5 to 30 inches high. Most average on 29 inches. You adjust the leg length down to 28 to compensate for the apron, keeping chair comfortable.
Seat Clearance
You need 9 to 12 inches of clearance between the apron and the seat top. That's visual and physical. If you sit with too little, thighs catch.
This dictates combined thickness of the layer.
Chair Width
Plan 26 to 28 inches per person seated across the table. A 6-person table, 72 inches long, leaves you a comfortable amount.
Safety: Power. Speed. Almond. Guards
The Push Stick
Never free-hand a narrow rip cut. Use a push stick. Even with a proper edge gate.
Glue and Dust
Wood glue is a mild irritant if it gets in your eyes. Wear safety glasses when spreading it. Dust from sanding your hardwood, particularly oak and walnut, is the most toxic.
Use a dust mask and good, not just a dust mask.
Kickback Zones
The area behind the table saw is the danger zone. Stand out of the plane of the blade. The blade controls the feed.
A blade that grabs moving wood caught in a few milliseconds, no matter the foot.
That's the build. Following these guides, you'll end with a piece that looks both assembled and handmade for years.
Final Pass: The "My First Table" Walkthrough
You've clamped, glued, and finished. Now comes the last check before furniture goes live.
Run your hand flat across the top. It should feel smooth with no snags or ridges between boards. The legs should sit level on a hard floor with no rocking.
The apron corners should be flush with the legs.
If a surface is rough, sand again at 220 grit and wipe it clean. A polyurethane top takes a week fully cure, so keep hot pans off it initially.
That's it. You built a kitchen table. For a small-space adjustment, check out these kitchen layout tips while you enjoy your new build.
For hardwood movement over seasons, the USDA Forest Products Laboratory has the definitive moisture data.
After a few months, the piece settles into your home. It carries a unique mark from the grain patterns, and it's moment of history only you know. That's the real reward of the build.