How Many Lumens Do You Need for a Kitchen?
Most people search "how many lumens for kitchen" and get a single number like 5000 or 8000. That number is useless because it ignores ceiling height, cabinet color, and where you actually chop onions. Your kitchen has distinct zones that need different light levels.
A flat lumen target leaves you straining at the sink or squinting under glare.
Per IES RP-28 the baseline ambient target is 20 to 30 foot-candles while task zones need 50 to 100 foot-candles. That spread is why one number fails. The next sections walk you through the variables and a step-by-step calculation.
Quick Answer
Start with 30 to 40 lumens per square foot for ambient light. Multiply by 1.5 for dark surfaces. Add 50 to 75 foot-candles for each task zone.
Use the calculator below to get your exact number.

Why Kitchen Lumens Confuse Everyone (And Why One Number Doesn't Work)
You see a lumen rating on a box and assume it tells the whole story. It doesn't. Lumens measure total light output from a source.
Foot-candles measure what actually hits your counter. The gap between them depends on distance, beam angle, and surface reflectance. A 1000-lumen bulb in a 10-foot ceiling delivers half the foot-candles of the same bulb at 8 feet.
Dark walnut cabinets absorb 40 percent more light than white shaker. Glossy quartz reflects light differently than honed soapstone. These factors stack.
A kitchen with 10-foot ceilings and dark finishes needs roughly double the raw lumens of an 8-foot white kitchen. That's why a single rule of thumb fails.
Lighting designers use the zonal cavity method. It accounts for room geometry, surface reflectance, and fixture efficiency. The result is a lumen target per zone not per room.
We'll show you a simplified version that works for any layout.
The Quick Baseline: Start With 30–40 Lumens Per Square Foot — Then Adjust
If you need a starting number today use 35 lumens per square foot of floor area. A 150-square-foot kitchen starts at 5250 lumens ambient. That's for 8-foot ceilings with light surfaces and standard 4-inch recessed spacing.
Now apply multipliers. Ceiling height: multiply by 1.25 for 9 feet, 1.5 for 10 feet, 1.8 for vaulted. Surface reflectance: multiply by 1.3 for medium cabinets, 1.6 for dark.
Fixture type: integrated LED wafers lose 15 percent more light than deep baffle trims. Add 20 percent for dirty lenses and lumen depreciation over five years. The table below shows how fast the number climbs.
| Condition | Multiplier | Example 150 sq ft Result |
|---|---|---|
| Baseline (8 ft, light) | 1.0x | 5,250 lm |
| 9 ft ceiling | 1.25x | 6,560 lm |
| 10 ft ceiling | 1.5x | 7,875 lm |
| Dark cabinets/floor | 1.6x | 8,400 lm |
| Combined worst case | 2.4x | 12,600 lm |
This baseline covers ambient only. Task zones need separate calculation. We cover that next.
How Light Actually Works in a Kitchen: Foot-Candles, Work Planes, and Zones
Foot-candles are the metric that matters. One foot-candle equals one lumen per square foot at the work plane. The work plane is typically 36 inches above finished floor, counter height.
Ambient light targets 20 to 30 foot-candles at that plane. Task zones target 50 to 75 foot-candles. Critical tasks like reading a recipe at the sink or checking doneness at the range need 75 to 100 foot-candles.
Accent and decorative layers are aesthetic not functional.
Zoning splits the kitchen by activity. Perimeter counters get under-cabinet task light. Islands get pendants or recessed task heads.
Sinks get a dedicated narrow beam. Ranges get hood-integrated or adjacent recessed. Walkways stay at ambient.
Each zone gets its own circuit and dimmer. That separation lets you run 100 foot-candles at the island while the dining edge sits at 15. The diagram below shows a typical zone map.

Key terms to know. Foot-candle (fc) equals lumens per square foot. Lux is the metric equivalent (1 fc = 10.76 lux).
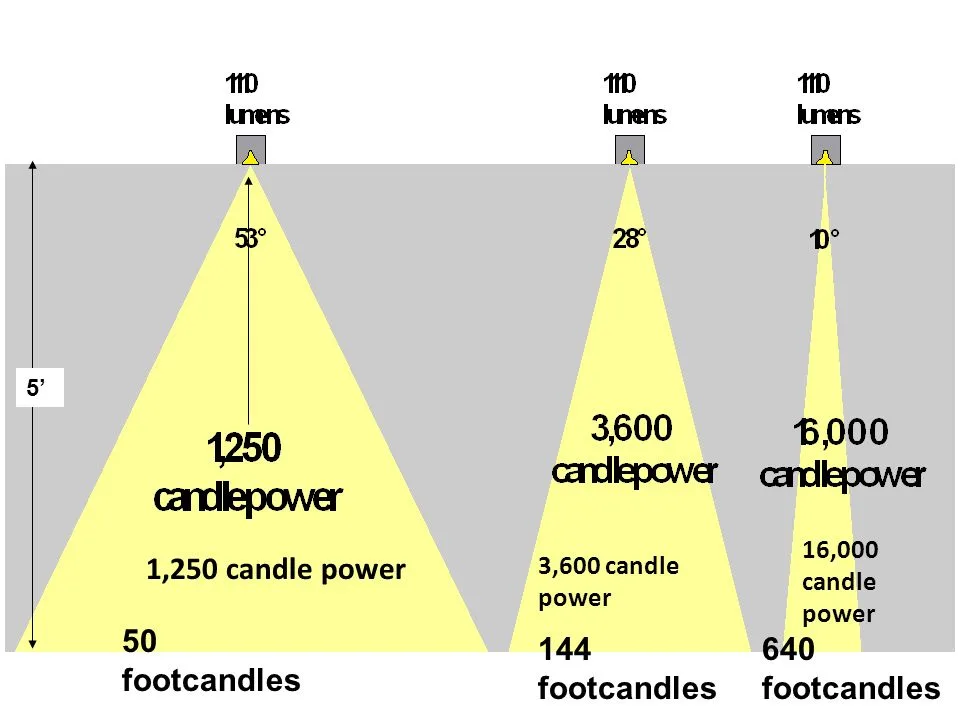
Lumens (lm) is total source output. Candela (cd) is intensity in a direction. Beam angle defines the cone where intensity stays above 50 percent of center.
Spacing criteria (SC) times mounting height equals max on-center distance. A fixture with SC 1.0 at 8-foot mounting spaces 8 feet on center.
The Six Variables That Change Your Number
Every kitchen shifts the baseline. Here are the six variables and how each moves the needle.
Ceiling height and mounting distance. Light follows the inverse square law. Double the distance and you get one quarter the foot-candles. A 10-foot ceiling needs roughly 1.5x the lumens of an 8-foot ceiling for the same work plane illuminance.
Vaulted ceilings need aimable gimbals or pendants that bring the source down.
Surface reflectance. Light-colored cabinets, counters, and floors bounce light back into the room. Dark surfaces absorb it. IES reflectance categories: light (70-80% ceilings, 50-70% walls, 20-40% floors), medium (50-70% ceilings, 30-50% walls, 10-20% floors), dark (30-50% ceilings, 10-30% walls, <10% floors).
Dark kitchens need 1.4 to 1.6x the baseline lumens.
Kitchen zones and task density. A galley with one cook needs less task light than an open plan with island, prep sink, and beverage station. Count your task zones. Each gets its own lumen budget.
Fixture optics and light loss. A 60-degree wide flood spreads light broadly but delivers fewer center-beam foot-candles. A 25-degree narrow flood punches light down but creates scalloping on walls. Lens diffusion, baffle depth, and dirt depreciation all reduce delivered lumens.
Plan for a 0.70 to 0.80 light loss factor on LED.
Natural light and time of day. South-facing windows can provide 500+ foot-candles at noon. That lets you dim ambient to near zero. North-facing or shaded kitchens need full electric output all day.
Design for the worst-case evening scenario.
Dimming and control strategy. Dimming reduces both lumens and wattage. But not all dimmers play nice with LED. Flicker, dropout, and color shift ruin the experience.
Specify 0-10V, DALI, or phase-cut drivers matched to the dimmer. Plan scenes: Cook (full task), Clean (high ambient), Entertain (low ambient, accent only), Late Night (toe-kick only).
Step-by-Step: Calculate Your Kitchen's Real Lumen Needs
Follow this workflow. Grab a laser measure and a notepad.
1. Measure and map your zones. Sketch the floor plan. Label each zone: perimeter counter, island, sink, range, dining, walkway.
Measure length and width of each. Note ceiling height at each zone.
2. Assign IES target foot-candles per zone. Use these targets. Ambient walkways: 20 fc.
Perimeter ambient: 30 fc. Island task: 75 fc. Sink task: 75 fc.
Range task: 75 fc. Prep sink: 75 fc. Dining accent: 15 fc.
Toe-kick: 5 fc.
3. Apply reflectance and loss multipliers. Multiply each zone's target fc by the reflectance factor (1.0 light, 1.3 medium, 1.6 dark). Then divide by the light loss factor (0.75 typical).
This gives you the required maintained foot-candles at the work plane.
4. Convert to lumens per fixture. Lumens = maintained fc × zone area (sq ft) ÷ number of fixtures × 1/cu. CU (coefficient of utilization) depends on fixture optics and room cavity ratio.
For a quick estimate use CU = 0.5 for recessed, 0.6 for pendants, 0.7 for under-cabinet. The worksheet below does the math.
5. Check spacing criteria against your layout. Pull the fixture's SC from the spec sheet. Max spacing = SC × mounting height to work plane.
For 8-foot ceiling and 36-inch work plane, mounting height = 5 feet. SC 1.0 fixture spaces 5 feet on center. Adjust your fixture count if spacing exceeds this.
6. Assign circuits and switch legs per layer. Minimum four circuits: ambient perimeter, island task, sink/range task, under-cabinet. Add accent and toe-kick on separate dimmers if budget allows.
Each circuit gets its own dimmer matched to the load type.
The result is a fixture schedule with lumen targets, beam angles, and control zones. Hand that to your electrician or lighting rep. They'll confirm with photometric software.
Fixture Selection: Match Output, Optics, and Form to Each Zone
Each zone demands a specific fixture type. Recessed downlights handle ambient and task. Under-cabinet linear bars wash counters.
Pendants bring light down to island height. Sink and range need narrow beams with damp ratings. Toe-kick strips use low-profile tape.
The table below matches fixture to zone with typical lumen ranges.
| Zone | Fixture Type | Typical Lumens | Beam Angle | Key Spec |
|---|---|---|---|---|
| Ambient perimeter | 4" or 6" recessed | 700–1100 lm | 60–90° | SC ≥ 1.0 |
| Island task | 4" gimbal or pendant | 800–1500 lm | 25–40° | 90+ CRI |
| Under-cabinet | Linear bar or tape | 300–500 lm/ft | 120° diffuse | ≥90 CRI, R9>50 |
| Sink | 4" narrow flood | 900–1200 lm | 25–35° | Damp rated |
| Range | Hood light or 4" recessed | 800–1100 lm | 35–45° | Heat rated |
| Toe-kick | LED tape in channel | 50–150 lm/ft | 120° | 24V, dimmable |
Recessed downlights come in 4-inch and 6-inch apertures. Four-inch fixtures offer tighter beam control and cleaner ceiling look. Six-inch fixtures deliver higher lumens and wider spread.
For 8-foot ceilings 4-inch at 5-foot spacing works well. For 10-foot ceilings 6-inch at 6-foot spacing maintains coverage. Check the spacing criteria on the spec sheet.
The photo below shows beam spread difference between apertures.

Under-cabinet lighting needs continuous output. LED tape in aluminum channel with frosted lens eliminates diode imaging. Spec 24-volt constant voltage tape with remote driver.
Puck lights create pools and shadows. Linear bars give uniform wash. Aim for 300 lumens per linear foot at the counter surface.
Mount at front edge of cabinet not back. This pushes light toward the user not the backsplash.
Pendant selection balances output and glare. A single large pendant over a 4-foot island needs 1500+ lumens with a wide diffuser. Three mini pendants each at 800 lumens spread light more evenly.
Hang height 30 to 36 inches above counter. Use a dimmable driver with 0-10V or phase-cut compatibility. Shade material matters.
Clear glass creates sparkle but glare. Frosted or opal diffuses. Metal shades direct light down only.
Sink and range fixtures need damp or wet location listing per UL 1598. Hood lights often max at 1000 lumens. Supplement with a dedicated 4-inch narrow flood 24 inches off-center from sink.
Range task light should sit just outside hood capture zone. Use a 35-degree beam to keep light on the pan not the cook's face.
Layered Control: Why One Switch Ruins Everything
A single switch forces every zone to the same level. You end up with blinding ambient when you only need island task. Or dim ambient when you need sink focus.
Layered control separates circuits by function. Minimum four switch legs: ambient perimeter, island task, sink/range task, under-cabinet. Add accent and toe-kick on separate dimmers if budget allows.
Dimming protocol must match driver. Phase-cut (TRIAC/ELV) works for most retrofit lamps. 0-10V is standard for commercial-grade integrated fixtures. DALI and DMX offer addressable control for tunable white.
Wireless systems like Lutron Caséta, Crestron, or Matter/Thread devices need compatible drivers. Spec the driver and dimmer as a matched pair. Mismatched pairs cause flicker, dropout, or dead travel.
Scene programming turns zones into activities. Cook scene: island 100%, sink 100%, under-cabinet 100%, ambient 30%. Clean scene: all zones 80%.
Entertain scene: ambient 20%, accent 60%, toe-kick 40%, island off. Late night scene: toe-kick 10% only. Program scenes at the keypad or app.
Label buttons with activity names not zone names.
Smart home integration adds voice and scheduling. But each ecosystem fragments. Wi-Fi bulbs clog the router.
Zigbee and Thread need a border router. Z-Wave needs a hub. Pick one protocol for the whole house.
Run neutral wires to every switch box. This future-proofs for any smart switch.
Common Mistakes That Leave You Cooking in Shadows
Mistake one: spacing recessed cans by room dimensions not work plane. Cans centered on cabinets leave the counter edge dark. Center cans 24 inches off the wall for perimeter counters.
Center over island edges not centerline.
Mistake two: under-cabinet tape mounted at cabinet back. Light hits the backsplash not the cutting board. Mount at front lip.
Use a frosted lens. Spec 90+ CRI and R9 above 50 for accurate reds in meat and produce.
Mistake three: pendants hung too high. Light misses the work surface. Hang 30 to 36 inches above counter.
Adjust for sight lines. Tall users need higher hang.
Mistake four: dimmable LEDs on non-dimmable drivers. Flicker at low end. Color shift toward green.
Spec dim-to-warm or tunable white if you want color temperature to drop with intensity.
Mistake five: ignoring voltage drop on long tape runs. 24-volt tape drops 1 volt every 16 feet at 4 watts per foot. Use home-run wiring or power injection every 16 feet. Otherwise the far end runs dim and warm.
Mistake six: no separate circuit for toe-kick. Toe-kick on the ambient circuit means you can't use it as a night light. Run a dedicated low-voltage circuit with its own dimmer.
Mistake seven: mixing color temperatures. 2700K ambient next to 4000K task looks broken. Pick one CCT for all functional light. Use 3000K as the sweet spot.
Reserve 2700K for decorative accent only.
Code, Safety, & Compliance: What Your Inspector Actually Checks
NEC 210.12 requires AFCI protection for all kitchen circuits. This includes lighting circuits. NEC 210.8(A)(6) requires GFCI protection for any lighting outlet within 6 feet of a sink.
That covers under-cabinet, sink recessed, and range hood lights. Use dual-function AFCI/GFCI breakers or dead-front devices at the panel.
Recessed housings in insulated ceilings must be IC-rated and airtight per NEC 410.116(B). Non-IC cans need 3 inches clearance from insulation. That kills the thermal envelope.
Spec IC-rated airtight housings everywhere. Look for the ASTM E283 label.
Damp location listing per UL 1598 is required for luminaires in wet or damp areas. Sink lights, range lights, and any fixture above a cooktop need this rating. Wet location listing is required for outdoor kitchen fixtures or interior fixtures subject to spray.
Title 24 JA8 (California) requires 90+ CRI, R9>50, and dimming to 10% without flicker for high-efficacy classification. IECC 2021 limits lighting power density to 0.96 watts per square foot in dwelling unit kitchens. Count all watts including drivers.
LED efficacy of 90+ lm/W keeps you under.
Energy Star certified fixtures qualify for utility rebates in many regions. Check the EPA database for listed models. Rebates often require specific CCT and CRI thresholds.
Permit the lighting plan. Submit a single-line diagram showing circuits, switch legs, and load calculations. Inspector will verify AFCI/GFCI, IC ratings, damp listings, and LPD compliance.
Fixing after drywall costs ten times more.
Expert Tips From Lighting Designers Who Spec This Daily
Designers start with the reflective ceiling plan. They model every surface in AGi32 or Dialux. They run point-by-point calculations at the work plane.
They adjust fixture spacing until uniformity ratio (max/min) stays under 3:1 for task zones. They specify fixtures with published IES files not just lumen claims.
They use 3000K 90+ CRI for all functional light. They avoid 4000K in residential kitchens. It feels clinical.
They specify dim-to-warm for ambient layers. It mimics incandescent behavior. They keep decorative accents at 2700K for warmth.
They wire every zone independently. They run 0-10V control wires to each fixture group even if the client starts with phase-cut dimmers. This allows future upgrade to tunable white or DMX without rewiring.
They specify remote drivers for under-cabinet tape. Drivers in the cabinet overheat. Remote drivers in a cool closet last longer.
They use Class 2 wiring for all low-voltage runs. No conduit needed.
They commission with a light meter. They measure foot-candles at the work plane in each zone. They adjust aim on gimbals.
They program scenes on site. They hand the owner a one-page scene guide.
They budget for mock-ups. A single 4-foot section of under-cabinet tape and one recessed can on a temporary stand lets the client approve color and glare before full install. Mock-ups prevent expensive change orders.
Decision Guide: Pick Your Starting Path Based on Project Type
New construction or gut remodel: you control everything. Run the full calculation. Wire every zone independently.
Spec 0-10V dimming throughout. Budget for mock-ups. Hire a lighting designer for the control narrative.
Retrofit with existing cans: measure can spacing and aperture. Choose retrofit trims that match spacing criteria. Add under-cabinet tape on a new circuit.
Swap ambient dimmers for LED-compatible models. Accept compromise on uniformity.
Rental-friendly: use plug-in under-cabinet bars. Swap bulbs for high-CRI dimmable LEDs. Add battery-powered puck lights in dark corners.
Use smart bulbs in existing pendants. No wiring changes.
Aging-in-place: target 100 foot-candles at all task zones. Use glare-free optics. Spec dim-to-warm for circadian support.
Add motion-activated toe-kick at 5 foot-candles. Label switches with large print.
Open-concept great room: treat kitchen as a zone within a larger plan. Match CCT across kitchen dining living. Share ambient circuit with dining.
Keep kitchen task circuits separate. Program cross-zone scenes.
Low-ceiling condo: use wafer-thin recessed or surface-mount linear. Skip pendants. Maximize under-cabinet.
Use 90+ CRI 3000K throughout. Keep it simple.
High-ceiling custom: bring light down with pendants or adjustable gimbals. Use narrow beams for task. Add accent layers for architecture.
Budget for DMX or DALI control. Hire a designer.
Frequently Asked Questions
How many lumens do I need for a 10×10 kitchen?
A 100-square-foot kitchen needs 3,000 to 4,000 lumens ambient baseline. Add 1,500 to 2,500 lumens per task zone. Dark cabinets or 10-foot ceilings push total toward 8,000 to 10,000 lumens.
What color temperature is best for kitchen task lighting?
3000K with 90+ CRI and R9 above 50 renders food accurately and feels warm. Avoid 4000K for residential kitchens. Use 2700K only for decorative accent.
Can I just use brighter bulbs in my existing cans?
Retrofit lamps rarely match the optic of dedicated trims. Beam control suffers. Glare increases.
Dedicated LED modules with proper baffles deliver better work-plane foot-candles.
Do under-cabinet lights need their own circuit?
Yes. Separate circuits let you run task light without ambient. Code requires GFCI protection for under-cabinet fixtures within 6 feet of the sink.
How far apart should recessed lights be in a kitchen?
Space 4-inch cans 4 to 5 feet on center for 8-foot ceilings. Space 6-inch cans 5 to 6 feet. Match spacing criteria from the spec sheet to mounting height.
Is 5000 lumens enough for a kitchen?
Only for very small kitchens under 100 square feet with light surfaces and 8-foot ceilings. Most kitchens need 7,000 to 12,000 total lumens across all layers.