
Standard Kitchen Cabinet Dimensions: Complete Size Guide
You stare at the empty kitchen and wonder how big are kitchen cabinets really. The catalog says 36 inches high for base units. Your ceiling says nine feet.
The math does not work without a plan. Every remodel hits this wall because cabinets are not one size fits all.
Standard base cabinets sit 34.5 inches tall before the countertop adds another 1.5 inches. That 36 inch finished height is baked into appliance specs and ergonomic guidelines. Let’s walk through the decision tree that turns raw measurements into a cabinet order that fits.
Quick Answer
Base cabinets measure 34.5 inches high by 24 inches deep. Wall cabinets run 12 inches deep and 30 to 42 inches tall. Tall cabinets reach 84 to 96 inches high.
Widths climb in 3 inch increments from 9 to 48 inches. Your ceiling height and appliance sizes dictate the final numbers.
Why Cabinet Sizing Trips Up Every Remodel
The problem starts with the word standard. Manufacturers publish baseline dimensions for stock cabinets. Your kitchen has soffits, sloped floors, and a 36 inch range that actually measures 35.75 inches.
A half inch gap becomes a reorder nightmare.
Stock cabinets lock you into fixed heights and depths. Semi-custom lines let you tweak depth or add a valance. Custom shops build to your exact opening.
Each tier adds cost and lead time. The decision tree branches at budget, timeline, and how weird your room really is.

Image source: Web (Bing) / stkittsvilla.com (Web image (fair-use with source credit))
Most mistakes happen before the tape measure comes out. People order 42 inch uppers for an 8 foot ceiling. They forget crown molding eats 4 inches.
They skip the filler strip between the last cabinet and the wall. The list goes on. We’ll cover each trap in the sections ahead.
The Short Answer: Standard Numbers Exist, But Your Kitchen Decides
Base cabinets: 34.5 inch box height, 24 inch depth, 9 to 48 inch widths. Wall cabinets: 12 inch depth, 30/36/42 inch heights, same width range. Tall cabinets: 24 inch depth, 84/90/96 inch heights.
These are the stock starting points.
Your finished countertop hits 36 inches off the floor. That number drives everything. The NKBA recommends 18 inches between countertop and wall cabinet bottom.
Subtract crown molding. Subtract light rail. What remains is your maximum wall cabinet height.
If the result is 38 inches, you cannot use a 42 inch cabinet. You either stack a 30 and a 12, or you go semi-custom.
| Cabinet Type | Standard Height | Standard Depth | Width Increments |
|---|---|---|---|
| Base | 34.5 in | 24 in | 3 in (9–48 in) |
| Wall | 30/36/42 in | 12 in | 3 in (9–48 in) |
| Tall | 84/90/96 in | 24 in | 3 in (18–30 in) |
These dimensions assume a face frame overlay. Frameless boxes add roughly 1/4 inch interior width per side. That matters for pullout trays and drawer organizers.
We’ll compare construction methods later.
How Cabinet Dimensions Actually Work: Boxes, Faces, and Finished Heights
A cabinet is a box. The box height for bases is 34.5 inches. The toe kick recess sits at the bottom, 4.5 inches high and 3 inches deep.
Your feet go there. The floor may slope. Shims fix that.
The countertop sits on top of the box. Standard thickness is 1.5 inches (3 cm stone or 1.5 inch butcher block). That brings the working surface to 36 inches.
The backsplash adds 4 to 18 inches depending on material. Wall cabinets hang above that.

Image source: Web (Bing) / vtfurnitureworks.com (Web image (fair-use with source credit))
Wall cabinet height is measured from the bottom of the box to the top. A 36 inch wall cabinet is 36 inches tall. The door covers the face frame or the box edge.
Full overlay doors hide the frame. Inset doors sit inside it. The reveal changes the visual height but not the box dimension.
Tall cabinets sit on the floor like bases. They extend to the ceiling or stop short for crown. A 96 inch tall cabinet in a 9 foot room leaves zero room for molding.
You need 90 inch cabinets plus a 6 inch crown. Or you stack a 30 inch wall on top of a 54 inch base tall unit. The combination approach gives flexibility.
Key dimensions to memorize:
- Toe kick: 4.5 H × 3 D inches
- Base box: 34.5 H × 24 D inches
- Countertop: 1.5 inch typical
- Backsplash: 4, 18 inches
- Wall cabinet bottom to countertop: 18 inches ideal
- Crown molding: 2.5, 6 inches tall
Step One: Measure the Room, Not the Catalog
Grab a 25 foot tape, a laser level, and a notebook. Sketch the perimeter. Mark every window center, door trim, pipe chase, and electrical outlet.
Measure wall lengths at floor, countertop height, and ceiling. They differ.
Check ceiling height in three spots. Older homes vary by an inch. Find the lowest point.
That number drives your wall cabinet max. Note soffits. Measure their depth and height from floor.
A 13 inch deep soffit blocks a 12 inch wall cabinet unless you fur it out.
Measure appliance openings. Refrigerator width at the hinge side. Range width at the widest point.
Dishwasher opening between cabinets. Write actual numbers, not model specs. A 36 inch fridge often needs 36.25 inches of clearance.
Record floor transitions. Tile to hardwood changes the toe kick reveal. You may need a tapered toe kick or a transition strip.
Plan for it now.
Photograph every wall. Label the photos. When you sit down with the cabinet designer, you’ll thank yourself.
The designer needs to see the gas line behind the range. They need to see the vent hood duct centerline. Photos catch what notes miss.
Step Two: Lock In Your Appliance Dimensions First
Appliances anchor the layout. The range dictates the cookzone width. The fridge dictates the cold zone.
The dishwasher dictates the cleanup zone. Everything else flexes around them.
Pull the spec sheets for every appliance. Note the overall width, depth with doors open, and height to the top of the unit. A pro range may stand 37 inches tall.
That changes the backsplash height. A counter depth fridge sticks out less but costs more.
Common appliance widths:
- Range: 30, 36, 48 inches
- Refrigerator: 30, 33, 36 inches
- Dishwasher: 24 inches standard
- Microwave drawer: 24 or 30 inches
- Wall oven: 24, 27, 30 inches
Add clearance. NKBA says 12 inches on one side of the range, 15 inches on the other. Fridge needs 15 inches on the handle side.
Dishwasher needs 21 inches of open space in front. These are minimums. More is better.
If your range is 35.75 inches wide, the cabinet opening must be 36 inches minimum. Some designers add 1/4 inch per side for wiggle room. Write the required opening width on your sketch.
The cabinet order uses that number, not the appliance width.
Vent hood width should match or exceed the range. A 36 inch range needs a 36 inch hood minimum. The hood mounts 28 to 36 inches above the cooktop.
That dimension eats into wall cabinet height. Factor it in now.
Microwave over range? That unit replaces a wall cabinet. Its height is fixed, usually 16 to 18 inches.
The bottom sits 15 to 18 inches above the range. That kills the 18 inch countertop to cabinet clearance. Accept it or choose a different microwave location.
Now you have hard constraints. The cabinet layout flows from here.
Step Three: Choose Your Cabinet Tier — Stock, Semi-Custom, or Custom
Stock cabinets ship in fixed sizes from the warehouse. You get 3 inch width increments, three wall heights, and one base depth. Lead time is one to three weeks.
Price runs $100 to $300 per linear foot as of 2026. Boxes are typically particleboard with melamine interior. Hinges and slides are basic.
Semi-custom lines add modified depths, extended stile widths, and premium finishes. You can order a 13 inch deep wall cabinet for a soffit. You can get a 27 inch deep base for an island.
Lead time stretches to four to eight weeks. Cost jumps to $200 to $600 per linear foot. Plywood boxes and soft close hardware become standard.
Custom shops build every box to your drawing. Any height, any depth, any width. Inset doors, beaded inset, integrated appliances, curved ends, all possible.
Lead time hits eight to sixteen weeks minimum. Price starts at $500 per linear foot and climbs fast. You pay for engineering time, not just materials.
| Tier | Lead Time | Linear Foot Cost | Box Material | Depth Options |
|---|---|---|---|---|
| Stock | 1–3 wks | $100–$300 | Particleboard | Fixed 24/12 in |
| Semi-Custom | 4–8 wks | $200–$600 | Plywood upgrade | Modified ±3 in |
| Custom | 8–16+ wks | $500–$1,500+ | Any | Unlimited |
Choose stock if the room is square, ceilings are standard, and budget drives the bus. Choose semi-custom when you have one weird dimension, a 13 inch soffit, a 10 foot ceiling, a 48 inch range. Choose custom when the kitchen is the centerpiece of the home and resale value matters.
Most remodels land in semi-custom. The upcharge over stock buys plywood sides, dovetail drawers, and a depth tweak that saves a filler strip. That filler strip costs $50 and looks like a mistake.
The depth tweak costs $200 and looks intentional.
Step Four: Pick Construction — Frameless vs Face-Frame Changes Everything
Face frame cabinets have a 1.5 inch wide wood frame glued to the front of the box. Doors attach to the frame. Hinges mount to the frame.
The frame adds rigidity. The frame eats interior width. A 12 inch wide face frame cabinet gives you roughly 10.5 inches clear inside.
Frameless cabinets skip the frame. The box sides are thicker, usually 3/4 inch plywood. Doors mount directly to the box side.
Hinges are European concealed cup hinges. You get the full 12 inches inside. Pullout trays glide easier.
Drawer boxes can be wider.

Image source: Bing (Web (fair-use with source credit))
Frameless originated in Europe. It dominates modern and contemporary lines. Face frame dominates traditional and transitional lines.
The aesthetic difference is visible. Face frame shows a reveal between doors. Frameless shows a tight 1/16 inch gap.
Installation differs too. Face frame cabinets hang on the frame. You screw through the frame into studs.
Frameless cabinets hang on the box side. You need a hanging rail or cleat system. The box must be perfectly square or doors won't align.
Frameless is less forgiving of rough walls.
Hardware options follow construction. Face frame uses half overlay or full overlay hinges. Frameless uses full overlay almost exclusively.
Inset doors only work on face frame. If you want that furniture look, you need a frame.
Cost comparison: frameless boxes cost less to manufacture. But the hardware is pricier. Installed cost ends up similar.
The real decision is style and interior access. If you store sheet pans and stand mixers, frameless gives you the extra inch that matters.
Step Five: Calculate Wall Cabinet Height From the Ceiling Down
Start with your lowest ceiling measurement. Subtract 36 inches for countertop height. Subtract 18 inches for the standard backsplash clearance.
Subtract your crown molding height. Subtract light rail if you use it. The result is your maximum wall cabinet height.
Example: 96 inch ceiling minus 36 minus 18 minus 4 inch crown minus 2 inch light rail equals 36 inches. You can run a 36 inch wall cabinet to the crown. You cannot run a 42 inch cabinet.
You either accept the 36, stack a 30 plus a 12, or go semi-custom for a 38 inch cabinet.
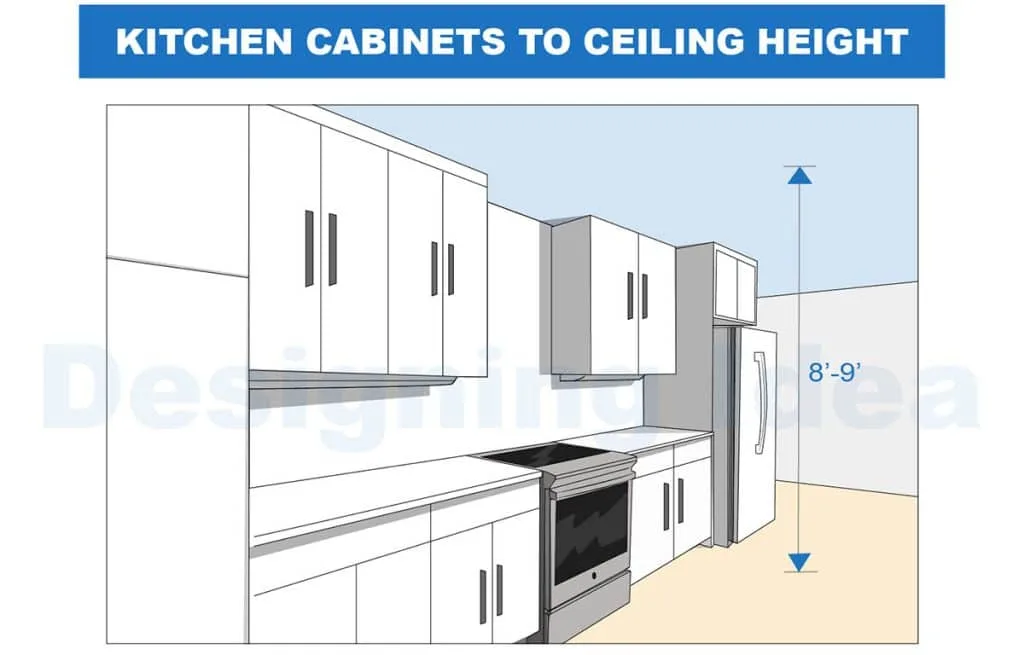
Image source: Web (Bing) / storage.googleapis.com (Web image (fair-use with source credit))
Eight foot ceilings (96 inches) with standard crown leave 38 inches max. That fits a 36 inch cabinet with a 2 inch gap. Most designers stack 30 inch uppers with a 12 inch bridge cabinet.
The bridge holds rarely used items. It also hides the soffit if one exists.
Nine foot ceilings (108 inches) give you 50 inches after deductions. Run 42 inch uppers plus an 8 inch crown riser. Or run 36 inch uppers with a 14 inch stack.
The stack looks more custom. The 42 inch single cabinet costs less.
Ten foot ceilings (120 inches) open every option. Two rows of 30 inch cabinets. One row of 42 with an 18 inch stack.
Full height tall cabinets at 96 inches with 6 inch crown. The math gets fun. The budget gets tight.
Soffits change the game. Measure soffit depth. If it's 13 inches, a 12 inch wall cabinet fits with a 1 inch scribe.
If it's 11 inches, you need a 10 inch deep cabinet, semi-custom only. Measure soffit height from floor. That number minus 54 inches (countertop plus 18) gives your max cabinet height in that zone.
Write the calculation on your sketch. Show the designer. They will catch errors you miss.
A 1/2 inch math error means a cabinet that hits the crown or leaves a dust trap gap.
Step Six: Plan Base Cabinet Runs With Fillers, Toe Kicks, and Overhangs
Base cabinets butt together. The last cabinet in a run rarely hits the wall perfectly. You need a filler strip.
Order a 3 inch filler. Rip it to fit on site. Do not guess.
Measure the gap at top, middle, and bottom. Walls bow.
Toe kicks ship loose on most lines. You install them after cabinets are leveled. The toe kick height is 4.5 inches.
The recess is 3 inches. If your floor slopes, the toe kick reveals it. Scribe the bottom edge to the floor.
A multi tool makes this fast.
Countertop overhang is 1.5 inches standard. That means the cabinet run ends 1.5 inches short of the finished countertop edge. Your base cabinet layout must account for this.
The fridge opening, the range opening, the dishwasher space, all measured to the cabinet box, not the countertop.
Island overhangs differ. Seating overhang is 12 to 15 inches. That requires corbels or steel brackets every 24 inches.
The cabinet depth stays 24 inches. The countertop extends. Plan the electrical for island outlets before you pour the slab.
Corner base cabinets come in three flavors. Blind corner: one door, dead space behind. Lazy susan: rotating shelves, full access.
Pullout: wire trays on glides, best access. Blind corners need a 3 inch filler on the adjacent cabinet to clear hardware. Write the blind corner width on your plan.
The manufacturer needs the "pull" dimension.
Sink base cabinets have a false drawer front. The bowl sits lower. The cabinet floor is often removable for plumbing access.
Specify a sink base that fits your sink. A 33 inch sink needs a 36 inch sink base minimum. Undermount sinks need reveal clearance.
Farmhouse sinks need a special front apron cutout.
Drawers versus doors. Deep drawers hold pots. Shallow drawers hold utensils.
A three drawer base (one shallow, two deep) costs more than a door base with a rollout. Budget drives this. Function drives the better choice.
Step Seven: Handle Corners, Tall Cabinets, and Specialty Units
Wall cabinet corners mirror base corners. Blind corner uppers need a filler. Diagonal corner uppers (pie cut) give two doors meeting at 45 degrees.
They look clean but waste the back triangle. Lazy susan wall corners exist but are rare. Most designers run a blind corner and accept the dead space.
Tall cabinets anchor the pantry zone. Standard widths: 18, 24, 30 inches. Heights: 84, 90, 96 inches.
A 24 inch wide 96 inch tall cabinet holds a shocking amount. Add pullout shelves on the bottom half. Fixed shelves on top.
The top shelf hits 8 feet, bring a step stool.
Oven cabinets are tall cabinets with a cutout. Single oven, double oven, microwave combo, each has a specific opening height. The cabinet comes with a trim kit frame.
You cut the opening on site or order it pre cut. Pre cut costs more but saves field errors. Measure the oven twice.
Refrigerator cabinets surround the fridge. Standard depth is 24 inches. Counter depth fridges need a 24 inch cabinet with a 1 inch spacer panel.
The cabinet above the fridge (bridge cabinet) is usually 12 or 15 inches tall. It aligns with the wall cabinet run. If the fridge is 70 inches tall and ceilings are 96, you get a 24 inch bridge.
If the fridge is 72 inches, you get 22, order a 24 and rip it.
Appliance garages sit on the countertop. They hide toasters and blenders. Height is typically 18 inches.
Depth matches wall cabinets at 12 inches. They need a pocket door or lift up door. Swing doors block the backsplash.
Pocket doors need a 3 inch wide cavity inside the cabinet box.
Wine storage, spice pullouts, tray dividers, cutlery inserts, these are accessories, not cabinets. Order them with the cabinets. Retrofit is a nightmare.
The cabinet box gets bored for hardware at the factory. Field drilling voids warranties on some lines.
Specialty units: microwave drawer base (24 inch wide, 15 inch tall), warming drawer base (same), vacuum base (toe kick mounted), trash pullout base (15 or 18 inch wide). Each has a fixed opening. Match the appliance spec sheet before ordering.
Stock vs Semi-Custom vs Custom: What You Actually Get at Each Level
Stock gives you fixed sizes and particleboard boxes. Semi-custom adds plywood sides, soft close, and depth tweaks. Custom delivers unlimited dimensions and premium joinery.
Choose based on your weirdest measurement and budget ceiling.
Frameless vs Face-Frame: Interior Space, Door Alignment, and Install Reality
Frameless offers full interior access and a tight 1/16 inch reveal. Face-frame shows a traditional reveal and easier door alignment. Frameless demands perfectly square walls.
Face-frame forgives minor bows. Pick the look you want.
Common Layout Scenarios: 8-Foot Ceilings, 9-Foot Ceilings, Soffits, and High Ceilings
Eight feet means 36 inch uppers plus a 12 inch stack or 30 inch uppers with crown. Nine feet fits 42 inch uppers and a small riser. Soffits force shallow cabinets or custom depth.
Ten feet allows double stacks or full height pantries. Measure the lowest ceiling point first.
The Mistakes That Cost Money: Gaps, Collisions, and Reorders
Ordering 42 inch uppers for a 96 inch ceiling leaves no room for crown. Forgetting filler strips creates ugly gaps. Ignoring appliance hinge clearance blocks door swing.
Skipping the toe kick scribe reveals floor slopes. Each error triggers a reorder and weeks of delay.
Real Numbers: Linear-Foot Pricing, Lead Times, and Material Grades
Stock runs $100 to $300 per linear foot with 1 to 3 week leads. Semi-custom hits $200 to $600 at 4 to 8 weeks. Custom starts at $500 and climbs past $1,500 with 8 to 16 week waits.
Plywood boxes add 15 percent over particleboard. Soft close hardware adds $10 per drawer.
Pro Tips From the Field: Scribing, Shimming, and Ordering Extras
Order two extra filler strips. You will mess one up. Scribe fillers to the wall with a compass, not a pencil guess.
Shim base cabinets every 12 inches along the run. Use composite shims, not wood. They don't compress.
Order toe kick material 10 percent longer than the linear run. You need miter returns at ends.
Code, Clearance, and Safety: NKBA, ADA, and Anti-Tip Requirements
NKBA requires 42 inch aisles for one cook, 48 for two. Landing space: 15 inches beside fridge, 12 beside range, 18 beside sink. ADA caps countertop at 34.5 inches with knee space below.
Anti-tip brackets on every tall cabinet and range. GFCI on all countertop receptacles. Vent hood makeup air required over 400 CFM.
Your Decision Path: Match Your Budget, Timeline, and Kitchen to the Right Cabinets
Standard room, tight budget, fast timeline, go stock. One odd dimension, mid budget, 6 week window, semi-custom. Unlimited budget, weird geometry, heirloom goal, custom.
Frameless for modern access. Face-frame for traditional look. Measure the ceiling at three points.
Subtract 36, 18, crown, light rail. That number picks your wall cabinet height.
Frequently Asked Questions
What is the standard height of upper kitchen cabinets?
Standard wall cabinets come in 30, 36, and 42 inch heights. The right choice depends on your ceiling height minus countertop, backsplash, and crown molding.
How deep are base cabinets?
Base cabinets are 24 inches deep standard. Islands often use 27 or 30 inch depths for extra storage.
What is the standard distance between countertop and upper cabinets?
18 inches is the NKBA recommended clearance. This fits most small appliances and works with standard 30 to 42 inch wall cabinets.
Can I put 42 inch cabinets in an 8 foot ceiling?
Only if you skip crown molding and accept a tight fit. Most 8 foot ceilings need 36 inch uppers with a 12 inch stack or 30 inch uppers with crown.
How much filler space do I need at the end of a cabinet run?
Order a 3 inch filler strip. Rip it to fit the actual gap which varies top to bottom on bowed walls.
Do cabinets come with toe kicks installed?
Most ship with loose toe kicks. You install them after leveling the base cabinets. This lets you scribe the bottom to the floor.


