how to cut a kitchen countertop
Cutting a kitchen countertop yourself saves money but one mistake ruins a six-hundred-dollar slab. The material dictates everything from blade choice to dust control. Laminate chips if you cut face up.
Quartz cracks if you skip the corner radius. This guide walks through each material and the tools that match.
Per OSHA Table 1 wet cutting keeps silica exposure below the 50 microgram limit. A track saw with a guide rail delivers straight cuts within half a millimeter over ten feet. The next sections break down the workflow by material and show the visual cues that prevent costly errors.
Quick Answer
Cutting a kitchen countertop starts with identifying the material. Laminate cuts face down with a fine-tooth carbide blade. Quartz and stone need a diamond blade and water feed.
Solid surface routes like hard wood. Support the full slab on rigid foam. Clamp a guide rail for every straight cut.
Drill corner radii before plunge cutting sink holes. Polish edges to match the factory finish.

Why Seeing the Cut Matters More Than Reading It
Photos reveal what text hides. Chip-out on laminate shows as white flecks along the top edge. A quartz stress crack starts as a hairline at the sink corner.
Seam lippage catches a fingernail at the joint. Burn marks on solid surface look like amber streaks. These defects appear in close-up images before they become expensive problems.
Diagrams show the tool orientation that prevents each failure. The track saw base must sit flat on the rail. The router bit bearing rides the template edge.
The diamond pad sequence progresses from fifty grit to three thousand grit. Visual references train your eye to spot a clean cut versus one that needs rework. Keep reference photos on your phone while you work.
Identify Your Material Before You Pick Up a Tool
Laminate (HPL) is particleboard faced with phenolic resin sheet. It cuts with standard woodworking blades. Solid surface (Corian Avonite) is acrylic or polyester resin throughout.
It routes and sands like dense hardwood. Quartz (Caesarstone Silestone Cambria) is ninety-three percent crushed stone bound by polymer resin. It demands diamond tooling and water.
Granite and marble are natural stone slabs. They vary in hardness and fissure patterns. Porcelain and ultracompact (Dekton Neolith) are sintered ceramic.
They require specialized diamond blades and low vibration.
Check the slab edge or underside for a label. Most quartz brands laser-etch the name near the sink cutout area. Laminate shows a brown particleboard core.
Solid surface looks consistent through the thickness. Natural stone reveals crystalline structure. If unsure, contact the supplier with a photo.
The material determines every downstream decision.
Tool Kit: Match the Blade and Saw to the Stone
A plunge-cut track saw (Festool TS 55 Makita SP6000) with a guide rail system handles straight cuts on all materials. For laminate use a sixty-tooth triple-chip carbide blade. For quartz stone and porcelain use a continuous-rim diamond blade sized to the saw (160 mm or 230 mm).
A variable-speed angle grinder with a four-inch diamond blade trims notches and finishes sink cutouts. A router with a half-inch collet profiles edges. Use carbide roundover bits for laminate and solid surface.
Use diamond router bits for quartz and stone. A HEPA vacuum with a cyclone separator captures dust at the source. For wet cutting attach the manufacturer water feed kit to the track saw.
| Material | Track Saw Blade | Grinder Blade | Router Bit | Dust Control |
|---|---|---|---|---|
| Laminate | 60T carbide triple-chip | N/A | Carbide roundover | HEPA vacuum |
| Solid surface | 48T carbide | N/A | Carbide roundover | HEPA vacuum |
| Quartz | Continuous-rim diamond | Segmented diamond | Diamond roundover | Wet cut + HEPA |
| Granite | Continuous-rim diamond | Segmented diamond | Diamond roundover | Wet cut + HEPA |
| Porcelain | Ultra-thin diamond | Turbo diamond | Diamond roundover | Wet cut + HEPA |
Workstation Setup: Full-Slab Support That Prevents Snaps
A 120-inch by 60-inch three-centimeter quartz slab weighs six hundred pounds. It will bow and snap on sawhorses alone. Build a continuous bed.
Lay two-inch XPS rigid foam insulation on the floor or a sturdy bench. Frame the perimeter with two-by-fours on edge. Space sawhorses twenty-four inches on center under the frame.
The foam distributes load evenly across the full bottom surface. Clamp the slab to the frame with bar clamps and soft jaws. For on-site cuts in existing cabinets use the same foam principle on the countertop base.
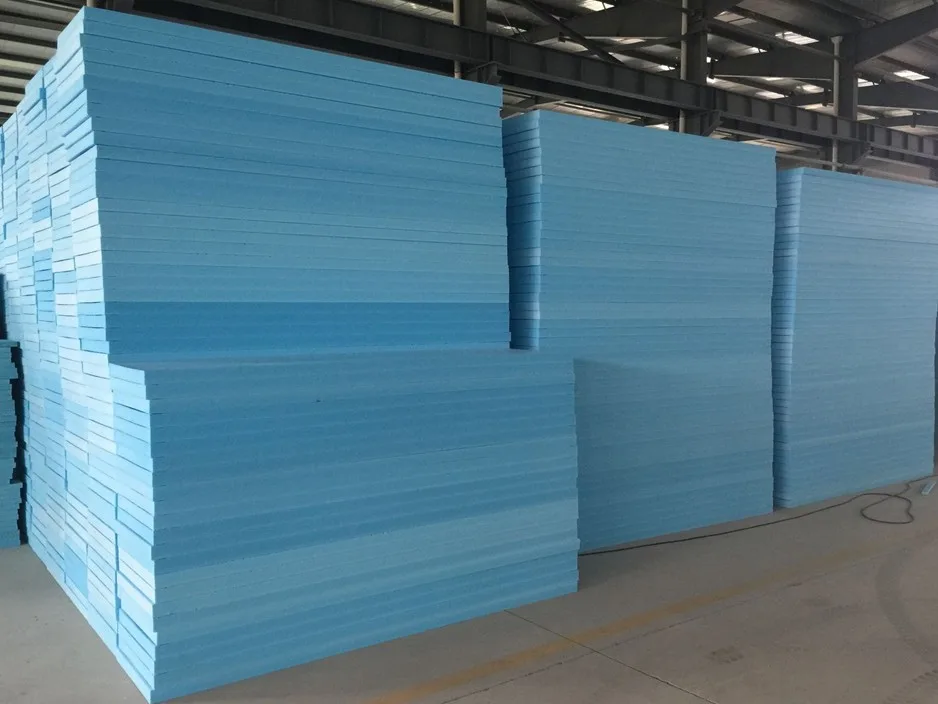
Never cut a slab balanced on two sawhorses. The unsupported span creates a hinge point. The vibration from the saw initiates cracks at natural fissures.
If you must move a slab alone use an A-frame cart with carpet-wrapped rails. Two people carry vertical edges only. Keep the slab vertical during transport.
Horizontal carry invites flexion breaks.
Straight Cuts: Track Saw Technique for Clean, Square Edges
Align the guide rail to your cut line. Use a Festool square or a trusted carpenter square to verify ninety degrees. Clamp the rail at both ends and the middle.
Place a sacrificial melamine strip under the cut line. This prevents tear-out on the bottom face. Set the saw depth to the slab thickness plus two millimeters.
Engage the plunge lock. Start the saw at full speed before contacting the material. Enter the cut with a slow steady feed.
Let the blade do the work. Do not force the saw.
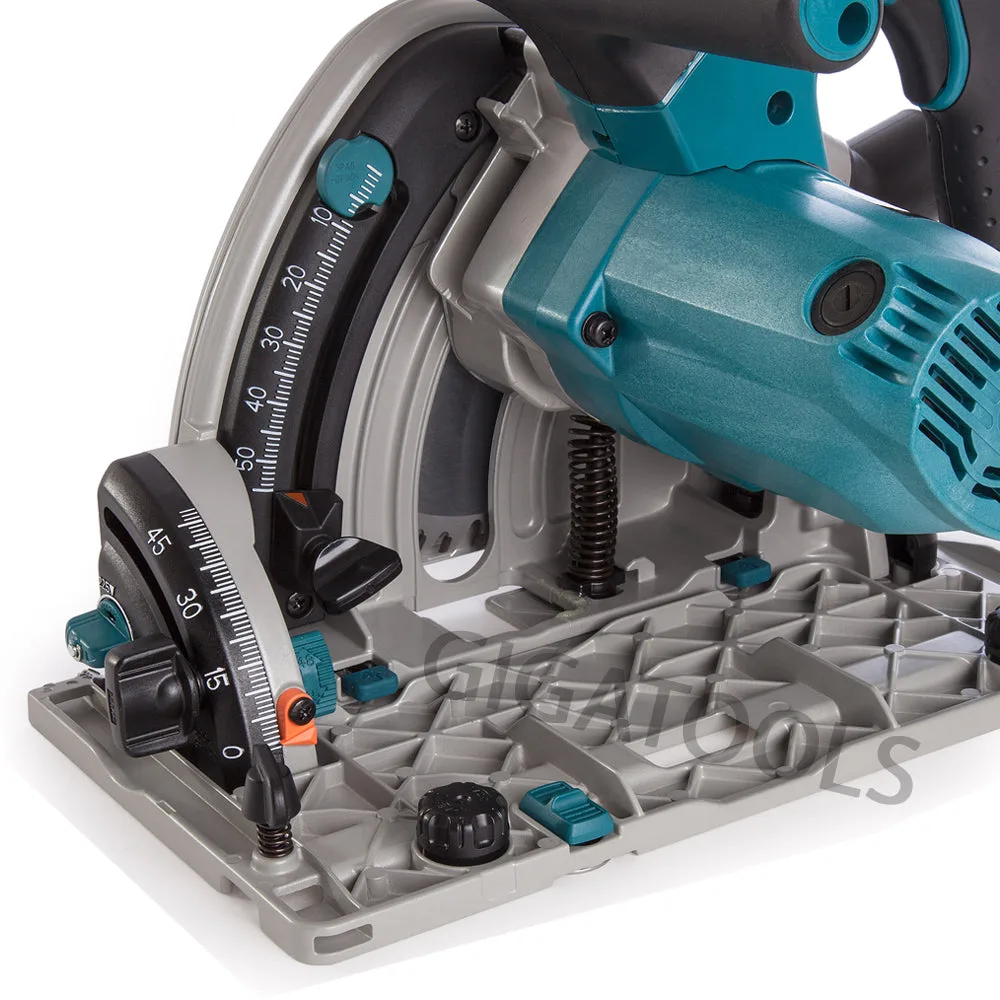
For quartz and stone run water continuously. The slurry should look like thin milk. Dry cutting creates silica dust that exceeds OSHA limits instantly.
A first pass at one-eighth depth scores the surface. The second pass completes the cut. This two-pass method reduces chip-out on the exit side.
After the cut check the edge with a straightedge. Light should not show gaps. A clean edge feels smooth to a fingernail dragged perpendicular to the cut.
Sink and Cooktop Cutouts: Drill, Plunge, and Radius Without Cracks
Every inside corner needs a radius. A sharp ninety-degree corner concentrates stress and guarantees a crack. The minimum radius is three-eighths inch for quartz and stone.
Half inch is better. Use a half-inch carbide drill bit for laminate and solid surface. Use a half-inch diamond core bit for quartz stone and porcelain.
Drill at each corner before any plunge cut. Keep the bit perpendicular. Run water on stone.
Clear the slug after each hole.

Mark the cutout outline from the manufacturer template. Tape the template to the slab. Trace with a fine-point marker.
Remove the template. Connect the drilled holes with the track saw or angle grinder. Plunge at each hole and cut to the next.
Move slowly. Support the cutout piece so it does not drop and bind the blade. For cooktop cutouts add an extra sixteenth clearance all around.
Thermal expansion needs that gap. Do not force the blade through the final connection. Let the waste piece fall free.
What If the Sink Flange Hits the Faucet Deck
Check the sink spec sheet for flange width. Measure from the cutout edge to the nearest faucet hole center. If clearance is less than one inch consider a different sink or faucet.
Some undermount sinks have offset flanges. Rotate the sink ninety degrees if the cabinet allows. Test-fit the actual sink before final polishing.
A dry run catches interference that drawings miss.
Seaming Two Pieces: Alignment, Epoxy, and Invisible Joints
A tight seam starts with a straight cut. Both edges must be flat and square. Dry-fit the pieces on the foam bed.
Check for gaps with a flashlight behind the joint. Light leaks mean the edge needs another pass. Mark the seam location with painter's tape.
Cut Domino slots or biscuit slots every six inches along the joint. These align the faces and prevent lippage. Vacuum the slots and edges.
Wipe with acetone. Let flash off completely.
Mix colored epoxy per the manufacturer ratio. Tenax T-2000 and Integra Ultra are common choices. Match the color to the slab vein not the base tone.
Apply a thin bead to both edges. Insert Dominos or biscuits. Bring the pieces together.
Apply seam setters every twelve inches. Tighten until a small bead squeezes out. Do not over-clamp.
Starved joints fail. Let cure per the data sheet. Tenax gels in eight minutes at seventy degrees.
Integra gives twenty minutes.
Scrape excess epoxy with a razor blade once firm. Polish the seam line with the same grit progression as the edges. A finished seam disappears in patterned quartz.
In solid colors a faint line may remain. That is normal. The joint should feel flush to a fingernail dragged across it.
Edge Profiles: Router Bits, Polish Pads, and Factory-Match Finishes
Factory edges come from CNC machines with water-fed diamond tooling. Field-routed edges need the same progression. Start with a bearing-guided roundover bit matched to the profile radius.
Common radii are one-eighth quarter-inch three-eighths and half-inch. Run the router left to right on the outside edge. Keep the base flat.
Feed at eight to twelve feet per minute in quartz. Faster in solid surface. Listen for a clean cut.
Chatter means dull bit or wrong speed.
After routing progress through diamond hand pads wet. Fifty one-hundred two-hundred four-hundred eight-hundred fifteen-hundred three-thousand. Each grit removes the previous scratch pattern.
Skip a grit and the scratch stays. Keep the pad flat. Use plenty of water.
Wipe between grits. The final three-thousand pad restores the factory gloss. For laminate use a trim router with a flush-trim bit then a roundover bit.
File the sharp corner. Burnish with a laminate roller.
Can You Match a Full Bullnose in the Field
A full bullnose requires a specialized bit and multiple passes. It is difficult to match factory quality without a shape-shift bit set. Most fabricators order bullnose edges pre-profiled.
If you must field-profile a bullnose use a two-bit set: a roughing bit then a finishing bit. Take light passes. Polish each step.
Expect a slight difference in the transition radius. The eye catches it at countertop height.
Visual Red Flags: Chip-Out, Burn Marks, Lip Seams, and Corner Stress
Chip-out on laminate shows as white fiber flecks on the face side. Cut face down with a sacrificial board to prevent it. Burn marks on solid surface appear as amber streaks along the router path.
They mean the bit is dull or the feed is too slow. Sand them out before polishing. Lip seams catch a fingernail.
They come from uneven substrate or over-clamping one end. Shim the low side before epoxy. Corner stress cracks radiate from sharp inside corners.
They grow with thermal cycling. Every sink cutout needs that radius.
Quartz slab fissures look like hairline veins. They are natural. Do not cut through a fissure if avoidable.
If you must cross one stabilize the area with fiberglass mesh and epoxy on the underside. Porcelain edge chipping happens on the exit side of the cut. A zero-clearance sacrificial board prevents most of it.
Inspect every cut edge before moving to the next step. Fix issues immediately. They compound fast.
Silica Safety: Wet Cutting, Respirators, and OSHA Table 1 Compliance
Engineered stone contains ninety percent crystalline silica. Dry cutting creates respirable dust at five-hundred micrograms per cubic meter. The OSHA permissible exposure limit is fifty micrograms as an eight-hour TWA.
Table 1 specifies wet methods as the primary control. Water at the blade suppresses dust at the source. Use the manufacturer water feed kit.
Check flow before every cut. The slurry should be milky not pasty.
Wear a NIOSH-approved N95 or P100 respirator even with water. Fit-test annually. HEPA vacuum the work area after each cut.
Do not dry sweep. Bag and seal waste slurry. Change clothes before leaving the site.
Wash hands and face. Silica exposure is cumulative. There is no safe threshold for silicosis.
The OSHA silica standard 29 CFR 1926.1153 applies to all fabrication shops and job sites. Compliance is not optional.
When to Walk Away and Call a Fabricator
Full slab quartz and stone exceed DIY scope when the layout requires more than two seams. A kitchen with a peninsula island and wall run often needs three or more pieces. Seam planning involves vein matching book-match or end-match decisions that affect yield.
CNC shops optimize nesting to avoid fissures and weak zones. They carry slab-handling equipment A-frame carts vacuum lifters that prevent flexion breaks. If the slab weighs over four hundred pounds and you lack a two-person team and an A-frame cart stop now.
Undermount sink installations in stone demand polished interior radii. A hand grinder cannot match CNC consistency. The faucet deck drilling pattern must align with the sink flange.
Misalignment by two millimeters leaks. Cooktop cutouts in porcelain require water-jet or CNC precision. Thermal shock cracks propagate from micro-chips.
If the project includes a waterfall edge miter joint the tolerance is near zero. Field miters rarely hold. These scenarios warrant a fabricator.
The cost delta versus a ruined slab is small.
What About Laminate and Solid Surface
Laminate countertops with pre-formed edges and drop-in sinks stay DIY-friendly. Solid surface seams disappear with acrylic adhesive and sanding. Both materials weigh far less.
They cut with standard shop tools. If your project is laminate or solid surface and the layout is simple proceed. If it is quartz stone or porcelain with complex geometry call a pro.
Quick-Reference Spec Card: Blade, RPM, Feed Rate, and Grit by Material
| Material | Track Saw Blade | RPM Range | Feed Rate | Router Bit | Polish Grits |
|---|---|---|---|---|---|
| Laminate HPL | 60T carbide triple-chip | 4500–5500 | 15–20 ft/min | Carbide roundover | 120 220 320 sandpaper |
| Solid Surface | 48T carbide | 4000–5000 | 15–20 ft/min | Carbide roundover | 120 220 320 400 600 |
| Quartz | Continuous-rim diamond | 2500–3500 | 8–12 ft/min | Diamond roundover | 50 100 200 400 800 1500 3000 |
| Granite | Continuous-rim diamond | 2500–3500 | 6–10 ft/min | Diamond roundover | 50 100 200 400 800 1500 3000 |
| Porcelain | Ultra-thin diamond | 3000–4000 | 6–10 ft/min | Diamond roundover | 50 100 200 400 800 1500 3000 |
Blade kerf is 2.2 mm typical. Add two millimeters to cut depth. Domino slot spacing six inches on center.
Seam setter spacing twelve inches. Epoxy working time eight to twelve minutes at seventy degrees. Silica PEL fifty micrograms eight-hour TWA.
Respirator N95 minimum P100 preferred. GFCI required all wet tools.
Frequently Asked Questions
Can I cut quartz with a regular circular saw
No. A regular circular saw lacks the plunge action guide rail registration and water feed needed for clean straight cuts in quartz. The blade will wander chip the edge and create dangerous silica dust.
Use a track saw with a diamond blade and water.
What is the minimum corner radius for a quartz sink cutout
Three-eighths inch is the absolute minimum. Half inch is standard and safer. Sharp ninety-degree corners crack within months from thermal stress and countertop flex.
How do I match the factory polish on a field-cut edge
Progress through diamond hand pads wet from fifty grit to three thousand grit. Do not skip grits. Each step removes the previous scratch pattern.
The three-thousand pad restores the gloss. Consistency comes from flat pad pressure and plenty of water.
Do I need a respirator if I cut wet
Yes. Wet cutting suppresses but does not eliminate respirable silica. NIOSH testing shows levels can still exceed the PEL during plunge entry and exit.
Wear a fit-tested N95 or P100 respirator for every cut in engineered stone.
Can I seam two laminate pieces myself
Yes. Use a router with a straight bit to joint the edges. Apply contact cement to both edges and the substrate.
Align with dowels. Roll with a J-roller. Trim the overhang with a flush-trim bit.
File the sharp corner. The seam will be visible but functional.
What tool cuts porcelain slab without chipping
A track saw with an ultra-thin continuous-rim diamond blade designed for porcelain. Run water. Use a zero-clearance sacrificial board.
Feed slowly six to ten feet per minute. An angle grinder with a turbo diamond blade cleans the corners.