How to Install a Kitchen Sink Drain Pipe: Step-by-Step
Learning how to install a kitchen sink drain pipe starts with accepting that the real work happens in a dark cabinet on your back. The parts are simple, strainer, tailpiece, trap, arm, but the geometry is unforgiving. A tailpiece cut ½″ too short kills your slope.
A trap arm run uphill guarantees a callback. Most leaks show up at 2 a.m. because someone rushed the dry-fit.
Per the 2024 International Plumbing Code a 1½″ kitchen trap arm needs ¼″ per foot slope and cannot exceed 5 ft developed length before the vent. That single spec drives every measurement you'll make today. Let's open the cabinet and lay out the parts.
Quick Answer
Install a kitchen sink drain pipe by seating the basket strainer in plumber's putty, tightening the locknut, cutting the tailpiece to reach the trap inlet, assembling the P-trap with slip nuts and poly washers, running the trap arm to the wall at ¼″ per foot slope, and pressure-testing both basins for two minutes with zero drips.
Why This Job Lives or Dies Inside the Cabinet
The cabinet interior is where geometry meets gravity. You have finite vertical space between the sink bottom and the cabinet floor. You have a fixed wall drain height.
Everything between those two points must slope correctly or water sits and smells. A centered drain on a deep undermount sink often forces the trap below the cabinet floor, that's when you need a low-profile trap or an offset tailpiece. Double-bowl sinks add an end-outlet or center-outlet tee that eats another inch of height.
Disposal flanges sit lower than standard strainers and change the math again. Measure the clear vertical drop from strainer flange to cabinet floor before you buy a single fitting. That number dictates every choice downstream.

Image source: Web (Bing) / serengetikitchen.com (Web image (fair-use with source credit))
Parts You'll Actually Touch: Strainer, Tailpiece, Trap, Arm
Every installation uses the same core components. The basket strainer seals the sink hole. The locknut and friction ring clamp it from below.
A rubber gasket sits between flange and sink. The tailpiece drops down, straight, flanged, or with a dishwasher branch. The P-trap holds the water seal.
Slip nuts and poly washers join trap to tailpiece and trap to arm. The trap arm runs horizontal to the wall tee. An air admittance valve may replace a roof vent on islands.
Dishwasher hose connects to a tailpiece branch or a wye on the trap arm. Garbage disposal flanges replace the strainer entirely. Know each piece before you open a bag.
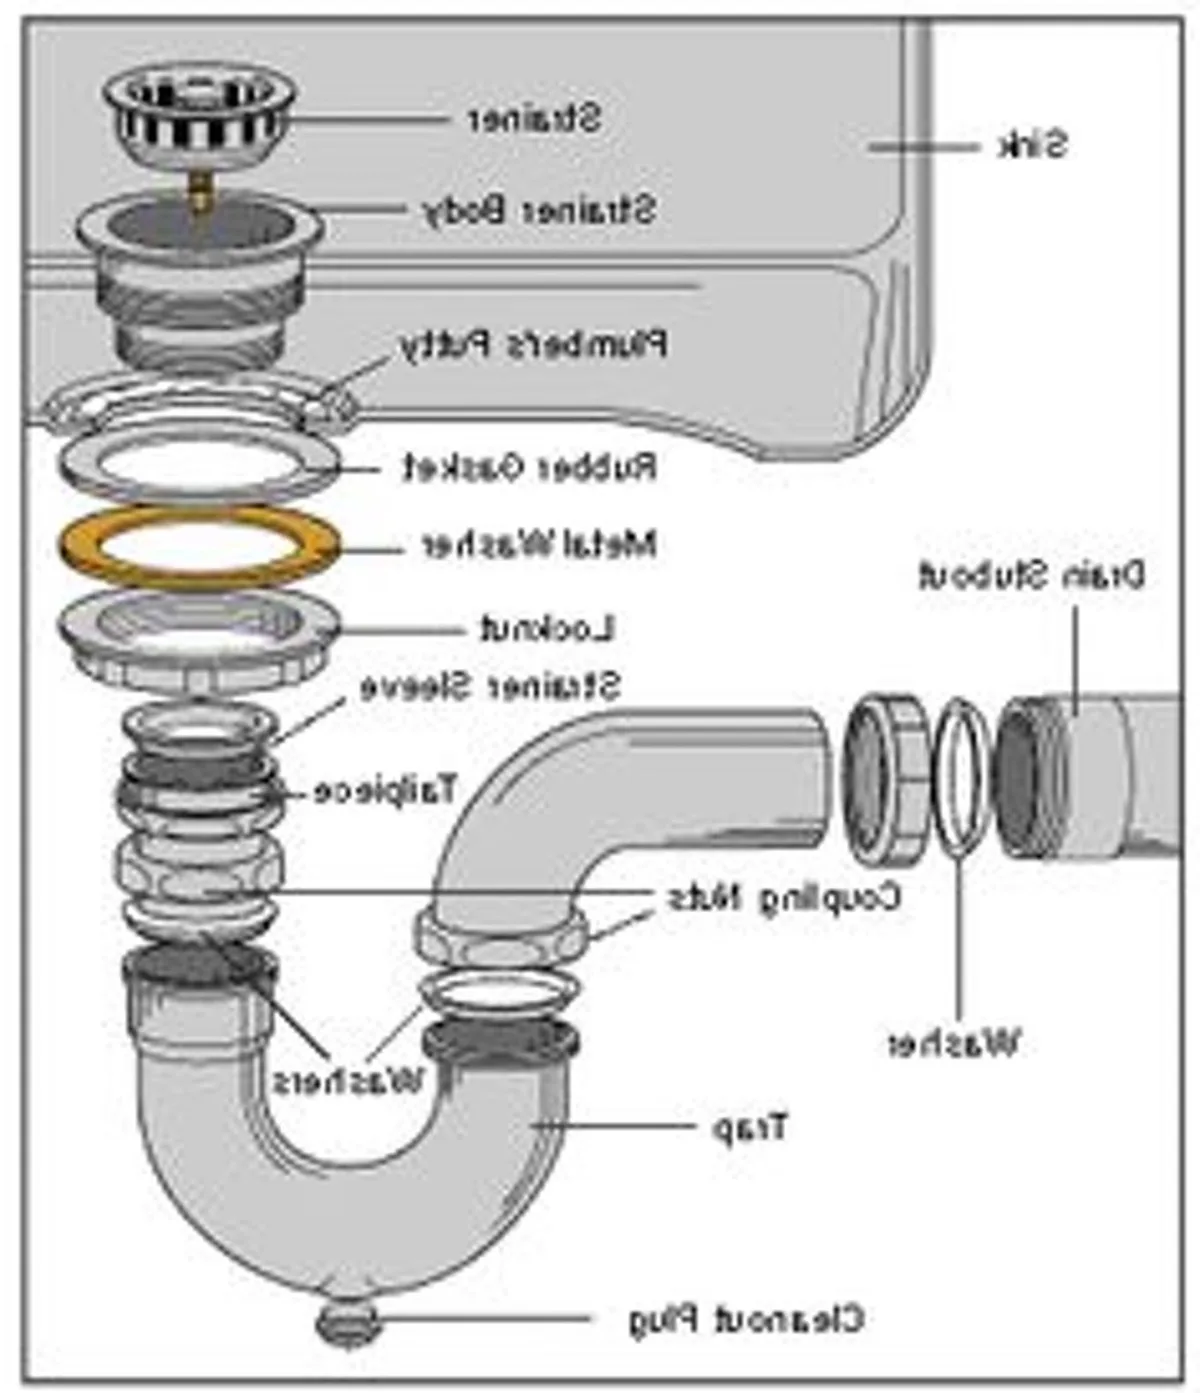
Image source: Web (Bing) / schematicwiringcora99.s3-website-us-east-1.amazonaws.com (Web image (fair-use with source credit))
| Component | Typical Size | Material Options | Key Spec |
|---|---|---|---|
| Basket strainer | 3½″ throat | Stainless, brass | Deep cup catches more debris |
| Tailpiece | 1½″ OD × 6–12″ | Brass, polypropylene, PVC | Flanged or threaded ends |
| P-trap | 1½″ tubular | Brass, polypropylene, PVC schedule 40 | 2″ min seal depth |
| Trap arm | 1½″ OD | Same as trap | ¼″/ft slope, 5 ft max (UPC) |
| Slip nuts & washers | 1½″ & 1¼″ | Poly washers preferred | Hand-tight + ¼ turn |
Before You Cut: Dry-Fit, Measure Twice, Mark Once
Dry-fitting prevents the number-one error: a tailpiece cut too short. Assemble the strainer, tailpiece, trap, and arm loosely in the cabinet. No putty, no glue, no wrenches.
Slide the trap up and down the tailpiece. Pivot the arm to hit the wall fitting. Check that the trap arm slopes toward the wall at ¼″ per foot, use a torpedo level on the arm itself.
Verify the trap seal depth stays between 2″ and 4″. Confirm the dishwasher branch (if used) sits above the trap weir. Mark the tailpiece cut line with a fine-point Sharpie where it meets the trap inlet.
Disassemble. Cut. Deburr.
Now you have a parts kit that fits the cabinet, not the box.
Basket Strainer: Putty, Locknut, and the Flush-Fit Test
Plumber's putty stays pliable for decades. Silicone skins over and tears when you eventually service the strainer. Roll a ⅜″ rope of putty.
Press it into a continuous ring under the strainer flange. Drop the strainer into the sink hole. Press down firmly, excess putty squeezes out.
From below, slide the rubber gasket, then the friction ring, then the locknut. Hand-tighten the locknut. Give it another half-turn with a spud wrench or large channel-locks.
Wipe away the putty squeeze-out from inside the sink. Fill the basin with water. Watch the underside for 60 seconds.
Zero drips means the seal holds. If water appears, snug the locknut another eighth-turn and retest.
Tailpiece Length & Trap Height: The Slope Starts Here
The tailpiece connects the strainer to the trap inlet. Its length sets the trap height. The trap height determines whether the trap arm can slope to the wall.
Measure from the strainer locknut face down to the trap inlet centerline. Subtract ½″ for slip-joint engagement inside the trap. That is your cut length.
A standard 12″ tailpiece works for most 8″-deep sinks with a wall drain at 18″, 20″ above the floor. Deeper sinks or higher wall drains need a tailpiece extension. Shallow sinks with low wall drains need a low-profile trap.
The diagram below shows the critical dimensions in one view.

Image source: Web (Bing) / hammerpedia.com (Web image (fair-use with source credit))
Per IPC 909.1 the trap arm must maintain ¼″ per foot slope toward the vent. On a 3-ft arm that is ¾″ total drop. On a 5-ft arm it is 1¼″.
Measure from the trap outlet centerline to the wall tee centerline. Divide by 12. Multiply by 0.25.
That is your required drop. Mark the wall tee height accordingly. If the existing tee sits too high you must open the wall, or use an AAV if your local amendment allows.
P-Trap Assembly: Slip Nuts, Poly Washers, and Alignment
Slide the trap inlet over the tailpiece end. Push the slip nut down, then the poly washer with its bevel facing the trap. Thread the nut onto the trap hub by hand.
Repeat on the trap arm side: slip nut, poly washer bevel toward trap, nut onto the arm hub. Do not use pipe dope or tape on slip joints, the poly washer seals by compression alone. Align the trap so its outlet points straight at the wall tee.
Rotate the trap arm until it meets the tee centerline. Hand-tighten both slip nuts. Give each a quarter-turn with channel-locks.
The trap should not rock. If it does, loosen, reposition, and retighten. A misaligned trap stresses the washers and weeps within weeks.
Trap Arm to Wall: Slope, Length Limits, and the Vent Connection
The trap arm enters a sanitary tee or wye in the wall. That fitting must be vented. Measure the developed length from the trap outlet to the vent connection.
UPC allows 5 ft for 1½″ pipe. IPC allows 6 ft. Exceed that and you need a vent tie-in closer to the trap or an AAV at the sink base.
Maintain ¼″ per foot slope the entire run. Use a torpedo level on the pipe itself, not the cabinet floor. Support the arm with a J-hook or plumber's strap within 12″ of the wall and every 4 ft after.
No sagging. A sag creates a second trap and kills the siphon break. If the wall tee sits too high for slope, open the wall and lower it.
There is no workaround that passes inspection.
Dishwasher Hose & Disposal: High-Loop, Air Gap, Knockout Out
A dishwasher hose must connect above the trap weir. The simplest code-legal method is a high-loop: run the hose up to the underside of the countertop (minimum 32″ above floor) and fasten it with a zip tie before dropping to the tailpiece branch or disposal inlet. Some jurisdictions, California, Washington, Minnesota, Massachusetts, require an air gap fitting on the countertop or sink deck.
Check your local amendment before you decide. If you are installing a garbage disposal, remove the dishwasher knockout plug inside the disposal inlet. Tap it out with a screwdriver and retrieve the plug from the grind chamber.
Forget this step and the dishwasher pumps into a dead end. Connect the hose to the disposal inlet or a tailpiece branch using a stainless hose clamp. No tape.
Common Visual Mistakes That Show Up at 2 a.m.
Five errors cause 90 percent of callbacks. First, the trap arm runs uphill, water stands, seal evaporates, sewer gas enters. Second, slip nuts overtightened until poly washers split, slow drip at the cabinet floor.
Third, dishwasher hose clamped below the trap weir, backflow into the machine during a sink backup. Fourth, disposal knockout left in place, dishwasher floods the cabinet. Fifth, an S-trap instead of a P-trap, self-siphons every draw.
The annotated photo below flags each one with a red X and the correct version with a green check. Compare your work before you close the cabinet.
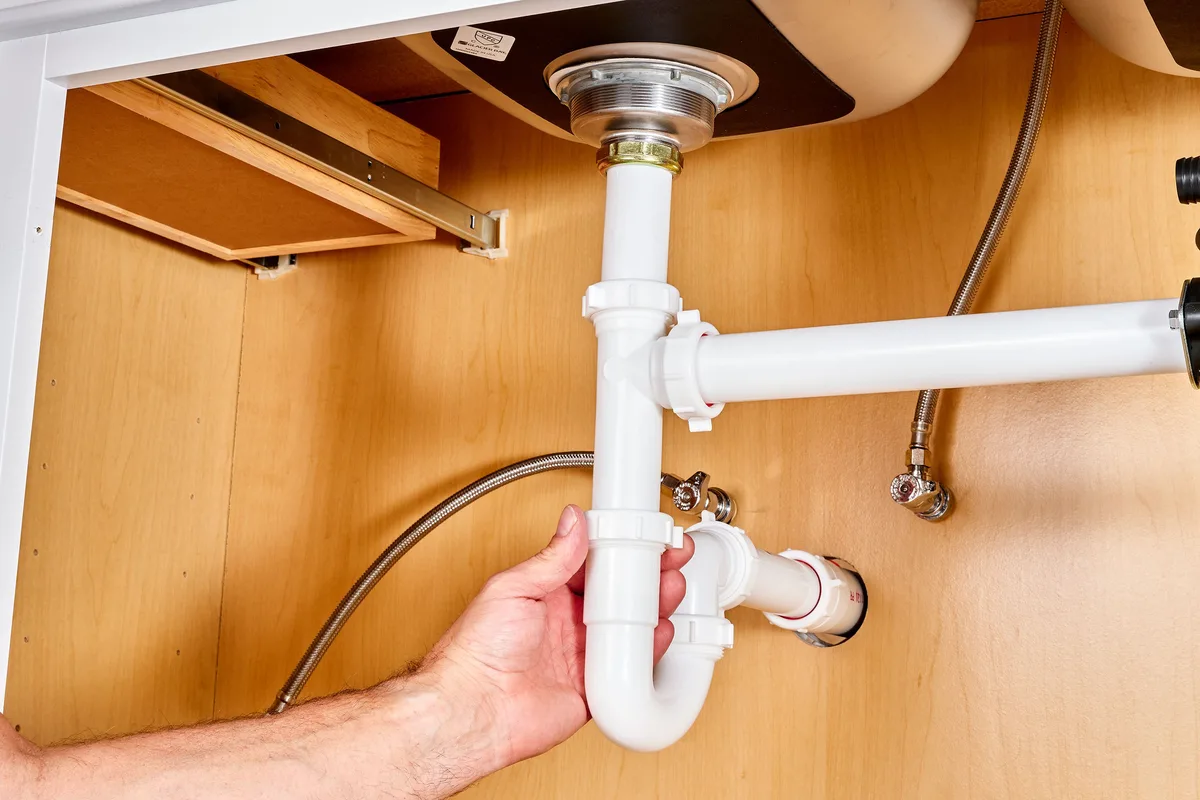
Image source: Web (Bing) / smart.dhgate.com (Web image (fair-use with source credit))
Pressure Test: Two Basins, Two Minutes, Zero Drips
Fill both basins to the overflow. Pull both stoppers simultaneously. Watch every joint, strainer flange, tailpiece slip nuts, trap inlet, trap outlet, trap arm at the wall tee, dishwasher branch, disposal flange.
Hold a flashlight. Wait two full minutes. Zero drips means the system is tight.
A single drop at any slip joint means loosen, reseat the washer, retighten. A drop at the strainer means the locknut needs another eighth-turn or the putty ring was too thin. Do not declare victory until the cabinet floor stays dry for the full watch.
This test catches 99 percent of leaks before they become insurance claims.
Code Lines You Can't Cross: AAVs, Cleanouts, Permit Triggers
An air admittance valve (AAV) replaces a roof vent only where the local amendment adopts ASSE 1051 and lists AAVs as an approved alternative. The valve must sit accessible, at least 4″ above the flood-level rim of the highest fixture, and within the same room. Concealing it inside a closed cabinet without an access panel fails inspection.
A cleanout is required on any horizontal drain run exceeding 5 ft developed length, some jurisdictions lower that to 3 ft. The cleanout must be accessible at floor level or through a wall panel. Replacing a trap like-for-like rarely triggers a permit.
Adding a new sink, moving a wall drain, or converting to an AAV usually does. Call the building department before you open a wall. A $50 permit beats a $500 reopen order.
When the Cabinet Geometry Wins: Call a Pro
Some layouts resist every DIY trick. A centered drain on a 10″-deep apron-front sink with a wall tee at 14″ above the floor leaves zero room for a standard trap. An island sink with no vent access and an AAV ban in your municipality requires a loop vent, that means cutting the floor and running pipe below the joists.
A cast-iron wall tee fused to a 1950s stack that cracks when you look at it needs an internal pipe cutter and a no-hub coupling. If you have spent two hours dry-fitting and the trap still sits above the weir or the arm still runs flat, stop. A licensed plumber solves these in one visit with tools you don't own.
The service call costs less than water damage remediation.
Frequently Asked Questions
What size pipe do I need for a kitchen sink drain?
Standard kitchen sink drains use 1½″ OD tubular or schedule 40 PVC. Bathroom sinks use 1¼″. Match the existing wall fitting or upsize with a reducer.
Can I use an S-trap instead of a P-trap?
No. S-traps self-siphon and are prohibited by IPC, UPC, and NPC. Always use a P-trap with a vented trap arm.
Do I need plumber's putty or silicone for the basket strainer?
Plumber's putty is preferred. It stays pliable for future removal. Silicone bonds permanently and tears the sink finish on service.
How high should the dishwasher drain loop be?
Minimum 32″ above the finished floor, fastened to the underside of the countertop. Some jurisdictions require an air gap fitting instead.
What slope does the trap arm need?
¼″ per foot toward the wall vent. Use a torpedo level on the pipe itself to verify.
When do I need a permit for sink drain work?
Like-for-like trap replacement rarely needs one. New rough-in, moved drains, AAV installation, or any wall opening typically does. Check your local building department.