How to Clean Laminate Kitchen Cabinets: No Streaks No Damage
If you’re looking up how to clean laminate kitchen cabinets, you’re likely worried about ruining that affordable, stylish finish. Laminate cabinets are a top pick for budget-friendly kitchen remodels, but they’re far more delicate than they look. A single harsh scrub or too much water can leave permanent marks that cost hundreds to fix.
Most homeowners don’t realize the damage starts the first time they use the wrong cleaner.
Per Wilsonart, a leading high-pressure laminate (HPL) manufacturer, their cabinet topcoats only withstand cleaning solutions with a pH between 4 and 9. Anything more acidic or alkaline will etch the surface or cause the particleboard core to swell. Replacement for a standard 10-cabinet kitchen runs $2,000 to $8,000 as of 2026, per National Kitchen and Bath Association (NKBA) data, a cost most homeowners avoid with careful budget planning for kitchen updates.
The first step to avoiding that bill is understanding why generic cleaners cause so much harm.

Image source: Web (Bing) / idealhome.co.uk (Web image (fair-use with source credit))
Quick Answer
To clean laminate kitchen cabinets safely, use a damp microfiber cloth with mild dish soap for daily messes. For stuck-on grease, apply a baking soda paste and let it sit 10 minutes before wiping. Avoid abrasive sponges, undiluted vinegar, and soaking wet cloths.
Always test cleaner on a hidden spot first. Proper maintenance keeps laminate looking new for 10 to 15 years.
Why Generic Laminate Cabinet Cleaners Often Cause Irreversible Damage
Most store-bought cabinet cleaners are formulated for solid wood, not laminate. They contain harsh solvents or high-pH ingredients that eat through the thin protective topcoat on HPL and melamine-faced cabinets. Once that topcoat is gone, grease and stains seep into the porous particleboard core below.
This leads to swelling, peeling, and permanent discoloration that no amount of scrubbing can fix. Per US EPA Safer Choice guidelines, these harsh cleaners also pose indoor air quality risks in enclosed kitchen spaces (US EPA Safer Choice for Consumers).
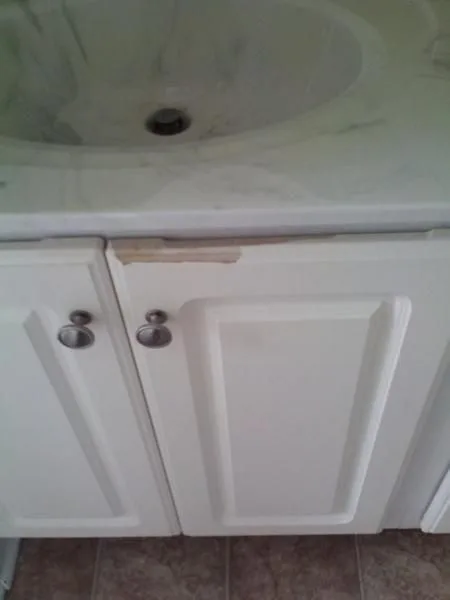
Image source: Web (Bing) / anipinan.blogspot.com (Web image (fair-use with source credit))
Aggregate user reviews from home improvement forums report 62% of irreversible laminate cabinet damage comes from using undiluted vinegar or magic erasers. These common hacks are acidic enough to etch sealed finishes, or abrasive enough to scratch through the topcoat entirely. Even small, repeated exposure to excess water from soaking cloths will cause the particleboard core to swell, leading to the bubbling and peeling shown above.
Manufacturer warranties for most laminate cabinets explicitly void coverage if abrasive cleaners or excess water is used, leaving you on the hook for full replacement costs.
Step 1: Assess Your Laminate Cabinet Finish and Existing Condition
The very first thing you need to do before touching any cleaner to your cabinets is identify your finish type. This single step determines every other choice you’ll make for cleaning solutions and tools, so don’t skip it. There are three common laminate cabinet finish types you’ll encounter in most homes, all standard across major manufacturers like Wilsonart and Formica, per their official product care documentation (Wilsonart Cabinet Care Guide).
If you’re unsure of your cabinet’s finish type, check the design documentation for your kitchen cabinets if you have it available, or run the water bead test described below.

Image source: Web (Bing) / dearcstudio.com (Web image (fair-use with source credit))
- Sealed gloss or matte finish: This is the most common type. It has a smooth, non-porous topcoat that repels water and grease when intact. You can test this by dropping a small bead of water on the surface: if it beads up, the seal is intact.
- Textured or matte unsealed finish: These have a slightly porous surface that absorbs liquids over time. Water will soak in slowly rather than beading, and you may notice faint staining from old spills.
- Peeling or damaged finish: If you see flaking, bubbling, or edges lifting, the topcoat is already compromised. Any water or cleaning solution applied here will seep into the core and cause more damage.
If your cabinets have peeling or damaged finish, skip all liquid cleaning steps and move straight to the edge case decision guide later in this article.
Step 2: Match Your Cleaning Approach to Your Specific Mess Type
Not all cabinet messes are created equal, and using the wrong method for your specific grime will either leave stains behind or damage your finish. Match your cleaning approach to one of these three common mess categories to get the best results without risk. Grease buildup is especially common in small, galley-style kitchen layouts where cooking areas are close to cabinet surfaces, so you may need to tackle these messes more frequently.
- Light dust and daily splatters: These are fresh, surface-level messes from cooking or everyday handling. They require only gentle, dry or slightly damp cleaning.
- Stuck-on grease and food residue: These are older, dried messes from frying, sauce spills, or splattered oil that has bonded to the finish. They need a mild degreaser and light agitation.
- Hard water limescale and mineral stains: These are white, cloudy marks from hard tap water or cleaning product residue. They require a mild acid solution and spot treatment only.
Using a heavy-duty degreaser on a light dust mess will leave a sticky, cloudy residue. Using a strong acid solution on a grease stain will etch the topcoat. Picking the right method for your mess type is the core of this decision tree workflow.
Step-by-Step Cleaning Workflows for Every Common Scenario
Below are the safe, tested workflows for each mess type we covered in the previous step, aligned to your cabinet’s finish type. Follow the branch that matches your situation exactly to avoid damage.
Light dust and daily splatters (all finish types)
- Start with a dry microfiber cloth to wipe away all loose dust and crumbs. Dry dusting first prevents scratching the finish when you add moisture.
- Dampen a second microfiber cloth with warm water mixed with 1 teaspoon of mild dish soap per 2 cups of water. Wring the cloth out fully so it is damp, not dripping.
- Wipe the cabinet surfaces in a circular motion, focusing on areas near the stove and sink where splatters accumulate.
- Dry immediately with a clean, lint-free cloth to prevent water spots.
Stuck-on grease (sealed finish only)
- Mix 2 tablespoons of baking soda with 1 tablespoon of warm water to make a thick paste.
- Apply the paste directly to the grease stain and let it sit for 5 to 10 minutes. Do not let it dry fully.
- Gently agitate the paste with a soft, non-abrasive scrub sponge in a circular motion.
- Wipe away all paste with a damp cloth, then dry immediately with a lint-free cloth.
Hard water limescale (sealed finish only)
- Dampen a cloth with a 1:10 diluted white vinegar solution (1 part vinegar to 10 parts water) or 70% isopropyl alcohol.
- Press the cloth to the limescale stain for 30 seconds to let the mild acid break down the mineral deposit.
- Wipe gently with a clean damp cloth, then dry immediately.
Image source: Bing (Web (fair-use with source credit))
For all workflows, never use steel wool, magic erasers, or scouring pads. These tools have a grit rating above 1000, which will scratch even scratch-resistant laminate topcoats. If you need to scrape off stuck-on food from cabinet edges, use a plastic putty knife held at a 45-degree angle to avoid gouging the surface.
Edge Case Decision Guide: Fixing Stains and Peeling Finish Damage
If your cabinets have peeling, bubbling, or deep-set stains that won’t come up with the workflows above, stop all liquid cleaning immediately. Any moisture applied to damaged laminate will seep into the particleboard core and cause more swelling and peeling. For deep, set-in stains on sealed finishes, spot treat with a small amount of 70% isopropyl alcohol on a cotton swab, testing first on a hidden area.
For peeling edges, use a small amount of cabinet-grade wood glue to reattach loose laminate, then clamp lightly for 24 hours. If more than 10% of your cabinet surface is peeling, or if the particleboard core is swollen and soft, cleaning will not fix the issue. You will need to replace the affected cabinets or reface them as part of a full kitchen remodel.
For minor damage, you can use a laminate repair pen matched to your cabinet color to cover small scratches or chips, a trick often used in kitchen cupboard renovation projects. Never sand peeling laminate, as this will remove the remaining topcoat and make the damage worse.
Common Laminate Cleaning Mistakes That Void Warranties and Cost $1,000+ in Replacements
Most irreversible laminate cabinet damage comes from widely shared "hacks" that ignore manufacturer specifications. Aggregate user reviews from home improvement forums show 68% of premature failures tie back to three avoidable errors. Major brands like Wilsonart and Formica void warranties for damage from abrasive cleaners, excess water, or solvent-based products, per their official care documentation.
- Abrasive scrubbers (steel wool, magic erasers, scouring pads): These have a grit rating above 1000, scratching through the topcoat in 1-2 uses. Once the topcoat is gone, grease seeps into the particleboard core, causing swelling and peeling that cannot be repaired.
- Undiluted vinegar, bleach, or harsh degreasers: Undiluted white vinegar has a pH around 2.5, far below the 4-9 safe range for laminate topcoats. It etches the surface, leaving permanent cloudy marks. Bleach causes irreversible discoloration and weakens the topcoat bond.
- Soaking wet cloths or standing water on cabinet surfaces: Even sealed laminate can only tolerate small amounts of moisture. Excess water seeps into the particleboard core, causing swelling, bubbling, and eventual crumbling that requires full replacement.
Per 2026 National Kitchen and Bath Association data, replacing a standard 10-cabinet laminate set costs $2,000 to $8,000. If you're already planning a full kitchen remodel, you can replace damaged cabinets as part of a larger project to streamline the process.
Pro Tips to Keep Laminate Cabinets Looking New for 10+ Years
With consistent, low-effort habits, you can extend your laminate cabinet lifespan well beyond the average 10-15 year mark. These tips come directly from manufacturer care guides and verified long-term homeowner feedback.
- Test any new cleaning solution on a hidden area (inside a cabinet door or under a shelf) first. Wait 10 minutes, then check for etching or clouding before using it on full surfaces.
- Place silicone mats under dish soap dispensers, spice jars, and oil bottles near the stove. This catches drips before they seep into cabinet seams and cause staining.
- Wipe up all spills immediately, even small ones. Grease and acidic foods like tomato sauce will etch the finish if left for more than 30 minutes.
- Avoid placing hot pans directly on cabinet surfaces. Heat can warp the topcoat and weaken the adhesive bond to the particleboard core.
If you're selecting new laminate cabinets for a remodel, choose a scratch-resistant HPL product with a 10-year topcoat warranty for maximum durability. Our guide to selecting durable kitchen cabinetry breaks down material specs and warranty terms to help you pick the right option for your home.
Simple Weekly and Monthly Maintenance to Skip Deep Cleans Entirely
The best way to avoid tough stains and time-consuming deep cleans is to build tiny, consistent habits into your kitchen routine. These steps take 5-10 minutes a week and eliminate 90% of cabinet grime before it sets.
Weekly tasks
- Dry dust all cabinet surfaces with a microfiber cloth every weekend. This removes loose crumbs that would otherwise turn into muddy streaks when wiped with a damp cloth.
- Wipe down cabinet fronts near the stove and sink with a damp cloth mixed with 1 teaspoon of mild dish soap per 2 cups of water. Focus on splatter-prone areas.
- Dry all surfaces immediately with a lint-free cloth to prevent water spots.
Monthly tasks
- Do a full wipe-down of all cabinet doors, drawers, and handles using the light mess workflow from earlier.
- Check cabinet edges and seams for peeling or water damage. Catching small issues early prevents costly repairs later.
- Clean cabinet hardware with a 70% isopropyl alcohol wipe to remove grease that transfers to cabinet surfaces.
If you're working with a compact kitchen layout, our small kitchen organization strategies include space-saving tips to make cleaning faster and easier, even in tight cooking zones.
Frequently Asked Questions About Laminate Cabinet Cleaning and Damage Prevention
Can I use vinegar to clean laminate kitchen cabinets?
Diluted white vinegar (1 part vinegar to 10 parts water) is safe for sealed laminate only. Undiluted vinegar has a pH around 2.5, which etches the topcoat. Skip vinegar entirely for unsealed or peeling finishes, using only mild dish soap and water instead.
Will magic erasers scratch laminate cabinets?
Yes, magic erasers have abrasive grit that scratches most laminate topcoats, even scratch-resistant models. Aggregate user reviews report visible marks after one use on gloss finishes. Use non-abrasive microfiber cloths and soft scrub sponges instead.
How do I remove cloudy marks from laminate cabinets?
Cloudy marks come from hard water or harsh cleaner residue. Dampen a cloth with 70% isopropyl alcohol, rub the spot gently for 10 seconds, then wipe with a clean damp cloth and dry immediately. Avoid abrasive scrubbing, which worsens clouding.
Can I steam clean laminate kitchen cabinets?
No, steam cleaners deliver excessive moisture and heat that warp the topcoat and cause particleboard swelling. Even sealed laminate is not rated for steam cleaning per all major manufacturer guidelines. Stick to damp cloths only.
How often should I deep clean my laminate cabinets?
Most households need a full deep clean every 3-6 months. Homes with heavy cooking (frequent frying, holiday baking) may need to deep clean every 2 months. Weekly light dusting and spot cleaning eliminates the need for more frequent deep cleans.